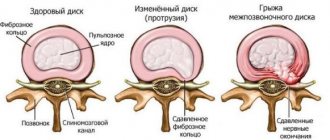
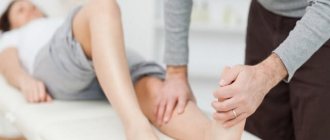
The anterior cruciate ligament is the most commonly injured ligament in the knee. It is the main stabilizer of the knee joint. The most common cause of such damage is sports activities (skiing, basketball, football).
The only effective treatment for such an injury is arthroscopic reconstruction followed by rehabilitation. It is important to understand that a complete tear of the anterior cruciate ligament can only be treated with surgery (arthroscopy).
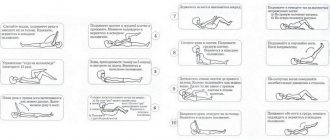
This selection of exercises is specially designed to effectively restore the anterior cruciate ligament and strengthen the muscular system of the developing leg. Before starting these exercises, you must coordinate treatment with your doctor!
Clothes should be loose, it is advisable to remove shoes. Perform all exercises (especially the first days) smoothly and gradually. Remember the important principle: “Endure mild pain, do not allow severe pain.”
You can start doing the first 4 exercises right away. The rest only after your doctor allows axial loading.
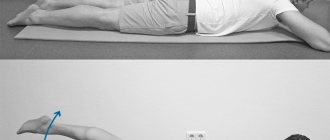
Passive knee extension
Lying on your back, rest on your elbows. Roll up a towel and place it under the heel of the leg being worked out, the distance from the heel to the floor is 15 cm. Relax the leg muscles and allow gravity to slowly straighten the leg at the knee joint. Hold for 2 minutes. Repeat 3 times. Do this exercise several times a day.
What you need to know about ligaments and tendons
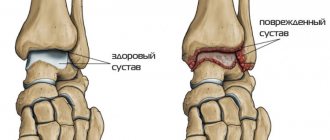
Ligaments and tendons of the knee
The complex anatomical structure of the knee joint and its surrounding segments is intended not only for walking and running. The joint receives force impulses: emphasis, ascent, descent, and performs flexion and extension movements.
Stretching ligaments and tendons is a necessary condition for professional achievements, no matter in what area they appear - in ballet, sports or physical work. A disabled knee joint is always a difficult and lengthy rehabilitation process, so stretching should be performed consistently and in doses, taking into account the degree of preparedness and the purpose of the exercises performed.
Basic rules when playing sports:
- the knee cannot perform unnatural movements without negative consequences;
- knee ligaments are shortened due to intense stress on other organs;
- The cause of a joint injury can be not only a sharp blow, but also a sudden change in direction;
- collagen fibers have only relative, limited strength and elasticity;
- any injury is accompanied by pain and associated symptoms;
- achieving results and trying to stretch the muscles under the knees at home, they can be damaged due to an unprofessional approach;
- Any exercise starts from simple to complex, from a minimum number of approaches to maximum load; you cannot train only one area of the body and ignore all the others.
The home stretching method used by amateurs differs from the professional stretching method performed by a trained person. To stretch a damaged tendon, you need to consult a doctor and select exercises depending on the nature of the injury and physical fitness.
Knee extension
Lying on your back, rest on your elbows. Slightly bend the knee of the leg you are working on. Straighten your knee without touching the floor. The distance from the floor to the heel in this position is 20-25 cm. Keep the muscles tense and the leg straight. Then slowly lower it back down.
Exercises with an expander
Attach one end of the expander to the ankle of your healthy leg, and the other end to a door or other stationary object at ankle level.
Causes of injury
The complexity of the functional structure of the ligaments is determined by the degree and variety of loads received. A healthy person rarely thinks about how the knee works until the mechanism fails.
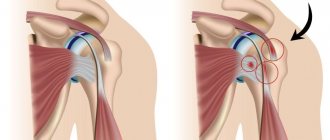
Cruciate ligament injury
The collateral ligaments hold the tibia in the required position in relation to the knee. When an excessive impulse occurs during an excessive tilt, the ligament tears on the opposite side: the inner one when tilting outward, the outer one when the impulse is inward. Cruciforms protect the lower leg from moving forward or backward. When there is an impact or load from the front, the rear one breaks, and the rear one, the front one.
A mild degree of stretching means microtears, a medium degree means individual fibers are torn, and a severe degree means a complete rupture.
In an attempt to stretch the hamstrings for the splits, unprofessionally performed exercises are as likely to result in injury as a blow, a sudden unnatural movement, or a sports injury. Treatment can take from 3 weeks for a mild injury to six months in the hospital for a moderate injury.
To properly conduct such training, you need a functional selection of exercises, a preliminary and final stage:
- warming up individual muscle groups and general preparation;
- easy starting exercises to develop the knee;
- simple and safe complexes: yoga, exercise therapy, massage;
- professionally selected complex exercises;
- muscle care after finishing classes.
Half squats with resistance
Stand facing the door. Fasten one end of the expander under the knee of the leg being worked out, and the other end to a door or other stationary object at the level of the knee joint. Raise your free leg off the floor; you can hold on to a chair or armchair for balance. Bend the knee you are working on slightly (do a half squat on one leg), then slowly straighten your leg. Repeat 15 times. You can simplify the exercise by not lifting your free leg.
Exercises on a balancing platform
Stand on the balancing platform. Optimal position: feet shoulder-width apart.
Treatment methods for knee sprains
As they say, disease is easier to prevent, so you should know how to protect yourself from sprains. When playing sports, it is best to choose suitable clothes and shoes and avoid stress that is too high for your body. Excess weight provokes dangerous conditions for sprains, increasing the load on the knee joints. But moderate physical activity, a proper balanced diet and an active lifestyle, on the contrary, can strengthen the ligaments. But if a sprain cannot be avoided, then you must immediately consult a doctor and take a number of measures for a speedy recovery.
Regardless of the severity of the sprain, you need to ensure maximum rest for the limb for the first few days. In severe cases, the knee is fixed with a special bandage or a hard cast is applied. It is also recommended to apply ice to the damaged joint every 3-4 hours through a damp towel, and the duration of each procedure should not be more than 20 minutes. It is acceptable to take painkillers such as aspirin or paracetamol. When the swelling begins to subside, you need to regularly perform simple strengthening and development exercises. This is necessary for the proper functioning of the ligaments in the future, otherwise the new tissue may become inactive.
Treatment of sprained knee ligaments using shock wave therapy
Along with other measures, the use of shockwave therapy (shock wave therapy) allows you to restore ligaments in the shortest possible time. The procedure involves using sound waves of a certain frequency. Their impact provokes the activation of tissue regeneration. A pronounced anti-inflammatory and anti-edematous effect also contributes to the speedy restoration of the knee joint.
The main advantages of UVT include:
- disappearance of pain, inflammation and swelling;
- rapid restoration of performance and all functions after sprain of the knee joint;
- reducing the likelihood of recurrence of joint damage;
- the ability to return to normal physical activity as soon as possible (which is especially important for athletes).
Treatment of sprained knee ligaments using shockwave therapy is successfully used in the network of Moscow clinics “Zdorovye Plus”, which specializes in the treatment of diseases of the musculoskeletal system. Treatment is carried out by experienced specialists using the latest Swiss equipment. Each client can count on an individual approach, professional advice and recommendations from doctors, as well as attractive prices and good discounts. We are happy to help each of our clients!
Platform rotation
- Rotate the balancing platform clockwise until its edge is in constant contact with the floor , then counterclockwise. Repeat 30 times in each direction.
- Rotate the balancing platform clockwise until its edge touches the floor , then counterclockwise. Repeat 30 times in each direction.
Dynamic hamstring mobilization
Role of the exercise: Gently warms up the hamstrings.
How to do it: Start in a squat position with your hips hips apart. Place your hands on your knees or thighs. Lift your pelvis by gently straightening your legs until you feel a slight stretch in your hamstrings. Pause for a few seconds, then return to the starting position. Keep your back straight and don't put too much strain on your hips by pulling too hard.
The knees-and-hands-down pose also provides a good stretch to the upper hamstrings and relieves tension there, a common site of hamstring injuries.
Volume: five to ten repetitions.
Chips for happy hamstrings
Myofascial release releases muscle tension to improve mobility. Use a foam roller or foam roller to gently roll out the hamstrings, applying tension but not so much that it hurts. Take comfort from working on any overly difficult or sensitive areas. It should be beneficial, not painful. If you have hamstring issues, Haas recommends a massage stick over a foam roller because you can use it in a bent-knee position, which takes tension off the hamstring, whereas a foam roller requires a straighter leg. In an ideal world, you'd roll on a foam roller daily before a workout to relieve tension in the hamstrings, says Haas, and again after a workout to relieve the same tension from exercise.
Hamstring flexion
Role of the exercise: Strengthens the hamstrings and makes them elastic through eccentric lowering. According to a recent study published in the British Journal of Sports Medicine, this exercise reduces the rate of hamstring injuries by half when included in an injury prevention program.
How to: Start kneeling on the mat with your shins parallel and directly behind you and your knees hip-width apart and bent at a 90-degree angle. Have your partner hold your ankles or lock your legs under a stationary object. Tighten your abs, keep your arms at your sides, then extend your knees and lower your upper body as slowly as possible. Land in a push-up position to cushion the impact, then use your arms to push up sharply to the starting position for one repetition. Don't bend your hips—your upper body should remain in line from your knee to your head.
Volume: three sets of 10-15 reps (or as many as you can do; proper technique is key).
Side ridges with resistance band
Role of the exercise: Strengthens the hip abductor muscles.
How to do it: Place an elastic band around your ankles and place your feet together. Bend your knees slightly and place your hands on your hips to keep them still. Then slowly take steps to the left, making sure that your toes are pointing forward and the level of your step to one side is about 30 centimeters, and then, with the same step, return your foot to its place. Continue in the same direction for 15 steps, then repeat in the opposite direction to the right. Pay special attention to proper technique and do not allow your knees to bend inward, as this incorrect movement can cause knee injury.
Volume: three sets of 15 reps on each side.
How to do stretching for beginners
In my opinion, the advantage of stretching over other training systems is that you can do it yourself. The opportunity to train at home is very attractive; another thing is that almost no one can train normally at home (there are a lot of distractions).
Most exercises are accessible to beginner athletes and do not require the use of additional equipment. But in order for the exercises to be effective and not lead to a sports injury, the following rules must be followed:
- The main rule is gradualism. You should not try to do the splits right away - you will break or get another injury. You need to listen to your feelings and take your time. Sudden movements or jerks are unacceptable at the initial stage.
- You need to work with the body comprehensively, since all muscles are interconnected. If you need to do the splits, stretch not only your legs, but also your back and abs. When performing exercises on different muscle groups, you need to keep your back straight, this helps to properly distribute the load on the spine.
- You need to exercise regularly, at least 3-4 times a week. After all, muscles quickly lose elasticity. The duration of the workout should be 20-30 minutes. And, of course, be sure to warm up before strength training!
- First you need to warm up your muscles well. This is why I always recommend performing 1-3 sets with 50-70% less weight than the working weight. This will help avoid injury.
- You should feel slight discomfort, resistance, but not pain. You cannot stretch aggressively to the point of pain.
- Do not hold your breath while performing the exercise. Due to hypoxia, the muscles will not be able to relax normally, and their elasticity will decrease. Therefore, you need to breathe evenly, slowly. It is recommended to stretch while exhaling. If you feel short of breath, stop and rest.
- Until the elasticity of your muscles and the mobility of your joints improves, you should not use additional weights. I recommend that beginners act only with their own body.
These are the most general rules that you must know. They are quite general, in my opinion, so let's study the topic of stretching deeper and more thoroughly.
Reverse Slip with Resistance Band
Role of the exercise: Strengthens the buttocks and thighs to reduce stress on the hamstrings.
How to: With an elastic band around your ankles, stand with your feet together and knees slightly bent. Take diagonal steps back, alternating sides. After each step, connect your legs: take a step back with your right leg, bring your left one to it; step back with your left foot, bring your right foot to it. And so on. With each step, step on your heel so that your foot is parallel to the floor, rather than standing on your toes. As with the previous exercise, keep your toes pointed straight ahead and focus on knee position and proper form.
Volume: three sets of 15 repetitions on each leg.