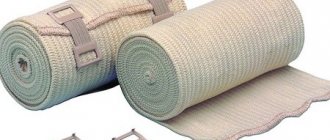
The elastic bandage entered the range of orthopedic production as a compression knitted product. The advantage of the bandage is its versatility, ease of use, and effectiveness in terms of treatment. Bandages with elastic properties are available in orthopedic stores and pharmacy chains in a wide range of sizes so that they can be used in various fields of sports medicine.
Fixation of the chest can only be done with elastic bandages in order to allow breathing movements and not reduce the free space for heart contractions. Sports medicine uses elastic bandages for chest bandaging during the recovery period after injuries and during the rehabilitation period after operations.
Properties and types of elastic bandages
Elastic bandages are indispensable aids in compression therapy in traditional and sports medicine. They have taken a stable leading place in fixing injuries in sports due to their irreplaceable quality characteristics.
Properties of elastic bandages:
- ensure uniform blood flow through the vessels;
- support veins under increased loads;
- tighten and support veins in the training and competitive process;
- acts as a protection against inflammation;
- stimulates the body to exercise;
- allows air to pass through well;
- during physical activity, it prevents tension in the muscles of the back and chest;
- prevents sprains.
Depending on the place of application, different types of bandages are used; for bandaging the chest, tapes with medium stretch and the softest are recommended. For medicinal purposes, long bandages from 3 to 5 m, 10-12 cm wide, consisting of 50% wool, are used. If necessary, 2-3 bandages are used, which are fastened with clips included in the tape kit.
The compression properties of the tape support the soft tissues of the back and chest, reducing pain during breathing movements.
Symptoms of ligament rupture
Ligament rupture is accompanied by an extensive list of symptoms. When the ligamentous apparatus is damaged, complaints arise about:
- pain;
- edema;
- difficulty in free movements;
- pathological mobility.
The severity of symptoms depends on the degree of damage to the joint, as well as the duration of the injury.
Fresh ruptures are accompanied by severe pain and swelling, and areas of hyperemia may appear on the skin.
Gradually, pain and swelling syndromes may decrease, but without treatment the limb will be significantly limited in movement.
Rules for applying an elastic bandage to the chest
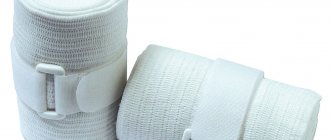
The hypoallergenic composition of the medical elastic bandage includes: cotton, latex, polyester fiber. This, in addition to protection against allergies, ensures a tight fit of the bandage to the skin without disrupting air exchange. The special woven structure protects the tape from deformation during frequent use.
Such properties of the elastic bandage allow you to fix the chest in different ways, depending on the need. And in any situation, bandaging is performed in compliance with the basic rules for applying an elastic band.
Requirements for chest banding using an elastic band
- The person providing assistance stands behind the victim.
- If the victim is able to sit, he sits on a stool so that he can be accessed from all sides.
- The first 2-3 turns of the bandage should be done around the chest and back to secure the bandage, without touching the site of the acute injury.
- Then the bandage is passed from the left shoulder girdle through the back, under the armpit of the right hand.
- After this, the bandage is raised up so that it goes around the shoulder; to do this, you need to pass the bandage diagonally under the left armpit. In this case, a “figure eight” of bandage is created on the chest and back.
- Once again you need to wrap the bandage around your chest.
- In this way, make 4-5 “figure eights” with careful wrapping around the chest.
- At the same time, follow the rule: the next turn of the bandage overlaps ½ of the previous tape.
- Make sure that the bandage stretches evenly to avoid over-tightening the bandage.
- Secure the edges of the tape with clips included in the set with the bandage.
The rules of bandaging are clearly visible in the video
Effective against ligament rupture
Products made from low-temperature plastic are the best option for ligament ruptures at all stages of treatment due to their unique properties:
- rigid fixation;
- high strength;
- shape memory;
- “breathable” structure;
- moisture resistance;
- hypoallergenic.
An important factor when choosing an orthopedic design for restoring the ligamentous apparatus is the price of the fixator. With all its advantages and efficiency, products made from low-temperature plastic are accessible to most people. Doctors and patients with various types of injuries increasingly prefer modern polymer orthoses.
Types of chest bandaging with elastic bandages
In the course of treating various injuries and rehabilitating athletes to begin their further training, the practice of therapeutic and restorative sports medicine has developed different types of bandages that are used in various situations. Bandaging is necessary immediately after injury to immobilize the chest; fixation of the ribs is required for their successful and correct fusion; support for the sternum is necessary at the beginning of training during the rehabilitation phase.
Features of the star bandage
Star (cruciform) shoulder ligation
In another way, in different sources, the bandage is called cruciform.
But the essence remains the same. It should be used for chest injuries. An elastic bandage for the chest should be at least 10 cm wide. Its application requires the use of the figure eight technique. The first few circles around the torso to fix the tape, then direct the bandage under the right armpit, around the shoulder joint. From the right shoulder, the tape is drawn diagonally across the chest towards the left armpit. The result is a cross. Next, you need to circle the second shoulder joint with tape, lifting the bandage above the left shoulder. This sequence is repeated several times, following the rule: the bandage lies on the previous one by at least ½. After this, circular turns on the chest are repeated.
In case of a back injury, the star bandage is applied in the same order, only the bandages are crossed on the back. Layers of bandages are conveniently applied when a person bandages from left to right, and holds the bandage in his right hand. Circles of the bandage are made one by one, turn by turn, covering the chest and back. The upper part of the chest bandage is effectively fixed by grasping the shoulder, for which the bandage is drawn diagonally from one shoulder and armpit to the other shoulder.
This bandage is similar to fixing the back to support its posture after injury. But there is a nuance: the rounds of the bandage pull the shoulders back, in an eight-shape. The disadvantage of this bandage is that it does not hold well, often slips, and is more suitable for bedridden patients. To securely fixate the chest, other bandaging methods are chosen.
Features of the spiral dressing
Spiral dressing
The chest coil bandage is suitable for a variety of injuries, including pneumothorax. The longest bandage with a width of 10 cm is used as standard. The peculiarity of this bandage is that before applying it, you should cut off two pieces of bandage longer than the back, lay one piece diagonally from the lower back to the shoulder, and the second piece from the shoulder down to the stomach , also obliquely. After this, you should make circular moves at the bottom of the chest to secure the edge of the tape, and then, moving upward in a spiral, bandage the entire chest and back area, ending the bandage at the armpit level. We remind you: the rule of applying the bandage to the previous turn is approximately ½.
Here the edge of the bandage is secured with the previously laid out edge of the tape, simply tying it into a knot. You also need to secure the edges of the gauze on the other shoulder. This creates additional fastening for the spiral passages.
Spiral bandage with belt
A type of spiral dressing with a belt differs from the classic dressing by applying additional tape for subsequent dressing after bandaging is completed. At the first stage, the bandage is applied in the form of a belt, always over a healthy shoulder that is not affected by injury. The main part of the bandage is applied in spiral turns from bottom to top, according to the rules of spiral bandaging.
Practice shows that with a bandage width of 10 cm, no more than 8-10 turns are required. The edges of the tape are secured to the uninjured part of the chest, creating the appearance of a “belt.”
Features of hermetic occlusive dressing
Hermetic (occlusive) dressing
The main purpose of an occlusive dressing is to prevent air from entering the pleural cavity during an open pneumothorax. This is necessary to prevent contact of the pleura with the external environment. To apply it, it is necessary to use a material that does not allow air to pass under the bandage. Since the elastic bandage itself is breathable, it means that the use of additional material is required.
What's always at hand? Cellophane bags, which, although will not comply with all hygiene requirements, will help solve the main problem.
Hermetic occlusive dressing
If in an emergency there is no medical dressing bag at hand, it is possible to use non-sterile materials, but first apply several turns of a sterile elastic bandage. As an option, apply a sterile napkin from a PPM package to the wound, followed by non-sterile material to block the flow of air into the wound. After a couple of turns of elastic bandage, you need to apply a large ball of cotton wool on top of the wound, and after that carefully finish the bandage. This sequence of actions makes the open pneumothorax closed.
Good to know: tightness is ideally ensured by a roll of adhesive plaster, which is applied directly to the wound in a “tiled” manner, as shown in Fig. 1 Having sealed the wound in this way, apply a large layer of cotton wool on top and apply a bandage with an elastic bandage.
Rice. 1.
The technique of fixing the bandage varies depending on the location of the wound.
If the wound was in the upper part of the chest, it is better to use the spica bandaging method.
If the wound is located below the 3rd rib, then the spiral type of fixation will be optimal.
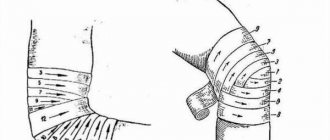
Deso bandage
Deso bandage
The purpose of such a bandage is to bandage the arm to the body for immobilization when delivered to the emergency room with a suspected fracture of the collarbone or shoulder joint. Judging by the pictures, the difference with the Velpeau bandage is not significant, but there is a nuance here: the palm of the hand must be bandaged higher to the collarbone, for this the arm at the elbow must be bent as much as possible, but without increasing the pain in the victim. Equipment for making such a bandage: a bandage 10 cm wide. Features of applying the bandage: the left hand is bandaged to the body, the bandage is held with the right hand, and the bandage is done from left to right, as usual. When immobilization of the right hand is required, the bandage must be held in the left hand, and the bandaging is then done from right to left.
Sequencing:
- first, with many circular movements of the bandage, the bandage presses the arm bent at the elbow to the body;
- under the armpit, pre-compact with a cotton roll; if there is no cotton, use a rolled-up soft cloth, the same T-shirt; it needs to be wrapped in gauze or bandage for hygiene;
- the second part of the bandage consists of passing the bandage from the armpit of the healthy side in an oblique direction in front of the chest to the supraclavicular part of the injured side;
- then the bandage is moved from behind from top to bottom under the elbow, the bandage is wrapped on the forearm and again in an oblique direction it is led in front along the front side of the arm under the healthy armpit;
- along the back, the bandage should go in an oblique direction to the supraclavicular region, moving it down to the front surface of the shoulder;
- Having wrapped the elbow in front with a bandage, it must be passed to the back and in an oblique direction - under the armpit of the healthy side.
The sequence of all moves is repeated. When the bandage strokes are performed correctly, triangles are formed in front and behind.
How to choose an orthosis?
Before use, be sure to consult a doctor and select the appropriate type of product. When choosing an orthosis, you should focus on several simple parameters:
- product material;
- quality of construction;
- fixation adjustment.
You can view the entire line of ORDEKT thermoplastic orthopedic products on our website. We work on product quality and try to be closer to our customers. Our company organizes delivery of goods to more than 400 cities in Russia.
To get expert advice, just call 8 800 500 8333 or ask a question in the feedback form.
The article was checked by Strakhov Maxim Alekseevich - Candidate of Medical Sciences, Associate Professor of the Department of Traumatology-Orthopedics and Military Field Surgery of the Federal State Autonomous Educational Institution of Higher Education Russian National Research Medical University named after. N.I. Pirogov of the Ministry of Health of Russia, Associate Professor of the Department of Traumatology and Orthopedics of the Federal State Budgetary Institution Federal Scientific and Clinical Center of the Federal Medical and Biological Agency of Russia (Moscow).