The hip joint is one of the most important elements of the musculoskeletal system. Thanks to the full performance of its functions, a person can stand up, bend back, forward, to the sides, hold the body in an upright position, and move in space. The joint is formed by the ilium and femur. The first has a recess - the iliac fossa, into which the femoral head is inserted.
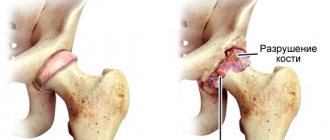
Injuries to the area are severe, and fractures in elderly people practically do not heal.
The need for TBS flexibility
Healthy joints must be mobile and have sufficient flexibility, since only in this state do they produce synovial fluid necessary to nourish cartilage and normal functioning of the lower extremities.
Lack of mobility of the hip joints entails:
- stagnation of blood in the pelvis, varicose veins, development of inflammatory processes in the area of the urinary organs;
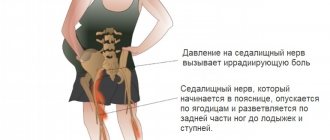
- the appearance of pain in the lower back;
- sexual dysfunction;
- arthritis, arthrosis associated with the destruction of the cartilage layer;
- limitation of limb mobility.
To develop joint flexibility, it is recommended to regularly perform special physical exercises. Women who are in the later stages of pregnancy are especially advised to perform such gymnastics.
How to stretch the joints in the pelvic area?
You can open the joints through exercises that move the pelvic bones apart. As a result, a fairly wide interarticular space is formed, where synovial fluid begins to be intensively produced. It nourishes the cartilage layer and smoothes out friction in the joint capsule.
The process of opening the joint itself is traumatic. Therefore, it is necessary to follow several rules in its implementation:
- Before performing the exercise, carefully study each step. The instructions always provide detailed information about unexpected nuances that at first glance seem unimportant for a particular exercise.
- Perform all actions gradually and slowly. This is the most important principle that will help you move forward without discomfort in your body. Rapid stretching inhibits the tissues ability to adapt naturally.
- Stop if you feel significant pain. This indicates disturbances in blood circulation.
Make pelvic opening exercises regular and systematic. At least 2-4 workouts should be done every week.
The most effective exercises for stretching the joints of the pelvic area are presented in yoga.
Yoga for stretching and opening the hip joints
Excessive rigidity and closedness of the hip joints is due to:
- prolonged sitting, leading a sedentary lifestyle;
- wearing high-heeled shoes that are excessively narrow and uncomfortable;
- unbalanced diet, lack of essential microelements;
- uneven distribution of physical activity;
- nervous overstrain, stress, unstable mental states.
Yoga classes, which involve giving the body certain stable and comfortable positions (asanas), can effectively complement the basic treatment of many somatic diseases and are a good preventative measure for the occurrence of chronic ailments.
Contraindications
There are no special contraindications to physical activity in the form of asanas. But there are prohibitions in severe cases.
It is worth noting the following contraindications to classes:
- Mental disorders.
- Organic lesions of the heart muscle.
- Severe forms of diabetes.
- Blood problems.
- Infectious diseases.
Temporary contraindications include exacerbations of chronic diseases, acute infectious diseases, the period after surgery, heavy menstruation, and severe physical exhaustion. You can’t train at high temperatures either. Exercises on a full stomach are not recommended. During menstruation, the practice of asanas should be gentle. During this period, power loads should not be used. Twisting and bending back are not recommended. Pregnancy is not a contraindication. But depending on the condition and period, there are certain contraindications.
You should not strive to achieve a quick effect. It takes time. If you have chronic problems, it is important to be careful. You should not suddenly change physical activity.
Asanas should be performed correctly and without increased stress. Exercises should gradually open the hip joints. You cannot carry out movements with all your might. If you have problems, you should first consult with a specialist. Before training, you should assess your physical condition and select suitable loads.
Features of the exercises
When training independently at home, it is recommended to follow the following rules:
- First study the technique of performing the asana.
- All techniques should be carried out slowly.
- If painful symptoms occur, training should be stopped.
In order for exercises aimed at opening the hip joints to be beneficial, they should be performed regularly. You need to conduct 2-3 classes per week. The first yoga sessions are best carried out under the supervision of a trainer who is thoroughly proficient in these practices.
Preparatory exercises for joint stretching
To open the hip joints, at the beginning of classes it is advised:
- sit on the ground, straighten up; stretch your arms forward, bend over and try to clasp your calf muscles as much as possible;
- standing on all fours, gradually straighten your legs;
- lie on your back, slowly raise your left leg up 90 degrees relative to your body, fix the position, slowly lower it; repeat the exercise on the right leg.
Gymnastics should begin with simple exercises for beginners, gradually moving to more complex positions.
Basic asanas
They are also performed sequentially. Only after completely mastering one asana is it possible to study another.
Dhanurasana (Bow pose)
You need to lie on your stomach, lift your right leg and left limbs up and clasp your ankles with your hands. Fix the resulting position.
Upavistha Konasana (Seated Angle Pose)
To do the exercise you need:
- sit on the floor, straighten up;
- stretch your legs to the sides as much as possible, without lifting your hips and knees from the ground;
- tilt your body forward, touch your forehead to your toes.
This asana should not be performed by people who have spinal diseases or suffer from chronic inflammatory processes.
Baddha Konasana (Butterfly Pose)
To take a pose you should:
- sit down, bend your legs;
- connect the feet together, pull them towards the pelvis;
- pull your knees down, fix the position;
- tilt your torso forward, keep your back straight, rest your elbows on your hips;
- stay in this position for a few seconds, then repeat the asana.
Supta Padangusthasana
The asana is performed lying on your back. One leg is extended upward, the socks are grabbed by the fingers of the same hand and brought to the head. The position is then repeated for the second limb. Beginners doing the asana for the first time are recommended to use a belt.
Podmasana (lotus pose)
Sit on the floor, spread and straighten your lower limbs. Take your foot with both hands and place it on the inner surface of the opposite thigh (the heel should approach the pelvic bones). Extend your arms and place them on your knees. Closing your eyes, you need to remain motionless for several seconds.
Warm-up part
Performing asanas immediately, without warm-up exercises, is difficult both physically and psychologically. Therefore, it is necessary to start classes with some preparatory movements. This may include a massage or some simple positions. The most suitable way to prepare the body for the main part of the workout is the “sun salutation” complex. It is good to use for waking up and preparing for the work day, but it is also suitable as a warm-up for yoga classes.
Starting position – front stand, legs together. Hands in namaste position - palms joined together at chest level, fingers pointing straight up. The following sequence of exercises continues continuously:
- From the starting position, as you exhale, the arms are separated and raised through the sides above the head, where they are connected again.
- As you inhale, bend back until the moment when free breathing becomes difficult.
- As you exhale, you need to straighten up and continue to move your torso, bending down until your palms touch the floor. The knees should remain straight. This position is called a fold.
- As you inhale, you need to step back with your right leg as far as possible so that it is straight, and the left leg is bent at the knee at an angle of 90 degrees. In the final position, you need to bend your back, pulling your chin up.
- As you exhale, you need to put your left leg next to your right and go into dog pose - the buttocks are raised up, arms and legs are straight. The body forms a triangle with the vertices of the pelvis, feet and palms. The heels must be pressed to the floor. This does not always work out, but with regular training it will be possible over time.
- As you inhale, you need to lower your stomach to the floor, lean on your arms, straighten them and bend your back, turning your face up.
- As you exhale, you need to return to dog pose.
- As you inhale, the left leg goes forward to the hands, and the fourth position is repeated.
- As you exhale, the right leg is placed next to the left leg and the fold is repeated.
- As you inhale, you need to straighten up, your arms go up through your sides, your palms are joined above your head, and you bend back, as in the second position.
- As you exhale, return to the starting position.
It is recommended to repeat these movements, only this time in the fourth position the left leg is put out, and in the eighth position the right leg goes first to the hands.
Tips and Cautions
For yoga for the hip joints to be useful and effectively complement the treatment prescribed by your doctor, you need to:
- perform exercises for a long time;
- increase the load not suddenly, but gradually;
- do not overstrain your joints, perform all positions correctly;
- if you feel severe muscle fatigue or weakness, then you need to give the body a rest;
- Initial sessions are carried out under the supervision of an instructor.
It is recommended to open the hip joints gradually, so as not to injure weak muscles and joints that are not prepared for such loads.
Main part of the lesson
After completing the preparatory complex, the body is ready for more complex loads. This does not mean that you will have to do the splits or put your legs behind your head. Many asanas are easy to repeat visually. The main thing is the internal content.
This training complex consists of the following exercises:
- Tree pose. From the starting position, one leg is bent at the knee and the foot is placed on the inside of the supporting leg. It is advisable to place the heel as close to the pelvis as possible. Hands in namaste position at chest level or above head. The latter option makes it easier to maintain balance. When maintaining balance, there is no need to strain, the body should be relaxed.
- Hawk pose. From the starting position, one leg bends at the knee, and the other leg wraps around the supporting leg, like a vine. At the same time, her foot goes so as to bend behind the shin of the bent leg. The arms symmetrically repeat the movements of the lower limbs. Do not arch your lower back. Coming out of the position, you need to press your chin to your chest. The asana is repeated for the other side.
- Warrior pose. From the starting position, you need to bend one leg at the knee, the bend angle at the knee is 90°, the other leg needs to be pulled straight back. The heels of the feet are on the same line, the hip joint of the bent leg must be turned outward. The shoulders turn along the line of the hips, straight arms are extended at shoulder level parallel to the floor.
- Open foot pose. From the starting position, you need to place your feet twice as wide as your shoulders. The body leans forward, the back is straight. The palms rest on the floor at the level of the feet. The back must be well stretched and relaxed.
Benefits of practice
Yoga classes contribute to:
- restoration of cartilage tissue;
- improving the elasticity of the ligamentous apparatus, preventing sprains;
- strengthening bones;
- activation of blood circulation in the pelvis;
- saturation of tissues and organs with oxygen.
Yoga is a set of specially designed physical exercises that are complemented by balancing a person’s internal state and are associated with freeing him from negative thoughts and desires. The practice of yoga shows that thanks to gymnastics, stress is relieved, mental relief comes, physical pain goes away, and the healing process is activated.
Pelvic structure
The pelvis has a complex anatomical structure. You need to know it at least in general terms to make yoga practice safe.
The pelvic bone is formed by the ilium, ischium and pubic bone.
The structure of the pelvic bone
The ilia are paired bones that are located in the upper part of the pelvic bone. The ilia are easy to feel if you place your hands on the lower abdomen, near the groin area.
At the junction of the sacrum with the iliac bones, the sacroiliac joint (SIJ) is formed. This is a paired joint with a powerful and durable ligamentous apparatus.
The ischiums are paired bones that are the lower part of the pelvic bone. They can be felt by placing your palms under the buttocks.
The pubic bone is a paired bone that is the front part of the pelvic bone.
The pubic symphysis is the pubic fusion of the pubic bones along the central line.
Next, we will consider asanas that are performed in a lying position.
Anantasana (mythical snake on which Vishnu reclined)
In this asana, the hip joint flexes and rotates outward, mainly working the muscles of the raised leg, the muscles of the groin area, the muscles responsible for abduction of the leg and external rotation of the hip joint, the piriformis, gemelli and obturator muscles. The muscles of the back and inner thighs are greatly stretched. Recommendations: it is advisable to maintain balance and not fall forward or backward. Therapeutically, this asana strengthens the pelvic floor muscles, prevents the appearance of hernias, back pain, and has a beneficial effect on the reproductive system of both men and women.
Supta Padangusthasana (“Supta” - lying down, “Pada” - foot, “angustha” - big toe)
The hip joint of this asana works almost the same as when performing hanumanasana. Flexion and inward rotation of the hip joint is accomplished by contraction of the rectus femoris muscle. Traction occurs due to pressure on the ankle joint with hands or a belt. Working muscles for stretching: The back of the thigh, gluteal muscles, muscles of the lower leg, partially the muscles of the inner surface of the raised thigh. In this asana it is quite easy to relax, since the position itself speaks for itself and at the same time you need to concentrate and be attentive. That is, effort must be combined with humility; these are the recommendations that underlie all asanas and this is stated in Patanjali’s Yoga Sutra. This asana is very useful for sciatica and paralysis of the legs.
The next group of asanas from a sitting position
Upavishtakonasana (seated corner pose)
An asana in which the hip joints bend and simultaneously rotate outward, there is a strong stretching of the entire back of the legs, pelvis and lower back. Very often there are convulsive sensations in the buttocks, since with such a stretch they experience a large load, and the length of these fibers is insignificant. If the knee joint bends, it is necessary to force the hamstring muscles to return them to the opposite position, since the entire back of the legs should touch the floor. Also, in order to maintain the position of the hip joints, it is necessary to keep the feet in a vertical position and not tilt them to the sides. If the muscles are not stretched enough, care must be taken, as this position is quite traumatic and dangerous. In this case, it is better to reduce the angle between the legs. It's better not to force things. Physiologically, this asana has a strong therapeutic effect, helps with rheumatism and back pain, and has a beneficial and calming effect on the brain.
Baddha Konasana (Bound Angle)
Asana stretching the groin area. They say that shoemakers sit in this position in India. The heels are near the perineum, while the hips are moved to the sides until they touch the floor. The hip joint flexes and rotates outward. Under the influence of gravity, the sacrum bends forward. Thus, the adductor and sartorius muscles of the thigh are stretched, and the short and thin adductor muscles to a lesser extent. It is necessary to sit with a straight back and not tilt your head forward, otherwise the spine will bend, not the hip joint. In this asana, the pelvic floor muscles are well stimulated, which has a beneficial effect on the performance of mula bandha. It is also possible to change the position of the feet, but this can put unnecessary stress on the knee ligaments, and if the hip joint is not very flexible, then the knee ligaments can be injured. This asana is very useful for diseases of the bladder, prostate and kidneys.