Preventive therapeutic yoga and gymnastics for coxarthrosis of the hip joint have already proven themselves to be excellent methods of combating this disease. In order to choose the right course of treatment and a number of exercises used in yoga, you need to contact specialists so as not to accidentally start performing useless and possibly harmful actions.
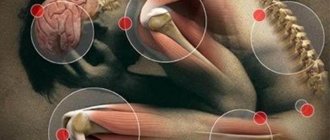
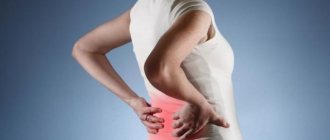
Judging by the responses of people specialized in the field of coxarthrosis, as well as scientists studying the effect of yoga and physical exercise on joint diseases, today almost every 4 inhabitants of our planet are exposed to diseases such as arthritis and arthrosis. Coxarthrosis is a derivative of arthrosis, and its only difference is that it affects the development of the musculoskeletal system, while arthrosis destroys the joints of the limbs.
Reasons for the development of the disease
The impact of coxarthrosis of the hip joint on the musculoskeletal system is becoming increasingly stronger due to the fact that:
- Every day there are more and more organizations that force their employees to spend the entire day in a sedentary position. Such spending of time negatively affects the hip joint and the spine as a whole. If you want to keep your musculoskeletal system healthy, then stretch and take a break from sedentary work.
- Another thing that contributes to the development of coxarthrosis is postponing a visit to specialists and not taking the disease itself seriously in general. You need to go to the hospital in a timely manner for qualified help, because the longer you turn a blind eye to the pathology, the less chance you have of overcoming it.
- Coxarthrosis can be exacerbated by an incorrectly designed schedule and diet. The food you consume must contain some microelements and vitamins that contribute to the proper development of the bone system. It is necessary that the food contains minerals, vitamins a, b, c, and others. In addition, it must contain microelements. The food we consume in fast foods and restaurants is not at all correct and healthy for humans. A good diet will consist of a good combination of fruits, meat and vegetables.
- In addition to poor posture, other types of improper organization of work can lead to the development of diseases of the musculoskeletal system. In particular, this is the lack of breaks and rest during work. Being in a bent position over the keyboard, forgetting about everything in the world besides work, you greatly worsen your health. It is imperative to take a break from the work process and warm up.
- Most scientists studying the characteristics of coxarthrosis draw our attention to the possibility of inheriting the disease. Of course, if your father or grandfather had this pathology, then it is not at all necessary that you will get it genetically. But don't forget that your chances of getting sick are much higher than other people. Avoid bad habits, such as smoking cigarettes, drinking alcohol, eating unhealthy foods, etc., to prevent the disease from developing in you. You should also be careful if it is written somewhere in your medical history that in childhood you had an anomaly in the development of the spine and bone apparatus.
The importance of exercise for joint diseases
Qualified scientists recommend using a variety of sets of exercises, which are taken from yoga and regular physical education. All of them are capable of providing the load we need on damaged tendons. The main thing is that this load is not too heavy, since such an approach to maintaining your own health can worsen it.
Yoga exercises used for coxarthrosis are aimed not only at relieving swelling, but also at restoring joint function, restoring mobility and, to some extent, youth.
Their use will cause blood and joint fluid to move. The blood, containing oxygen, will carry it to the tendon cells, which are slowly destroyed without access to nitrogen. The joint fluid, washing the joints, will reduce pain and speed up the healing process.
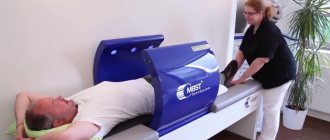
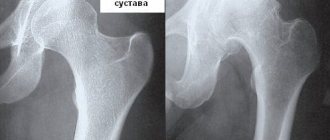
But it is very important to understand that all physical activity for coxarthrosis of the hip joint should be done only when all diagnostic examinations have already been carried out. This can only be done by a qualified specialist, who will be based not only on external observations of the patient, but also on blood tests, X-ray images, ultrasound and MRI. Using such a set of measures will allow you to perform 2 actions at once: determine whether the patient really has this or that disease being sought and give the doctor a comprehensive image of the entire musculoskeletal system. This will allow him to understand whether there are any other deviations, and having found them, take timely measures to eliminate them.
And only after receiving all the necessary tests and images, the doctor will be able to prescribe a course of physiotherapeutic procedures. We should not attribute anything of our own to these doctor’s orders. If you have any ideas of your own to combat the disease, be sure to discuss them with him.
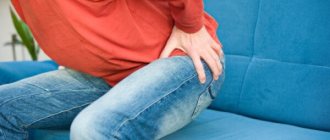
Moreover, pay attention to the technique of performing exercises for coxarthrosis of the hip joint. Since your tendons are very weakened, serious consequences may arise from the wrong approach to exercise. Therefore, you need to carefully study how these movements should be performed. That is why, when you feel pain in the hip joint while performing a particular yoga movement, be sure to inform your doctor about it and stop training for a while until they make a decision.
You should also understand that if you have been prescribed any non-steroidal drugs, then under no circumstances should you use them before training. Anti-inflammatory, painkillers, injections into the hip joint and other drugs will prevent you from understanding the effect of the exercises performed. For example, if you take a painkiller, you won’t realize when the workout starts to cause discomfort. Of course, this should not be allowed, because without noticing the deterioration of your own condition, you can greatly interfere with the therapeutic course of treatment of the hip joint.
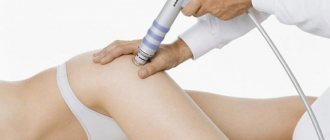
You also need to know that in addition to exercise, massage is useful. It has proven to be excellent as a relaxant and a way to warm up the tendons. In the treatment of coxarthrosis, massage gives very good results. The fact is that physical effects on the body can relieve swelling that blocks blood flow and prevents oxygen from reaching the joints. Moreover, massage is enjoyable. So why not use it?
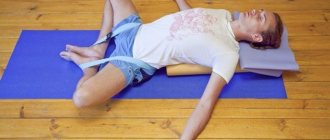
Sequence of exercises
After a 10-15 minute light dynamic warm-up, you should spend at least 15 minutes doing standing exercises. It is best to start with asanas that help warm up the muscles well. First of all, these are Utkatasana and Trikonasana . Then it is recommended to move on to exercises aimed at maintaining balance; each of them must be performed for at least 5 “inhale-exhale” cycles.
After this, you can begin yoga asanas designed to stretch the thigh muscles, bending forward from a sitting position, back twists and low lunges . Discomfort and acute pain should not be allowed. After each exercise you should relax and rest. Correct technique and high-quality execution of simple elements create the foundation for the safe development of complex ones.
Nutrition and physiotherapeutic procedures
Alas, in some cases, coxarthrosis of the hip joint leads to the fact that patients are forced to completely replace damaged tendons. If you want to avoid a similar fate, then you need to resort to conservative methods of treating the hip joint. They involve exercises that activate the regenerative properties of your body. In addition to exercises, such treatment procedures also contain a set of measures used in sanatoriums and medical institutions. This can be mud baths, solar therapy and many others. For the best effect, you should combine them with gymnastics.
Gymnastic measures are based on actions that promote the restoration of cartilage tissue. It is necessary to consume the products prescribed by your doctor to improve their effect. In all cases, such food contains minerals and trace elements that normalize the functioning of the body.
Nutrition should be given special attention also because, having provided the necessary support during the treatment of diseases, a good diet also counteracts the possibility of relapse of the disease.
Tips and Cautions
The process of opening the joints is always long, so you should not strive to restore their mobility in one week. Speed in this case is not an advantage, and for the treatment of chronic diseases, a sharp change in physical activity is strictly contraindicated.
Exercises performed incorrectly, as well as excessive stress, can lead to a number of health problems. One of the dangers is the development of joint hypermobility . Asanas should not only open the hip joints, but also strengthen the muscle corset.
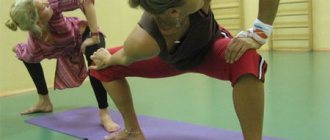
You should not train with maximum effort at the limit of your capabilities. This can result in an accidental dislocation, sprain or rupture of ligaments, even a fracture of the femur. The exercises are best done with an instructor, in a group or individually. If you decide to start learning yoga on your own, you should carefully study the video, where experienced specialists perform everything correctly and the technique is explained in detail.
List of gymnastic exercises
Despite the fact that all kinds of exercises during yoga should be selected by a specialist, there are a number of standard workouts that are performed by almost all people suffering from coxarthrosis.
It is necessary to take into account that when performing them, yoga will only benefit people whose stage of the disease has not risen above the initial or at least 2nd degree.
Workout 1. You need to do this exercise while standing. Climb to some height. It is necessary that the sore leg hangs down. Once at the height, grab hold of the support with your hand. Now you can rock your sore leg back and forth and from one side to the other. The injured limb should be on the other side of the support you are holding on to. You need to perform the exercise once in the morning, at lunch, and in the evening. Give it 5-10 minutes. If you feel any pain starting, stop training immediately.
Workout 2. This exercise is performed only by those who are completely unable to move their legs. It’s done like this: make a loop from a belt or rope, which you then hang over the bed. It should be located above the legs at a distance of about 25 cm. The damaged leg should be secured in this loop, and then slowly rock it and flex and extend the affected limb. The conditions are still the same: if you feel pain and malaise, you should stop training.
There is an exercise suitable at any stage of the disease. It is given below.
Exercises for the treatment of arthrosis of the hip joints - coxarthrosis
11 best exercises to treat arthrosis of the hip joints
Exercise 1.
Performed on the floor.
Starting position: lying on your stomach, legs straight. The arms are extended along the body. A. Slowly lift your right leg, straightened at the knee, about 15 degrees from the floor and hold it there for 30–40 seconds. Then slowly lower your leg and relax completely. After a short rest, repeat the exercise with the other leg. In this static version, the exercise is performed with each leg only 1 time.
Attention! When lifting your leg, you need to ensure that the movement occurs solely due to the efforts of the muscles of the thighs and gluteal muscles; The stomach and pelvic bones should be pressed tightly to the floor, the body should not turn after the rising leg. There is absolutely no point in raising your leg too high - it is more important that the exercise is performed correctly, without turning the body.
Note from Dr. Evdokimenko: Both legs should work with equal tension; that is, both need to be held suspended at approximately the same angle and for the same amount of time.
B. After a short rest, perform the same exercise in a dynamic version: very slowly and smoothly lift your right leg up, straightened at the knee, and hold it at the top point for 1-2 seconds. Then slowly and smoothly lower your leg down. Perform approximately 10 - 12 of these smooth leg raises and lowerings.
When lowering your leg down, be sure to relax the leg muscles for at least 1–2 seconds each time; When lifting your leg, hold it at the top point for 1–2 seconds each time.
When performing the exercise, do not overdo it! It is not at all necessary to raise your leg too high - it is enough to raise it at least 15 degrees from the floor.
After a short rest, perform the same exercise with the other leg.
Attention! As already mentioned, you need to ensure that the upward movement of the leg occurs solely due to the efforts of the muscles of the thighs and gluteal muscles; The stomach and pelvic bones should be pressed tightly to the floor, the body should not turn after the rising leg.
After all, when performing the dynamic version of this exercise, we do not have the task of “setting a record” for the height of the leg lift. It is more important for us to send a “wave of blood” down the leg with the help of smooth movements. And this can only be done with the help of soft movements performed correctly and without strain.
Important: Both legs must be worked with equal tension; both need to be “pumped” approximately the same number of times.
Exercise 2.
Performed on the floor. Starting position: lying on your stomach. Stretch your arms along your body. The left leg is straight. Bend your right leg at the knee at a right angle.
A. Slowly lift your right leg, bent at the knee, about 10 degrees from the floor and hold it there for 30–40 seconds. Then slowly lower your leg back to the starting position and relax completely. After a short rest, repeat the exercise with your left leg. In this static version, the exercise is performed with each leg only 1 time.
Attention! As in exercise No. 1, when lifting your leg, you need to ensure that the movement occurs solely due to the effort of the muscles of the hips and gluteal muscles. The stomach and pelvic bones should be pressed tightly to the floor, the body should not turn after the rising leg. There is absolutely no point in raising the bent leg too high - it is more important that the exercise be performed correctly, without turning the body.
Note from Dr. Evdokimenko: Both legs should work with equal tension; that is, both need to be held suspended at approximately the same angle and for the same amount of time.
B. After a short rest, perform the same exercise in a dynamic version: very slowly and smoothly lift your right leg bent at the knee about 10 degrees from the floor and hold it at the top point for 1-2 seconds. Then slowly and smoothly lower your leg down to the starting position (still keep your leg bent at the knee). Perform approximately 10 - 12 such smooth raises and lowerings of the bent right leg.
When lowering your leg down, be sure to relax the leg muscles for at least 1–2 seconds each time; When lifting your leg, hold it at the top point for 1–2 seconds each time.
When performing the exercise, make sure that during the exercise your leg remains bent at the knee at an angle of approximately 90°.
After a short rest, perform the same exercise with the other leg.
Attention! As already mentioned, you need to ensure that the upward movement of the leg occurs solely due to the efforts of the muscles of the thighs and gluteal muscles; The stomach and pelvic bones should be pressed tightly to the floor, the body should not turn after the rising leg. Don't lift your leg too high!
After all, we again need to use smooth movements to send a “wave of blood” down the leg. And this can only be done with the help of soft, low movements, performed correctly and without strain.
Important: Both legs must be worked with equal tension; both need to be “pumped” approximately the same number of times.
Exercise 3.
A fairly complex exercise that is suitable only for physically strong patients. Performed on the floor. Starting position: lying on your stomach, legs straight. Stretch your arms along your body.
Slowly raise both legs (straight) to a height of approximately 15- above the floor. Keeping your legs suspended, smoothly spread them apart. Then slowly bring your legs together.
Without lowering your legs, slowly spread them apart again, and then slowly bring them together again. Perform 8–10 of these slow leg raises.
Note from Dr. Evdokimenko: leg movements should be smooth, without jerking.
Attention! This exercise can provoke an increase in blood pressure, so it is not recommended for patients over 40 years of age and people with heart problems or a tendency to hypertension.
Exercise 4.
Performed on the floor. Starting position: lying on your right side, bend your right leg at the knee and straighten your left.
Raise your left leg and hold it suspended at an angle of approximately 45° for about 30 seconds. Then slowly lower your leg and relax completely. Then roll over to the other side and repeat the exercise with your right leg.
Important: both legs must work with equal tension; that is, both legs need to be held suspended at approximately the same angle and for the same amount of time.
Exercise 5.
Performed on the floor. Starting position: lying on your right side, bend your right leg at the knee and straighten your left.
Raise your straightened left leg to an angle of approximately 30–40°. Without bending your knee or lowering it, slowly turn your entire leg and foot outward. Then slowly turn your entire leg and foot inward.
Perform 10-15 of these rotations with your left leg outward and inward, keeping your leg suspended and without bending it at the knee, and then lower your leg and relax completely.
After a short rest, roll over to your left side and perform the same exercise with your right leg.
Attention! Rotate your leg “from the hip,” that is, rotate your entire leg outward—inward, not just your foot. Do the exercise slowly and smoothly, otherwise there is a risk of damage to the hip joint.
Exercise 6.
Performed on the floor. Starting position: lying on your back, bend your knees and spread them to the sides approximately shoulder width apart. Stretch your arms along your body.
A. Leaning on your shoulders, slowly raise your pelvis as high as possible and fix the achieved position for 30–40 seconds. Then slowly lower yourself down to the starting position and rest a little. In this static version, the exercise is performed only 1 time.
B. After a short rest, perform the same exercise in a dynamic version: slowly raise your pelvis as high as possible and fix the achieved position for 1-2 seconds, then slowly lower your pelvis 15-down.
Then again slowly raise it as high as possible, etc. Do 12-15 such movements with your pelvis up and down, moving extremely slowly and smoothly, without making jerks or sudden movements. Then slowly lower yourself down to the starting position and relax completely.
Exercise 7.
Starting position: sitting on the floor, legs straight. Lean forward and, without bending your knees, try to clasp your feet or toes with your palms. Then slightly pull your body forward with your arms as far as you can and stay in this position for 2-3 minutes, completely relaxing. Perform this exercise only 1 time per day.
If the stiffness of your ligaments does not allow you to freely grab your foot with your hands, as in the previous exercise, use a belt or towel. Throw a “loop” of these improvised means around your foot, and hold the ends of the loop with both hands. Using a loop will make it easier for you to pull yourself forward.
Note. Bend over as much as your body allows. Don't try to exceed your natural flexibility. Do not jerk or make significant efforts. Just fix the achieved position and relax. After about a minute, the relaxed muscles will give you the opportunity to bend a little lower, and after another minute - a little lower. By repeating the exercise day after day, you can significantly increase the angle of inclination within a year.
Your task in this exercise is over time, over several months, to stretch the muscles of the back of the thighs and back muscles to such an extent that the angle of inclination approximately doubles. Then the spasm of the posterior muscles of the thigh and lower back will disappear, and the blood supply to the legs will improve.
To accomplish the task more efficiently, we can use small tricks. You can play with tension and relaxation of the muscles: when you have pulled yourself forward as far as you can and feel that the body is not “going any further”, while inhaling, tense the muscles of your legs and lower back, as if trying to straighten back. But with your hands, maintain the previously achieved body position.
Maintain tension for about 10 seconds, and then, as you exhale, relax completely - also for about 10 seconds, and at this moment allow the body to freely fall forward and down. Don't disturb him, just relax completely. Or help your body very slightly by slightly pulling your arms forward in the direction of your feet.
You will be surprised to notice that at the moment of relaxation (after tension), the body moves forward more easily. Repeat the tension-relaxation cycle 3-4 times in one session, and you will achieve good results even in one session. And by repeating the exercise daily, you will very quickly restore the elasticity of the hamstring muscles.
Important: when performing the exercise, make sure not to tilt your head down - the head should be a “continuation” of the back line. And do not arch your back - your back should remain as straight as possible.
Exercise 8.
Performed while sitting on a chair. Slowly straighten your right leg at the knee and lift it as straight as you can. Hold your leg in this position, suspended, for 30–60 seconds. Then slowly lower your leg and relax completely. Then repeat the exercise with your left leg.
Perform the exercise with each leg 2-3 times.
Exercise 9.
This exercise is good for reducing painful spasms of the outer lateral thigh muscles. Starting position: sitting on the floor, lean your back against the wall (back straight). Straighten your legs and spread them to the sides as far as possible. Without bringing your legs together, bend your affected leg at the knee and place your foot on the floor.
Gently pressing with both hands on the knee of the sore leg, with smooth rocking movements, gradually tilt it inward, towards the knee of the straightened healthy leg, until you feel maximum tension, almost pain. Now we have to use little tricks - let's play with muscle tension and relaxation.
When you have tilted your sore leg as far as you can and feel that it is not “going any further,” while inhaling, tense the muscles of your sore leg, as if you were trying to move it back in the direction of its original position. But don't let your leg move back with your hands.
Hold the tension for about 10 seconds, and then, as you exhale, completely relax your leg - also for about 10 seconds, and slightly increase the pressure with your hands at this moment, tilting your leg even more downward and inward. But do not allow obvious pain, do everything very gently and carefully.
Repeat this tension-relaxation cycle 3-4 times in 1 session.
Note from Dr. Evdokimenko. Alternatively, this exercise can be done while sitting in a chair or on a low stool.
Attention! This exercise is recommended for patients only with the initial (first) stage of coxarthrosis, since in the second and third stages it can increase joint trauma.
Exercise 10.
Starting position: sitting on the floor, lean your back against the wall (back straight). Straighten your legs and spread them to the sides as far as possible.
Bend the sore leg at the knee, clasp the foot of the sore leg with your hands and slowly pull it towards you until you feel tension (but not pain!). If the slightest pain appears, release your leg slightly, and when the pain disappears, gently pull your leg towards you again. Having reached the limit, fix the position. Maintain this for 1-2 minutes, trying to completely relax. Perform the exercise only 1 time.
Note 1: If your flexibility does not allow you to wrap your hands around your foot, use a strap or towel to pull your foot toward you.
Note 2: Alternatively, this exercise can be done while sitting in a chair.
Attention! This exercise is recommended for patients only with the initial (first) stage of coxarthrosis, since in the second and third stages of coxarthrosis it can increase joint trauma.
Exercise 11.
Self-massage of the thigh. It is usually performed at the end of classes. Do self-massage while sitting. Massage the front and sides (but not the back!) surfaces of the thigh above the knee.
Execution: place your palms firmly on your thigh just above the knee and begin to vigorously rub your leg, gradually moving along the thigh from bottom to top, from the knee to the groin. Rub your thigh for about 3 minutes until you feel a steady warmth, but not burning or pain. At the end of the exercise, perform a soft, smooth stroking of the thigh, from bottom to top, from the knee to the groin, for a minute.
Attention: to retain heat after rubbing and to improve blood circulation in the legs, you can use warming ointments during the procedure. For example, Nikoflex cream or ointment, Espol, Ballet massage cream, and other similar products.
Article by Dr. Evdokimenko© for the book “Arthrosis”, published in 2003. Edited 2011. All rights reserved.
A video of gymnastics for the treatment of coxarthrosis can be viewed here >>
READ MORE:
- No more medications needed?
- Symptoms of coxarthrosis
- What is arthrosis of the hip joint (coxarthrosis) often confused with?
- Causes of arthrosis of the hip joint (coxarthrosis)
- Structure of the hip joint
- Changes in the hip joint with coxarthrosis
- Examination of a patient with arthrosis of the hip joint
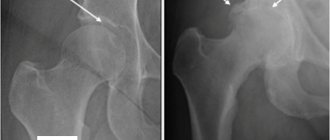
- X-ray diagnosis of coxarthrosis: the most common mistakes
- Treatment of arthrosis of the hip joint: prospects
- Surgical treatment of arthrosis of the hip joint
- Therapeutic treatment of arthrosis of the hip joint
All articles by Dr. Evdokimenko