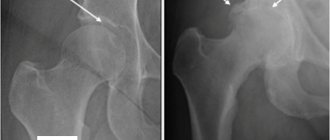
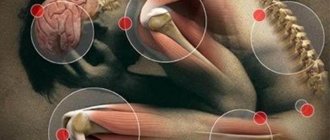
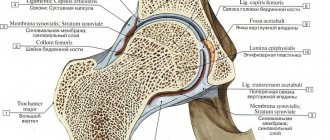
Arthrosis or coxarthrosis of the hip joint is a dangerous disease that can manifest itself on one or both sides. Treatment of the disease is usually complex, and an important measure is gymnastics for arthrosis of the hip joint. It is a special set of exercises aimed at recovery, alleviation of symptoms of the disease, normalization of blood circulation, which helps improve the condition of cartilage and bone tissue. Exercise also improves the muscle frame. They can be used not only for treatment, but also for prevention.
Therapeutic exercises for arthrosis of the hip joint: general recommendations
Treatment of arthrosis of the hip joint with physical education is a long process that requires strict adherence to certain instructions. You need to exercise regularly, ideally under the supervision of your doctor or an experienced instructor.
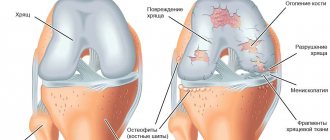
Particular care should be taken with osteoarthritis, which is accompanied by joint deformation and bone growths.
The basic principle of gymnastics is that movement is life. But it is important not to damage the diseased joints even more. Therefore, gymnastics should be gentle and meet certain specifics.
Exercises for arthrosis of the hip joint should be performed taking into account the following recommendations:
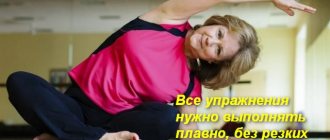
- Exercises should be performed smoothly, slowly, statically. Sharp turns, which can injure an even more damaged joint, are not allowed.
- Excessive intensity with large range of motion and deep squats can worsen joint health.
- Rotational half-turns, which involve the thigh muscles in work, are also excluded.
- Even if there is minimal pain or discomfort, stop the activity and rest for a while.
- Muscle tension and discomfort can be relieved through a warm bath, during which you can also perform simple movements.
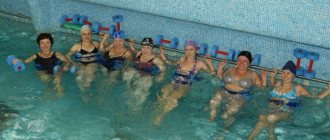
- To prevent discomfort, prepare your muscles and joints for the movement. To do this, a light massage is done in the pelvic area. Pleasant relaxation can also be achieved while swimming.
It is important not to forget that the load should not provoke pain. If they appear, consult your instructor or doctor. They may modify your routine or cancel the class for a while.
Physical exercises for arthrosis of the hip joint are represented by various complexes, which have both advantages and disadvantages. The most common and effective are the Bubnovsky, Evdokimenko, Popov, and Gitt complexes. These complexes give good results in the fight against arthrosis of the hip joint and complement the main therapy well.
Bubnovsky's technique
Bubnovsky’s gymnastics has proven itself well for arthrosis of the hip joint. It not only helps relieve the symptoms of the disease, but also acts on its cause.
It is very important to conduct a preliminary examination to confirm the diagnosis and determine the location of the source of the disease. The next stage is the development of an individual set of exercises.
A mandatory requirement, which Bubnovsky also considers very important, is breathing control. If it is correct, then the effectiveness of gymnastics will be much higher.
Bubnovsky’s complexes also contain general strengthening exercises for the musculoskeletal system and exercises for improving the health of individual joints.
Since in order for the impact on the joints to be successful, they need to be prepared, Bubnovsky created a set of exercises for beginners, which is very simple and involves minimal loads. The exercises can also be done at home.
The complex for beginners helps restore the mobility of joints and ligaments of the muscular corset as a whole. In addition to its therapeutic effect, it provides excellent disease prevention. Most exercises are performed while lying on a mat - the load on the joints in this case will be minimal.
Here are some exercises that include gymnastics for arthrosis of the hip joints at home according to Bubnovsky:
- Starting position – lying on your back. Bend your knees. Smoothly bring one of them closer to your stomach, then do the same with the second leg. Wrap your hands around your knees. Stay in this position for 5-10 seconds. When returning to the starting position, spread your arms to the sides and straighten your knees, relax.
- The starting position is similar. But your legs need to be positioned straight, and your arms should be placed along your body. Turn your palms towards the floor. Without bending your knees, lift them from the floor to a distance of 25-30 cm, bend your knees, and lower them bent onto the mat, then spread your knees as wide apart as possible. In this position, you need to make a movement as if you are trying to push a large load away from you.
- Starting position: lying down, knees bent, hands pressed to the floor. The knees are moved outward and then brought together. When spreading, you need to exhale them, when mixing, you need to inhale. The lower limbs slowly straighten.
Start with the minimum number of repetitions and work your way up to 15-20 repetitions.
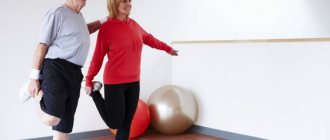
Some exercises can be performed if a diseased joint has been replaced. Sitting on a chair, lean forward and reach your toes with your hands. Then stand near a chair and grab its back, perform smooth movements with your leg - forward, backward, to the sides.
Bubnovsky’s technique involves the gradual inclusion of new exercises in training and a gradual increase in load. Since its main purpose is to eliminate pain, avoid sudden movements. The approach to everything should be as gentle as possible.
Rules and contraindications
By losing extra pounds you can significantly reduce the load on a sore joint.
Special gymnastic exercises for arthrosis of the hip joints will bring a significant effect if you adhere to the following recommendations.
Instructions:
- Exercise should become a habit and become daily. Exercise for arthrosis of the hip joint activates blood supply and prepares the affected joint for daily stress. The same complex, but performed in the evening, will relieve pain and allow you to sleep for 8 hours without aggravating consequences.
- Exercises are temporarily postponed if a person is sick, has a high temperature or blood pressure. Exercise is also contraindicated during exacerbation of chronic pathologies. However, as soon as the acute period of the illness has passed, it is necessary to immediately resume gymnastics, dosing the load according to how you feel.
- The lesson includes exercises whose starting position does not load the affected joint. The load is increased due to the number of repetitions, as well as the total number of exercises. The price of illiterate dosing of stress is an exacerbation of pathology, increased pain and, at a minimum, a “rollback” to the start of treatment.
- Since breathing during special exercises is performed arbitrarily, the beginning and end of each of them should be accompanied by a deep inhalation and exhalation.
On a note. If the attending physician has permitted, then personal gymnastics for arthrosis of the hip joint video may include movements performed with resistance.
Elastic tape and tourniquets are used to increase the load on the affected joint
Therapeutic exercise for arthrosis of the hip joint at different stages
Loads may vary depending on the severity and stage of arthrosis. This is important because exceeding the permitted difficulty can cause a deterioration in the condition.
Thus, gymnastics for grade 1 arthrosis of the hip joint may include the following exercises performed while lying on your stomach:
- Raise one leg above the floor 20 cm and bend it at the knee, stay in this position for up to half a minute, then slowly lower your legs. Repeat the same for the second leg. For each, do the exercise 2-3 times with short breaks. This exercise has a great effect on the gluteal muscles and hip joints, but the load is gentle and acceptable.
- Raise your leg bent at the knee until you feel tension, press the femur as much as possible to the floor, lock in this position for 3-5 seconds. Do the same for the second limb. It is recommended to do the exercise with the healthy leg first, then with the injured one. Avoid extreme discomfort. Do the exercise 7-10 times.
- At the same time, raise two legs above the floor surface and stay in this position for five seconds, then smoothly return to the starting position. To make it more difficult, you can further spread your legs to the sides.
- Raise your leg bent at the knee above the floor, hold for three seconds, then change legs.
- The exercise is done while sitting on a chair. Press your knees together, bring your toes together, spread your heels as wide as possible and connect them.
After finishing the exercises, lie quietly on your stomach.
First, do the exercises a minimum number of times and gradually increase it to 10. The main condition is the absence of painful sensations of severe fatigue in the joints when performing the complex.
Gymnastics for grade 2 arthrosis of the hip joint involves the following exercises, which are performed in a supine position:
- This exercise involves moving your arms with your legs straight. As you inhale, raise your arms in front of you, and as you exhale, lower them.
- Similar starting position. Bend and straighten your arms at the elbow joint.
- Now perform smooth rotational movements with your knees inward.
- Starting position - with your arms tightly pressed to your body, your legs straight, they need to be slowly moved apart, without lifting your heels from the floor.
- Keep your arms in a random position, and do the “bicycle” exercise with your legs for ten seconds.
At the end of the complex you need to repeat the first exercise. All movements except the fifth are repeated ten times.
In stages 1 and 2 of the disease, in the absence of discomfort and fatigue, you can perform exercises of both proposed complexes. If certain exercises are difficult to do or cause pain, stop doing them.
A more difficult question is what exercises to do for grade 3 arthrosis of the hip joints. You can use the Gitta technique, in which movements are minimized. Here are some exercises:
- Starting position - lying on your stomach, clasp your hands at the back of your head. Tighten your thigh muscles. Perform 5-6 movements, rolling from left to right and back.
- A similar starting position, but the front part of the body needs to be raised, resting on the elbows. Alternately stretch your legs straight and turn to the right and left. The turn should be no more than a centimeter.
- Starting position – sitting on a chair. Place your hands on your knees, spread to the sides. The feet should remain motionless, knees together and apart.
- Same starting position. Spread your knees to the sides, lift your heels and lower them.
- In the last exercise, in addition to a chair, you need to use a book, on which you need to stand with your healthy leg. The patient must simultaneously hang in the air. Rest your hands on the chair. Perform the exercises for 5-10 seconds.
Do as many exercises as you can so as not to overload your sore joints.
Gymnastics are not always allowed for arthrosis of the hip joint. It is an integral part of therapy in the early stages of the disease and during remission, but at the acute stage it can cause harm. There are also contraindications, including limb injuries, heart attack and stroke, and cancer. In any case, you should start exercising after consulting your doctor.
In general, a therapeutic gymnast for arthrosis of the hip joint helps improve the patient’s condition and helps restore motor activity. But remember that this is only one of the components of therapy, and it is important to adhere to all the specialist’s recommendations.
An approximate set of gymnastic exercises
This complex of therapeutic exercises for arthrosis of the hip joint is recommended by rheumatologist P. V. Evdokimenko. The video is not published in this article, but a photo is selected for almost every exercise.
Warm-up
Before each physical activity, sports training or therapeutic exercises, muscles, joints and ligaments must be prepared for the upcoming physical activity.
In the pictures below we present to your attention the simplest joint warm-up, which can be performed not only in a standing or sitting position, but also lying down. It can also be a wonderful introduction to morning exercises.
This warm-up for sore joints is borrowed from the practice of Qigong.
Instructions for implementation:
- Take the starting position (IP) of your legs - your feet lie on the back side, and your big toes are connected. The legs will remain in this position until the end of the warm-up. Place your palms on your stomach, spread your elbows to the sides. Take a deep breath and raise your shoulders as high as possible. Try to touch your ears. As you exhale, forcefully lower your shoulders down. Number of repetitions (KP): 6-8 times.
- Place your right palm on your left knee and your left palm on the top of the back of your head. As you exhale, rotate your torso to the right side, with your chin touching the top of your right shoulder. Return to IP and repeat the twist to the left. KP: alternately, 3-4 times.
- The right palm remains on the left knee, and the left hand is clenched into a fist, which must be used to make massage movements along the spine, as well as across (at the level of the shoulder blades). Massage the same areas with the other hand because this warms up the joints of the shoulder, elbow and hand.
- After massaging the shoulder blade area, perform a circular massage of the sacrum with the lumpy base of the palm. As in the previous exercise, make circular movements not only in different directions, but also with different hands.
- Now you should perform 5-6 breathing movements with the diaphragm. As you inhale, stick your stomach out and press it into your palms, and as you exhale, try to pull it in as much as possible.
- Bring your fists together, placing them on your solar plexus. Bringing your shoulder blades together and moving your elbows back, take a deep breath through your nose, and as you exhale, return the shoulder girdle to the IP.
- Interlace your fingers and place your palms on your lower abdomen. As you inhale, twist to the left side, but at the same time your head remains in place - your chin should touch your right shoulder. As you exhale, return to IP. Twist in the other direction. KP: 6 times.
- And finally, you need to make strong and powerful massage movements (circular rubbing) around the shoulders, elbows, knees and ankles.
On a note. When performing this warm-up in a lying position, do exercises on your knees using an exercise that simulates walking in place. To warm up your ankles, perform movements in the following sequence: from yourself and to yourself; turning in and out, circular movements in one direction and the other.
Exercises while lying on your stomach
Alternating straight leg raises
Asana Ardha Shalabhasana – half Grasshopper pose
The exercise consists of two parts.
First, perform a static hold:
- Take a deep breath and exhale. Raise one leg up without bending your knee. The initial distance from the floor to the heel is 8-15 cm. In the future, it will be possible to raise the limb higher. Hold this position for 35-45 seconds, making sure that the raised knee and foot “look” exactly at the floor. By the way, you don’t have to pull the sock.
- Smoothly lower the limb to the starting position . Take a break, relaxing all muscle groups.
- Repeat the same hold with the other leg.
- Lower your leg to the floor and rest as you prepare to perform dynamic movements.
Secondly, make smooth swings:
- Raise one leg as wide as possible. Freeze when your foot reaches the top point and count to three. The leg should not only be straight at the knee, but also not turned axially outward or inward. Having lowered your foot to the floor, you need to completely relax. Number of repetitions of “delayed swings”: from 8 to 10, but the initial number may be less.
- Rest for another minute, focusing on your breathing.
- Repeat slow “hold swings” with the other leg.
- The exercise is considered completed only after the final 1-minute relaxation.
Attention! The main goal of the exercise is to launch a wave of lymph and blood from the ankle joints to the hip joints. Therefore, do not pay attention to the amplitude of the swing, but to the smoothness of the movement. Do not engage your abdominal muscles. Do not rotate your torso or lift your pelvic bones off the floor.
Hold and alternate swings back with legs bent at the knees
The angle of flexion in the raised knee joint can range from 90 to 110 degrees
This exercise is also performed first statically and then dynamically:
- Lift one leg back, bending it at the knee. Freeze for 25-45 seconds. The height of the knee above the floor should be such that the pelvic bones do not come off the surface. Do not twist the raised limb outward or inward.
- Rest for a few seconds and perform a hold with the other leg.
- Now smoothly do 8-12 lifts with the “first” leg. At the extreme points - on the floor and above, stop and count to 3.
- Repeat an equal number of swings with the other leg.
Important advice. The time of isometric muscle tension and the number of repetitions of any of the movements, for both the diseased and healthy leg, should be equal.
Raising the lower limbs in the Grasshopper pose
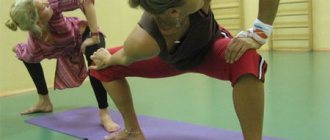
This exercise is a variation of the classic yoga asana - Shalabhasana.
- Unlike the top position in the photo, place your arms along your body;
- Without bending your knees, lift both legs up 10-30 cm;
- spread your legs symmetrically, count to 2, and bring them back together;
- perform 8 to 12 such extensions in a row without lowering your legs to the floor.
Important! These movements can increase blood pressure, so older people will only need to do a few adjustments or refuse to do them at all.
Exercises performed lying on your side and back
The next two exercises are performed in combination.
Leg raise while lying on your side
During the ascent, the knee and foot do not turn out, and the toe does not extend
- Raise your leg to the side and up 40-45 degrees. Freeze for 25-45 seconds, remembering to breathe rhythmically. Perform the leg return as slowly and smoothly as possible.
- Turn around on the other side and perform statics for the other leg.
- Turn around again. Raise your straight leg, but now make 8-14 rotations at the ankle joint in and out.
- Repeat ankle twists on the other leg. Remember that sudden turning movements, even at the ankle, can injure the sore hip joint.
A note to the point. During inversion of the foot, inversion of the knee is also allowed.
"Bridge"
The Setu Bandhasana asana should also be done statically and then dynamically
- Take the starting position as in the top fragment of the photo (feet stand shoulder-width apart). When lifting the pelvis up, ask a relative to control the height of the lift - the hips and back should form one straight line. Freeze in the Bridge position for one to one and a half minutes.
- Lower your buttocks to the floor and catch your breath.
- Now perform 12-16 pelvic lifts. The pace of movements is slow, and at the extreme points, do not forget to freeze and count to three. Inhale as you rise, and exhale as you descend.
- At the end of the exercise, simply lie down with your legs bent, waiting for your muscles to completely relax and your heart rate to return.
A block of exercises for coxarthrosis performed while sitting
The goal of the next exercise is to stretch and relieve tension from the long muscles of the back, buttocks and back of the thighs. After a month of daily one-time execution, your inclination will increase by 2 times, which in turn will help relieve spasms from the muscles of the lower back, buttocks and thighs.
Seated Forward Bend
Yoga asana – Paschimottanasana
This tilt must be maintained as long as you can. Holding the asana for 3 minutes is considered ideal. Try to get closer to the correct execution, which is demonstrated in the photo. If the flexibility of the spine is not enough to even reach your toes with your hands, use a handy object, for example, a tape, passing it through the middle of your feet.
Secret. While holding, take a deep breath and, holding your breath, tense very hard for 10 seconds, and then relax and catch your breath. This difference in muscle tension will cause the torso to lean closer to the legs. Apply alternating tension and relaxation several times.
Flexing the sore leg
In the starting position, sitting on the floor, lean against the wall. Don't bend your back. Spread your legs symmetrically:
- Bend your “sick” leg and place your sole on the floor. Tilt your knee toward the other (inward) with your hands until extreme tension occurs that does not cause pain.
- Holding your breath while inhaling (8-12 seconds), strain the muscles of the bent leg, trying to return it to the “evenly bent” position, and resist this movement with your hands. Then, relaxing your muscles, count to 15 while keeping your knee tilted inward. This hold must be repeated several times, controlling the sensations in the joint.
- Straighten your knee and rest for 1 minute, gently “tapping” the back of your straight legs on the floor, slightly bending your knees.
- Now, grab your knee and pull it towards you until discomfort arises in the hip joint. Freeze in this position for one or two minutes. If pain does occur, then immediately end the hold - you have overdone it. The next day, be more careful with the voltage selection.
Important! These movements can only be performed by people suffering from coxarthrosis in the first stage of development of the pathology. In the later stages of the disease, such exercises can injure the affected joint.