First aid for a hip fracture should be provided as soon as possible after characteristic signs of damage are detected in the victim. This will avoid serious complications in the future, as well as alleviate the patient’s current well-being until an ambulance gets to the scene.
Experts call the presented format of injury one of the most serious. At the same time, the medical care that should be provided to the patient before the arrival of doctors is somewhat different from the standard algorithm for a broken limb.
The main problem with such a deviation is the high percentage probability of significant blood loss. Moreover, it does not matter at all whether it is a closed fracture or an open alternative. In any case, blood loss leads to a stable deterioration in the overall clinical picture.
If you do not help the victim in time, blood loss can amount to up to one and a half liters. Such a large volume guarantees the onset of traumatic shock in the first 10-15 minutes after injury.
General classification
Content:
- General classification
- Help instructions
- Features of immobilization
- Femoral neck fracture
To figure out how best to provide first aid, you will first need to establish a clear localization of the lesion. During an initial cursory examination, even a person far from medicine will be able to “by eye” determine the severity of the pathology, which will allow more qualified assistance in the future.
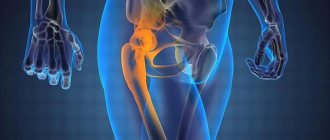
According to statistics, about 6% of all fractures are due to deformation of the femur, which leads to a violation of the integrity of the femoral neck. Doctors call this part of the skeletal system something of a weak link. Especially often, its damage is diagnosed in older people who have experienced a fall.
During the initial diagnosis on site, which allows you to draw up a subsequent program of emergency measures, it is extremely important to pay attention to several characteristic signs of deviation.
If a person is the victim of a femoral fracture, then he will not be able to step on the injured leg, and his knee and foot will be turned towards the healthy limb. The condition will also be accompanied by a pronounced pain syndrome, which will intensify every time you try to make even a slight movement.
If no external breaks were found, as happens with an open lesion, then it is worthwhile to additionally conduct an auxiliary test. To do this, you will have to gently press on the heel area with slight pressure, or tap on the ankle.
If there is a fracture, the patient will experience a new surge of discomfort, which will confirm the suspicions that have arisen. Other typical symptoms include:
- pain not only in the femur area, but also in the joints;
- limited movement;
- a visible change in the shape of the thigh, which is often accompanied by its shortening;
- unnatural mobility in the area of the suspected lesion;
- partial or complete loss of sensation in the peripheral parts of the lower extremities.
If at least one of the listed dangerous signs is detected, you should immediately call an ambulance. And before her arrival, those around him will have to independently try to alleviate the victim’s well-being.
Intramedullary treatment method
Intramedullary technique is another treatment method in which the femoral neck is fused on special pins - rods/wires, which are installed through the medullary canal of each bone fragment. Most often, locking type systems are used - holes for screws are already provided at its ends, which simplifies fixation. Some designs have special bends that stabilize the implant.
Devices for intramedullary treatment are available in semi-elastic and rigid types. They allow you to fix even multiple bone fragments.
Fixation of the pin is performed with or without perforation (pre-drilling of the channel). Like the titanium plate, the rod is removed after complete fusion. That is, surgery is performed twice. The operation to remove the implant is not accompanied by complications and has no consequences both intraoperatively and postoperatively.
Help instructions
Regardless of the type of fracture and its severity with the amount of healthy surrounding tissue affected, the general scheme for providing pre-medical measures remains identical.
It involves four main steps:
- preventing panic;
- anesthesia;
- immobilization;
- transportation.
The first point is especially important, despite the complexity of its implementation. Just to achieve the desired effect, you cannot use local sedatives or alcoholic drinks given “for courage.” Such scenarios will not only aggravate the patient’s general condition, but will also turn out to be the foundation for blurring the clinical picture. It will become much more difficult for specialists arriving at the scene to diagnose the extent and severity of the damage received.
Particular attention should be paid to the behavior of the victim. In this case, crying or swearing are the body’s preferred responses rather than indifference. The latter almost always indicates that a person begins to fall into a stage of traumatic shock, which is an almost impossible task to overcome with improvised means without doctors.
To prevent the spread of painful shock, it is worth turning to pain relief techniques. It is best to use intramuscular injections of an anesthetic spectrum. But they are allowed to be used only after preliminary consultation with the doctor on duty by telephone. It is prohibited to prescribe any medications on your own due to the risks of developing anaphylactic shock or other atypical complications.
The third point of the plan provides for complete immobilization of the affected part with subsequent fixation of the bone structure of the femoral system. This approach is designed to reduce painful manifestations that make themselves felt even with the slightest movement.
Also, correctly performed immobilization can prevent a number of complications that cause bone fragments. The latter is suitable for an open type of fracture with a wound surface and bleeding. Immobilization will help prevent additional tears:
- large vascular highways;
- nerve roots;
- healthy tissues, involving them in destructive processes.
But trying to set bones yourself, or pull out fragments or foreign bodies from a wound is strictly prohibited. Often it is the stuck parts of the bone skeleton and the fragments that get into the gaping wound that act as a blocker for massive bleeding. It would be more effective to simply apply a splint to fix the skeletal system without any chance of accidental movement.
The final point of the strategy must be carried out by professionals who will take care of the most reliable immobilization without consequences for the patient’s health. As soon as doctors arrive at the scene of the incident, they should briefly inform them about the circumstances that led to the tragedy, the current state of health of the victim and the measures taken.
Detailed information collected during the provision of a set of pre-medical measures will allow experts to quickly navigate the situation, as well as build a further action plan.
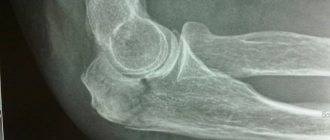
Proximal fractures (injuries to the lower femur)
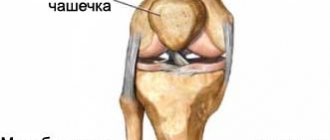
Condylar fractures are the result of a strong direct blow to the knee or a fall from a height. With such an injury, bone fragments are usually displaced and bleeding often occurs. Blood can accumulate in the joint and provoke the development of hemarthrosis. Clinical picture of proximal fractures:
- severe pain in the knee joint;
- severe limitation and pain in movements in the knee;
- swelling of the knee joint;
- deviation of the tibia outward or inward (depending on which condyle is injured).
The diagnosis is made on the basis of x-rays and MRI images of the knee joint.
Features of immobilization
In order to deliver the victim to the nearest hospital due to the inability of the ambulance team to reach the destination, care will have to be taken to create ideal conditions for proper transportation.
The best way to immobilize a victim of a femoral fracture of any type is a Dieterichs splint, adjusted to the anatomical features of the person. But such a version will only work if you have the appropriate medical instruments, so specialized splints are often only used by arriving ambulance doctors.
And already in the inpatient department of the hospital, the splint is supplemented with plaster rings. They are applied to three zones:
- shin;
- hip;
- torso.
Moreover, each ring must consist of at least seven layers of bandage along with a plaster solution. In total, five rings are applied to the victim, three of which are fixed on the unhealthy, diseased limb, and two are left for installation in the torso area.
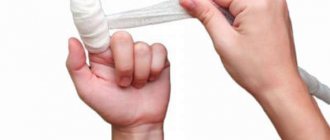
In field conditions, it is unlikely that such assistants will be available, which is why immobilization with ladder splints comes to the forefront in terms of relevance. For first aid, four similar splints will do, the length of each of which should be about 120 cm. In extreme cases, three ladder tools will do.
First, the suitable material will have to be wrapped with cotton wool and bandages to make the base softer. If you don’t have something like this at hand, then even just a clean rag or clothing will do.
The first splint is bent strictly along the contours of the three main parts of the body:
- femoral surface;
- feet;
- shins.
Next, you will need to form a recess for the muscular part of the lower leg and heel area. Separately, you need to ensure that arching in the popliteal region takes place, taking into account the obligatory posture of a slightly bent knee. And the lower end is bent in the shape of the letter “G”.
Such a thoughtful approach will allow you to securely secure the foot with the ankle joint bent, which occurs strictly at a right angle for the convenience of the victim. To complete the work with the first splint, it is necessary to completely cover the entire foot with its lower end. Approximately two centimeters of material should extend beyond the tip of your toes.
Afterwards you are allowed to start laying the other two tires. They are connected lengthwise to each other, and the lower end should follow the curves of the letter “G” at a distance of about 20 cm from the lower border.
The extended splint must be guided strictly along the outer surface of the body, starting from the armpit, and ending with the lower limb up to the foot. To avoid foot drop, you must first position the bottom folded edge so that it completely encloses the foot at the top of the rear tire.
If those around you are lucky enough to have a fourth professional stair splint at hand, then it is mounted according to the vector of the inner femoral plane. The material should be laid from the perineum, leading to the foot. The bottom edge also needs to be folded into an “L” shape to further secure the foot, preventing its anatomical sagging. The edge is brought behind the foot at the top of the lower bent border of the outer extended splint for greater stability. At the final stage, you will need to strengthen everything with gauze bandages.
But sometimes even ladder bus elements cannot be found. In such situations, it would be more productive to make a similar structure yourself from scrap materials while waiting for the ambulance crew. The following is used as a base:
- long stick;
- a disinfected metal strip that does not bend;
- construction board.
Before starting the manipulation, it is recommended to wrap the found tire substitute with cloth or cotton wool with bandages to avoid direct contact of the material with bare skin.
The board should be applied on the outside, starting from the armpits and right up to the ankle. Along the internal plane, the material is placed first in the groin area, and then carried to the end of the lower limb. All parts are methodically tied to the leg and torso itself.
The presented tactics will allow for more or less stable immobilization to the nearest hospital. In addition to the goal of neutralizing pain, applying a splint also works to ensure that there is no possible displacement of bone structures.
Rehabilitation after osteosynthesis of the femoral neck
Any method of surgical treatment involves postoperative recovery. Installation of plates for fractures ( osteosynthesis ) is no exception. The doctor who prescribes and carries out the procedure will advise the patient on the rules for this period. Typically, a rehabilitation program includes:
- special mode (reduced loads on the area in which the plate is installed on the femoral neck , control of movements, movement on crutches);
- breathing exercises;
- physical therapy (passive and active exercises, exercise equipment to maintain leg muscle tone and normal functioning of the musculoskeletal system);
- physiotherapy (magnetic therapy, ultrasound, electrophoresis);
- medicinal baths (pine needles, brine, hydrogen sulfide);
- swimming and aqua-gymnastics;
- paraffin wraps;
- therapeutic massage to activate blood supply to the restored area, normal lymph outflow, prevent swelling, congestion in the lungs, and the formation of bedsores.
The rehabilitation period after osteosynthesis of the femoral neck (connecting fragments using a plate) takes up to 12 months and is carried out under the constant supervision of specialists.