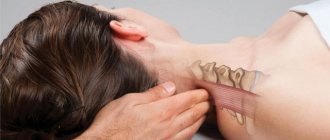
General idea of the post-isometric relaxation method
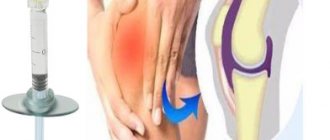
In medical terminology, muscle pain is called myalgia . They can be spastic or prolonged. Therapy for myalgia in the cervical region is most often carried out using medications in combination with one of the methods of restoring muscle tone. Doctors perform surgeries as a last resort.
Postisometric neck relaxation is used to restore muscle tone
To tone the muscles of any part of the body and eliminate pain, use the following types of influences::
- physical therapy;
- physiotherapy;
- manual therapy;
- reflexology;
- various forms of medicines.
The treatment method is selected depending on the factors causing pain. Postisometric relaxation refers to methods of manual stimulation. Manual therapy includes a set of procedures that are carried out through the work of the therapist’s hands on areas of the body that bother the patient.
The essence of the method
The long history of post-isometric relaxation dates back to 1906, when Dr. Puusel, a neurosurgeon, cured the sciatic nerve by stretching it. This formed the basis for the technique later developed by American orthopedists.
It includes a complex effect of the following components:
- sprains;
- relaxation;
- removing excess tone;
- pain relief.
The essence of the method is as follows: soft tissues are stretched smoothly and directionally. Stretching is combined with short-term, minimally intense resistance from the patient with gentle resistance from the therapist. Subsequently, the muscles stretch with greater amplitude and relax. All these steps must be repeated several times during one procedure. .
PIR involves stretching tissues
To ensure that the patient requires a minimum amount of effort, it is recommended to synchronize breathing or gaze direction with the manipulations. This is necessary in order to avoid excessive muscle strain.
Excessive overexertion will aggravate the disease , so when stretched, the patient should only feel tension in the muscles, but in no case a contraction. If pain intensifies during exercise, the method is incorrect.
Over many years of existence, the post-isometric relaxation method has been time-tested and is considered gentle . At the same time, it is highly effective on the muscular-ligamentous apparatus.
The course includes no more than ten procedures, and the duration of one procedure depends on the severity of the disease: on average, it ranges from 15 to 45 minutes.
After a course of treatment, patients experience pain relief, tense muscles relax and blood supply is restored.
Video: “What is post-isometric muscle relaxation?”
How isometric gymnastics helps the spine
how to treat the spine
, knows Igor Borshchenko, who came up with isometric exercises for treating the spine at home. It is simple, safe, accessible and allows any person with spinal column pathology to achieve the best possible results.
Who is gymnastics suitable for?
The branch of medicine specializing in the study of the spine and its therapy is called vertebrology. The main goal is to physically load the back and joints of the body. The specialist’s technique is suitable for different categories of people:
- With age, by the age of 50-60, the joints change, including the vertebral discs, due to the loads placed on the musculoskeletal system. A pathological process occurs in the connective tissue of cartilage. Properly organized vigorous activity helps prevent pathology.
- An overweight person also has back problems. Extra pounds put pressure on the joints, which leads to inflammation or destruction.
- The cause of the disease may be an improperly organized diet, which contains a lot of sweets, or food with the addition of hot spices and herbs. Fatty foods also disrupt the metabolism inside the joints.
- People who, due to the nature of their work, are forced to be in one position, are also susceptible to problems with the musculoskeletal system. The cervical joints react to low activity in their own way: muscles contract, and the functioning of the connective tissue plates deteriorates. They are no longer able to withstand the pressure exerted on the cartilage covering and connecting plates.
- Weightlifters' joints are subject to stress from fast, sweeping movements and heavy lifting. Young athletes do not warm up, but immediately take on heavy loads.
The spine specialist program is designed for those who engage in heavy physical labor and for patients who have undergone surgical treatment of joints or who have been injured.
What is good about Borshchenko gymnastics
Exercises are suitable for the recovery period because they act on cartilage and muscles with low intensity:
- Blood flow in the cartilage tissues is started, so they become more elastic.
- The gap between the vertebrae increases - muscle spasms become less.
- By strengthening the muscles, the “pressure” on the affected vertebral disc is reduced.
- Metabolism increases in the shoulder and other joints, which reduces inflammation.
- Isometric gymnastics returns the vertebrae to their normal position, removing them from a curved state.
The peculiarity of this type of exercise therapy is that few movements are performed, but the muscles are involved in the work. During exercise, the joints are not injured because there is no friction between them. The antispasmodic effect of the training is as follows: the patient tenses the muscles, it contracts for some time, and then relaxes as much as possible.
Borshchenko’s technique, called “smart spine,” has a number of advantages:
- no special equipment or training is needed;
- injuries or overexertion are excluded;
- the spine becomes more flexible;
- training relaxes the entire body;
- the pain syndrome goes away.
A person is able to confront problems because... his resistance to stress will increase.
How to use the system correctly
“A good result in a short time” - this is the postulate of static gymnastics from a popular vertebrologist. The training is aimed at building muscle mass, stretching ligaments (in the good sense of the word), and strengthening tendons. Dr. Borshchev’s method fights diseases of the musculoskeletal system: exercises help get rid of signs of osteochondrosis and symptoms of herniated intervertebral discs.
Static exercises remove chronic muscle spasms and promote expansion of the spinal canal. This gymnastics will strengthen the muscles that stabilize the spine in an upright position.
The duration of the exercise for a beginner is 3-7 seconds, with a gradual increase to 14 seconds, several approaches are done with a short break. The norm for beginners is 15 minutes. It is better to exercise in the morning, because if you exercise in the evening, it will be difficult to fall asleep. Warming up in the form of simple stretches is a mandatory element before gymnastics. Ventilation of the room is one of the conditions of the system. In a stuffy room there is a risk of dizziness.
Watch your breathing - it should be even and slow. Give your body a rest: training five times a week will be enough. After training, a contrast shower will refresh and invigorate you. If pain appears during the exercises, then the exercises should be stopped.
Examples of gymnastic exercises
Training the back and limbs is as follows:
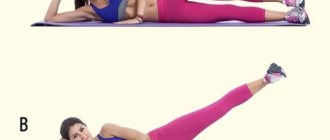
- Lying on your back with your knees tucked in and your feet resting on the floor (with your arms along your body), you begin to strain the abdominal muscles. Then they raise first one hand and then the other up. This exercise lasts from 20 seconds to a minute. Perform 2-3 times with breaks to restore breathing.
- Take a horizontal pose, as in the first option, raise your bent legs to the body and back. Tighten your abs. Three approaches will be enough.
- To strengthen the core muscles, you need to tighten your abdominal muscles, trying to keep the muscles tense. Do it for a minute. After a short rest, repeat twice.
An isometric contraction is a muscle effort when there is no movement in the joint.
Simple exercises will help the spine get rid of pain faster and strengthen it. Before you start exercising, ask your doctor for advice: are there any contraindications to exercise. Author: K.M.N., Academician of the Russian Academy of Medical Sciences M.A. Bobyr
Conditions
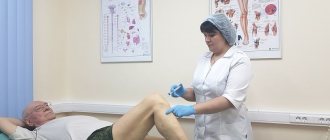
The method of post-isometric relaxation produces an effect on the muscles. During the procedures, muscles are stretched as a result of interaction between the patient and the chiropractor. This can aggravate the pain in some diseases, so there is no way to avoid indications and contraindications.
Indications
Postisometric relaxation of the muscles of the cervical spine is indicated for:
- pain in the muscles of any nature;
- local hypertonicity;
- general stiffness of the cervical spine (most common in older people);
- degenerative-dystrophic changes in the neck;
- regional postural muscle imbalance;
- preliminary relaxation in order to carry out other therapeutic manipulations.
Contraindications
Exposure to the neck area if the patient has certain diseases can provoke complications and thereby cause greater harm to health. Therefore, there are contraindications to post-isometric relaxation procedures.
Exposure is prohibited when:
- pain or its intensification during the session;
- cardiovascular diseases at the time of decompensation;
- pulmonary insufficiency of the second and third stages;
- separately existing vascular pathologies (thrombosis, platelets, etc.);
- fever;
- skin pathologies on the neck.
Rules
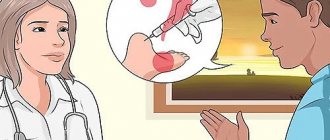
When prescribing a course, the therapist explains its necessity, the possibility of complications and pain during treatment. The patient retains the right to make an independent decision.
There are certain rules in the technique of post-isometric relaxation:
- The exercise begins with moving the joint in the direction of restricting movement; the contracted muscle should be stretched and tense to the maximum extent. The level of increasing pain is a limiting barrier to preparatory movement.
- Muscle contraction is increased by a movement directed towards the most painful area and corresponding to the previous muscle contraction.
- The additional muscle contraction in strength is 30 percent of the maximum. Pain should not be aggravated by even distribution of force.
- A tense muscle should not move due to resistance sufficient to hold it.
- Additional muscle tension is produced from 5 to 7 seconds.
- The tension is replaced by a three-second pause for relaxation.
- Relaxation is replaced by stretching until pain appears, which becomes a new restrictive barrier.
- The entire body, with the exception of the cervical region, should be motionless. To do this, it must be fixed.
- Strict adherence to phase changes is required.
The technique for the cervical spine includes three main phases: isometric tension; isometric relaxation; neck muscle strain .
The PIR technique includes three phases: tension, relaxation, stretching. At the very beginning, at the preparatory stage, a restriction barrier to muscle movement is identified.
Next, while inhaling, tense the muscle for a time period of 7 to 10 seconds. At this stage, the likelihood of pain occurring is low.
Then you need to hold your breath for one to three seconds and take a slow breath. This is the relaxation stage.
After this, the muscle is stretched, the threshold is the pain that appears. It becomes a new barrier.
Exercises must be repeated three to four times . The starting point is a new barrier; under no circumstances should the direction of influence be changed.
Check out some exercise therapy techniques for the neck:
- Gymnastics for the neck of Dr. Butrimov
- Gymnastics for the neck with a pinched nerve
- Gymnastics for the neck according to the Shishonin method
- Gymnastics for the neck using the Bubnovsky method
Exercise therapy exercises for the treatment of cervical hernia, technique of execution
Did you know that...
Next fact
Exercise therapy is an effective way to inhibit the disease , strengthen the muscles that support the cervical vertebrae, and correct spinal deformity. This is an opportunity to get rid of the return of the disease. Classes are conducted under the supervision of a specialist, who also selects an individual set of exercises. Improper implementation will aggravate the disease.
Therapeutic gymnastics for cervical hernia includes the following exercises:
- In a sitting position with your back straight, rest your head on your shoulder as much as possible. You cannot bend it with strong tension; the feeling should be comfortable. Hold the position for a few seconds. Then, without pushing, straighten your neck and repeat the same actions, but in the other direction.
- Same position and take a deep breath. After this, carefully tilt your head back, looking at the ceiling. Fix the position for a couple of seconds and return to the starting position.
- Same position, with a relaxed and straight back, smoothly lower your head so that your chin touches your chest. But do this without tension, do not try to achieve the desired result at any cost. Hold the position for a few moments, then return to the starting position.
- From a sitting position with a straight back, smoothly turn your head in one direction or the other, fixing the position for a few moments. Return to the starting position each time.
Exercises to strengthen the neck muscles
Exercise therapy complex for general strengthening, it is performed lying on a gymnastic mat:
- From a lying position on your back with your arms extended up and your legs together: pull your socks away from you, and then towards you.
- From a lying position on your back with your arms spread to the sides, lying on the floor with your palms down and your legs together: raise your head to your chest, fix it for a few moments and lower it again.
- From a position lying on your side with your arms extended in front of you (palms together) and legs bent at the knees and hips: tilt your head to your shoulder, fix the position for a moment and return to the lying position. Then change sides.
Each exercise is repeated 6-8 times. In case of cervical hernia, they relieve spasm of the cervical muscles, this is a reliable prevention of pinched nerves.
A few more recommendations for general strengthening of the cervical spine
Treatment complex recommended during rehabilitation after surgical removal of a cervical hernia:
- From a lying position on your back, bend your knees and spread them wide, and do not lift your shoulders off the floor. Direct the right knee towards the left heel, then, returning to the starting position, change the knee and heel.
- From a position lying on your back, straight legs closed, arms outstretched to the sides, palms up: leaving the body on the floor, direct your left hand to your right palm. Then change hands.
- From a position on your stomach with your legs straight and closed, your elbows bent, your chin resting on your hands: leaning on your toes and buttocks, lift your right knee with your leg straight. Then take the original pose and do the same with your left leg.
Repeat each exercise 5 times.
There are many other exercise therapy complexes developed by Bubnovsky, Dikul and other specialists in this field. Yoga classes are also useful. All these exercises are effective only if they are performed regularly and for quite a long time. .
Video: “Neck exercise from Dikul”
Postisometric relaxation of the neck muscles at home
Did you know that...
Next fact
Most often, when a doctor prescribes a course of procedures, the assistance of a chiropractor is required. There are actions that patients can perform independently. The complex consists of only three simple exercises; they do not require performance in strictly defined gym conditions. You can also work on stretching your muscles at home.
Execution Rules
Each exercise consists of three phases: tension, relaxation, stretching.
The technique requires strict adherence to the rules:
- When performing movements on your own, you need to resist slightly. The tension must begin at the moment of inhalation. You need to hold it for several breathing cycles.
- Recommendations must be strictly followed in terms of time and number of cycles.
- Overexposure is highly undesirable.
- When resisting, great zeal is not required: you should not fight with yourself.
- The transition to relaxation should be smooth and occur at the moment of exhalation.
- One cycle is repeated several times, with stops for 10-15 seconds.
When performing exercises at home, the principle of “new barriers” is observed: the barrier achieved in the previous cycle is the starting point for the next one..
Video: “Course of post-isometric neck relaxation: technique of execution”
Exercises to do
The complex consists of the following exercises: side bends (first); tilts down (second); “The Singing Snake” (third). Below are step-by-step instructions for performing each of these exercises.
First
Preparation for execution:
- You need to sit up straight, turn your shoulders and lower them.
- You need to tilt your head to the right side and stretch your neck. The other shoulder should be kept straight without lifting it: it should stretch.
- Stay in this position for three breathing cycles.
- Return to starting position.
- Repeat steps 1-4 for the left side.
Step-by-step implementation using the post-isometric relaxation technique:
- The right arm is extended upward.
- Place it on your head slightly above your left ear. It will serve as a support.
- Tighten your neck muscles.
- For three breathing cycles, you must try to straighten your neck and resist this with your hand (do not allow yourself to straighten your neck).
- As you exhale, relax smoothly.
- The head is tilted to the left and lower than at the preparatory stage.
- The right hand should fix the position.
- Hold for two or three breathing cycles.
- Repeat steps 1-8 two or three times with stops of 10-15 seconds. The tilt is each time lower than the previous cycle.
- Repeat steps 1-9 for the other side.
Second
The following condition is required for the entire period: the chin and chest must be kept at a distance.
Performance:
- You need to sit so that your back is straight, your legs are crossed, your spine is tilted forward.
- Lower your chin as low as possible.
A set of exercises for home practice consists of tilting your head and holding the position for two to three breathing cycles.- Smoothly lifting your chin, return the neck to a neutral position.
- Lower your chin no lower than half the permissible distance, raise your arms, touching the top of your head with your fingers.
- The head should press on the fingers, but the fingers should not allow this to happen.
- Resist for two or three breathing cycles.
- When exhaling, relax. Inhale and exhale.
- Grasp the back of your head with your hands, tilt your head, bringing your chin closer to your chest.
- Hold the position for two or three breathing cycles.
- Return to starting position.
- Close your eyes and relax for 10-15 seconds.
- Repeat steps 1-12 two or three times.
Third
- Sit down, straighten your back, relax.
- Open your mouth as wide as possible.
- Exhaling, tilt your head back and keep your mouth open.
- Relax your shoulders.
- With your head tilted as much as possible, close your mouth and clench your jaw.
- Exhaling, return to a neutral position.
- Tilt your head forward.
- Repeat steps 1-7 two or three times.
With these three exercises you can get rid of hypertonicity in the neck muscles.
, , . . . .
These exercises are recommended by major specialists dealing with neck and back problems; they use isometric (non-movement) tension on the neck muscles to strengthen them. As you make each movement, maintain an upright position, the so-called “noble posture.” During the exercise, the head and neck should barely move.
Start by placing both hands on your forehead. Slowly and smoothly move your head forward, while simultaneously pushing it back with the same force with your hands. Gently and gradually increase the resistance, but do not exceed half the maximum force of the muscle tension. Stay in this state for 2-5 seconds and then relax.
Place your hands at the back of the center of your head, interlocking your fingers. Slowly and smoothly move your head back while resisting this movement with your hands. Hold the tension for 2-5 seconds. Put your hands down and relax. You can perform this exercise 2-3 times a week, but it should never cause pain.
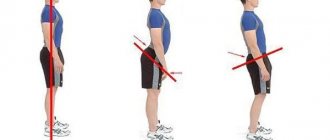
5-Second Posture Check: Sit tall and relaxed.
Whenever and wherever you sit, you should take care to pause briefly and choose the most balanced, comfortable position. Here's how to do it: first, sit up straight, don't slouch. Your buttocks and upper legs should be centered in the seat. Leaning to one side will shift your center of gravity, which will cause tension and restriction of circulation if you remain in this unbalanced position for a long time.
Chair armrests can take 25% of the weight off your lower back and provide stability and support as you change body position.
Avoid sitting on your wallet, car keys, pen, hairbrush, or checkbook.
A study published in Ireland showed that in some cases, chronic back pain completely resolved in male patients after they stopped carrying their fat wallets in their back pockets.
When you sit up straight, your chest and shoulders move forward slightly as you flex your hip/buttocks. This ensures that your buttocks and lower body are centered in the seat. Then smoothly move the upper body to the back of the seat.
If you feel like crossing your legs, do so at the ankles. Crossing your legs at the knees disrupts the proper alignment of your pelvis and can lead to muscle tension and back pain if you don't change this position quickly enough.
Whenever possible, place your feet flat on the floor. Here's another good option: Place one foot on the rung of a chair, or place it slightly forward on a low bench.
To find the best individual sitting posture, first balance your neck position by closing your eyes, gently tilt your head left and right, and then return to the starting position. Tilt your head slightly forward, then back and return to the point that you feel is the center point of the position.
To balance your torso, repeat this exercise, but only with your hips/buttocks.