Neck pain can begin at any age. Almost always they signal that a problem has arisen in the body that needs to be solved. One of the solutions today is rightfully recognized as post-isometric muscle relaxation - a manual therapeutic method that helps get rid of pain and improve the health of the spine.
Postisometric muscle relaxation for the cervical spine
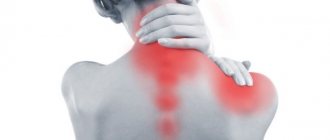
Neck pain and muscle hypertonicity
The cervical area is delicate and therefore most vulnerable. The normal functioning of many departments and systems directly depends on the health of the cervical vertebrae. Many pathologies can occur in them. The cervical area is affected by scoliosis and hypertonicity in the muscle, kyphosis and manifestations of osteochondrosis.
Structure and functions of the cervical vertebrae
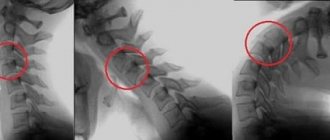
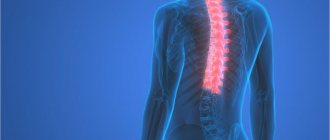
The first indicator of almost any pathology is pain. Neck pain is usually due to displacement of the vertebrae, which disrupts normal function and leads to overstrain of the neck muscles. This gives rise to deep aching or sharp shooting pains.
Pain in the cervical spine indicates existing pathologies
By the way. The body has the ability to self-heal, and if not for the constant hypertonicity of the muscles, the displacement could have been corrected during rest. But this does not happen, and the vertebrae need help to fall into place. Manual therapy helps with this.
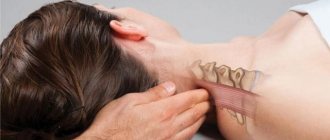
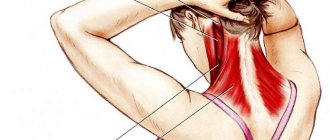
The role of the muscular system in the functioning of the body is very important. It consists of more than six hundred skeletal muscles, different groups of which help a person perform various movements. And for the system to function normally, it is necessary to train and relax the muscles.
The structure of the muscles of the cervical spine
There are many muscle relaxation techniques. Postisometric relaxation is just one of them. Its popularity lies in the fact that the technique is considered soft, safe, uncomplicated and effective.
By the way. This healing technique, under the abbreviation PIR, was developed specifically to solve problems with the spine. It can be applied to any part of it and is aimed at reducing muscle tone, which ultimately leads to the elimination of numerous pathologies.
Rules
When prescribing a course, the therapist explains its necessity, the possibility of complications and pain during treatment. The patient retains the right to make an independent decision.
There are certain rules in the technique of post-isometric relaxation:
- The exercise begins with moving the joint in the direction of restricting movement; the contracted muscle should be stretched and tense to the maximum extent. The level of increasing pain is a limiting barrier to preparatory movement.
- Muscle contraction is increased by a movement directed towards the most painful area and corresponding to the previous muscle contraction.
- The additional muscle contraction in strength is 30 percent of the maximum. Pain should not be aggravated by even distribution of force.
- A tense muscle should not move due to resistance sufficient to hold it.
- Additional muscle tension is produced from 5 to 7 seconds.
- The tension is replaced by a three-second pause for relaxation.
- Relaxation is replaced by stretching until pain appears, which becomes a new restrictive barrier.
- The entire body, with the exception of the cervical region, should be motionless. To do this, it must be fixed.
- Strict adherence to phase changes is required.
The technique for the cervical spine includes three main phases: isometric tension; isometric relaxation; neck muscle strain .
The PIR technique includes three phases: tension, relaxation, stretching. At the very beginning, at the preparatory stage, a restriction barrier to muscle movement is identified.
Next, while inhaling, tense the muscle for a time period of 7 to 10 seconds. At this stage, the likelihood of pain occurring is low.
Then you need to hold your breath for one to three seconds and take a slow breath. This is the relaxation stage.
After this, the muscle is stretched, the threshold is the pain that appears. It becomes a new barrier.
Exercises must be repeated three to four times . The starting point is a new barrier; under no circumstances should the direction of influence be changed.
Check out some exercise therapy techniques for the neck:
- Gymnastics for the neck of Dr. Butrimov
- Gymnastics for the neck with a pinched nerve
- Gymnastics for the neck according to the Shishonin method
- Gymnastics for the neck using the Bubnovsky method
Lack of effect and complications
Not all patients benefit from post-isometric relaxation, even if there are direct indications for its implementation. The missing effect may be due to the following reasons.
- The pre-procedural examination was not carried out in full, as a result of which the existing systemic pathological conditions of the nerves were not identified.
Without a pre-procedural examination it is impossible to carry out PIR therapy - Muscle tone was not analyzed in all muscle groups.
- The relapse of the problematic condition for which the PIR was carried out occurred in a short time.
Postisometric relaxation may not give the expected effect - The chiropractor does not have sufficient qualifications or experience to perform the procedure.
Important! Poorly performed postisometry can lead to muscle microtrauma, intensify the pathological process, increase the level of imbalance and involve other tissue groups in the pathology.
Also, after the manipulation, the following complications may occur:
- pain syndrome increased;
- segments of the spine near the impact area were blocked;
- a spasm appeared when the muscle was stretched (stretch reflex);
- weakened ligaments;
- movements became painful.
After post-isometric relaxation, movements may become painful
There are post-isometric relaxation exercises that can be performed at home. But it is necessary to understand that the use of the three-phase method when performing physical exercises independently does not make such gymnastics a PIR. And you can practice self-relaxation only to prevent muscle tension, and without serious illnesses or problems with the spine. If you experience the slightest discomfort while performing manipulations at home, you should stop them immediately and seek advice from a chiropractor.
Video - Postisometric muscle relaxation (PIR). Methods, mechanism of action, basics of PIR
The method of manual therapy for osteochondrosis of the cervical spine is aimed at improving blood circulation, mobility, and improving blood circulation in tissues. After a course of manual therapy, in most cases, patients note a decrease in pain in the occipital-parietal area, cervical region, and shoulder girdle. However, taking the course is not for everyone. You can view the list of contraindications and learn more about the benefits of manual therapy in the article at the link.
The essence of the method
The long history of post-isometric relaxation dates back to 1906, when Dr. Puusel, a neurosurgeon, cured the sciatic nerve by stretching it. This formed the basis for the technique later developed by American orthopedists.
It includes a complex effect of the following components:
- sprains;
- relaxation;
- removing excess tone;
- pain relief.
The essence of the method is as follows: soft tissues are stretched smoothly and directionally. Stretching is combined with short-term, minimally intense resistance from the patient with gentle resistance from the therapist. Subsequently, the muscles stretch with greater amplitude and relax. All these steps must be repeated several times during one procedure. .
PIR involves stretching tissues
To ensure that the patient requires a minimum amount of effort, it is recommended to synchronize breathing or gaze direction with the manipulations. This is necessary in order to avoid excessive muscle strain.
Excessive overexertion will aggravate the disease , so when stretched, the patient should only feel tension in the muscles, but in no case a contraction. If pain intensifies during exercise, the method is incorrect.
Over many years of existence, the post-isometric relaxation method has been time-tested and is considered gentle . At the same time, it is highly effective on the muscular-ligamentous apparatus.
The course includes no more than ten procedures, and the duration of one procedure depends on the severity of the disease: on average, it ranges from 15 to 45 minutes.
After a course of treatment, patients experience pain relief, tense muscles relax and blood supply is restored.
Video: “What is post-isometric muscle relaxation?”
Physical education - clinics in
Choose among the best clinics based on reviews and the best price and make an appointment
Family
Scoliosis Treatment Center named after K. Schroth
Moscow, st.
Azovskaya, 24, building 2 POM VI/KOM 5,6,7/ET 1 Sevastopolskaya
+7
- Consultation from 1500
- Exercise therapy from 2700
0 Write your review
Family
Medical
Moscow, st.
Arbat, 28/1 building 1 Smolenskaya
+7(495)212-90-98
- Reception from 700
- Neurology from 700
- Physiotherapy from 155
10 Write your review
Family
Medical
Moscow, Maroseyka, 10/1, building 3
Kitay-Gorod
+7
- Reception from 7500
- Manual therapy from 2000
- Massage from 2000
9 Write your review
Show all Moscow clinics
Postisometric relaxation in glenohumeral periarthritis
Periarthritis occurs after injury. The disease often develops without any particular symptoms or causes. Factors in the appearance of this disease also include age over 40 years, hypothermia, a history of osteochondrosis, as well as some congenital pathologies. Periarthritis responds well to treatment with post-isometric relaxation. At the same time, the person feels quite comfortable, since relaxation does not cause strong unpleasant sensations. PIR for glenohumeral periarthritis gives good results in combination with drugs and physiotherapy. Sometimes doctors prescribe physical therapy.
Physical education - specialists in Moscow
Choose among the best specialists based on reviews and the best price and make an appointment
Massage therapist
Zakrevskaya Natalya Alekseevna
Moscow, 1st Lyusinovsky Lane, 3 B. (Medical) +7
0 Write your review
Masseur
Avtandilyan Arsen Alikovich
Moscow, Landyshevaya st., 14, bldg. 1 (Medical)
+7
0 Write your review
Masseur
Pirm for piriformis syndrome
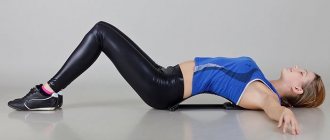
Pain in the case of piriformis muscle syndrome occurs due to pressure on the nerve endings. This problem often occurs in people directly involved in sports and in those who are often exposed to hypothermia. Postisometric relaxation of the piriformis muscle quickly relieves tension, thanks to which a person very quickly gets the desired result. Exercise for this problem. While lying on your back, bend one leg. Get her for someone else. In other words, the affected leg should be bent and lie on the outside of the other leg. With the opposite hand we hold the sore leg and pull it diagonally upward until pain occurs. Next you should tense your leg. Try to return to the original position. Hold for 5 seconds. Next, relax for 3 seconds. Repeat 4 times.
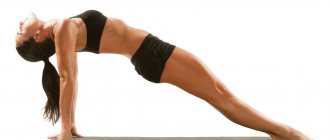
Exercises to relax the neck muscles using the pir method
There are exercises that will relieve discomfort in the tight area. If a person wants to carry out relaxation on his own, he should be extremely careful. An effective and very simple exercise. Sitting position on a chair. The head is tilted to the chest, hands are placed on the head. The head should be pulled back. Try to hold your head with your hands, offering resistance. Press your head down. Hold for 3-4 seconds. Take a break of 3 seconds. Repeat three times.
Exercises to relax the neck muscles
Rib cage.
Exercise 1.
It will help relieve pain in the chest and intercostal spaces in the subacute stage of intercostal neuralgia. It is also useful to do for lung diseases; it relieves discomfort in the heart area.
IP - sitting, preferably on a sofa or chair. The armrest fixes the lateral surface of the pelvis - on the healthy side. The hand on the side of pain is placed with the forearm on the head, the hand is facing down and is held with the other hand.
Exhale evenly and calmly and direct the movement of the sore arm so that the force passes through the most painful area of the chest. The healthy hand serves as a counterweight. Mentally imagine that you are exhaling from the painful half of your chest. Hold your exhalation as long as possible, but not to the point of discomfort. Muscle tension should not be accompanied by trembling. Usually it is enough to hold the tension while exhaling for 7-15 seconds.
Then inhale and at the same time pull the affected hand with your healthy hand. Tilt your torso to the healthy side, stretching your chest (b). Repeat the cycle 3-4 times, gradually increasing the volume of movement.
If the exercise is performed correctly, a feeling of stretching will appear between the ribs, and at the same time the pain will decrease. In this case, there should be no sharp pain in the chest.
Patients suffering from pulmonary diseases can be recommended to perform this PIRM exercise symmetrically, and gradually increase the time of holding their breath.
Exercise 2.
Helps relieve pain between the shoulder blades.
IP - standing, palm behind head, elbow pointing forward and slightly to the side. With your other hand, clasp your elbow joint and place your forearm horizontally (a). Tighten the muscles in the interscapular area and try to move your elbow to the side. Hold this position in a state of static tension for 7-10 seconds. Relax and pull your elbow in the direction of the opposite shoulder (b). A stretching sensation should appear in the interscapular area. Repeating a series of tensions and stretches, pull your elbow towards your chest. At a certain point, the movement in the shoulder blade will stop and switch to the shoulder joint. Try to keep your shoulder in a stable position and work only with the interscapular muscles. If the pain is symmetrical, the exercise should be done alternately with each hand. A good result is achieved if PIRM is performed under a hot shower.
For severe pain, the exercise can be done lying on your back or on your healthy side. In this case, the healthy hand will act as a counterweight.
Head tilts down
Sit up straight with your shoulders turned and down. If necessary, use props to make sitting easy and comfortable, use props: sit on a pillow, place yoga blocks under your knees.
Tilt your head to the right. Don't try to pull your ear towards your shoulder. Instead, lengthen and stretch your neck to the right. Keep the opposite shoulder straight, do not lift it, allow it to stretch as well. Stay in this position for 3 breathing cycles and return your head to the starting position. Repeat the exercise to the left.
Now let’s apply the PIR technique - post-isometric muscle relaxation - to our exercise for relaxing the neck muscles.
1. Phase of isometric tension of the neck muscles. Extend your right hand up and place it on your head above your left ear. Use this hand as a support for your head. Imagine it's a wall. Gently press your head against it, tensing your neck muscles. During 3 breathing cycles, without changing position, try to straighten your head and do not allow yourself to do this due to the resistance of your hand.
2. Phase of post-isometric relaxation of the neck muscles. As you exhale, gently, without jerking, relax, the pressure of your head on your hand stops.
3. Phase of stretching the neck muscles. Tilt your head to the left a little lower than at the beginning of the approach, and fix the new position with your right hand. Hold it for 2-3 breathing cycles.
Repeat the entire exercise on the other side
Observe yourself: on which side are the neck muscles weaker? Where is the volume of traffic less? And day by day, pay attention to the progress achieved in the strength and amplitude of muscle work
Important: When performing this neck relaxation exercise, create and maintain space between your chin and chest. Imagine that you are holding a fragile golden egg from a children's fairy tale at throat level without using your hands.
Lengthen your neck and carefully lower your chin, protecting the imaginary egg. Sit with your back straight, legs crossed and a pillow under your pelvis so that your spine tilts slightly forward.
If you are uncomfortable, you can do this exercise while sitting in a chair. Slowly lower your chin as far as possible, continuing to carefully hold the imaginary golden egg under your throat. Feel the muscles in your neck and shoulders lengthen. Hold the head tilt for 2-3 breaths, then gently lift your chin and return your head to a neutral position.
Sit with your back straight, legs crossed and a pillow under your pelvis so that your spine tilts slightly forward. If you are uncomfortable, you can do this exercise while sitting in a chair. Slowly lower your chin as far as possible, continuing to carefully hold the imaginary golden egg under your throat. Feel the muscles in your neck and shoulders lengthen. Hold the head tilt for 2-3 breaths, then gently lift your chin and return your head to a neutral position.
Then, remaining in the same starting position, lower your chin to half the range of motion available to it. Raise your hands and touch your fingers to the highest part of your head. And again, get ready to use the PIR - post-isometric muscle relaxation technique in exercises to relax your neck muscles.
1. Phase of isometric tension of the neck muscles. Press your head against your fingers as if you want to straighten your neck, but do not allow yourself to do this with the resistance of your fingers. Without changing the position of your head, allow your neck muscles to work with even, moderate effort throughout 3 breathing cycles.
https://www.youtube.com/watch?v=ORXd0H58XUs
2. Phase of post-isometric relaxation of the neck muscles. As you exhale, relax. Take another deep breath and exhale slowly.
3. Phase of stretching the neck muscles. Now grab your head lower, behind the ears. Tilt your head down, let your chin come closer to your chest, and gently, using your hands, help your neck stretch a little more. Keep your neck elongated for 2-3 breaths.
Important: When performing this neck relaxation exercise, create and maintain space between your chin and chest. Imagine that you are holding a fragile golden egg from a children's fairy tale at throat level without using your hands.
Phase of isometric neck muscle tension. Press your head against your fingers as if you want to straighten your neck, but do not allow yourself to do this with the resistance of your fingers. Without changing the position of your head, allow your neck muscles to work with even, moderate effort throughout 3 breathing cycles.
Yoga for weight loss
Yoga for weight loss has a significant effect on the body of every person. Yoga is perfect for burning calories. In addition, exercise improves blood circulation and has a positive effect on human immunity. Yoga is a spiritual process. Each asana carries a hidden meaning. It is very important not only to perform special exercises, but also to breathe correctly during them. All our organs are interconnected and the work of each of them is traditionally worked out in yoga. The impact occurs at a deep level. When working with excess weight, you should pay great attention to concentration, since some asanas require great skill and the ability to maintain balance, which is extremely difficult if you are overweight. Consciously performing asanas for weight loss leads to positive results within two weeks. Depending on the person’s initial weight, the indicators will vary. For example, with severe obesity, the process will occur much faster, since in the first weeks not only subcutaneous fat is shed, but also excess fluid.
It is important to remember that drinking plenty of water and eating right will help you lose weight quickly.
Yoga for stress
People who practice yoga know many asanas that have a positive effect not only on the general condition of the human body, but also have a significant effect on reducing stress. The most basic exercises. Pose "Dog looking at the floor." Performed standing on your palms and soles. The feet point toes towards each other. Trying to keep your back as straight as possible, straighten your legs at the knees. This should create a triangle. The head looks straight at the floor or at the hands. Don't raise your head up. A feeling of relaxation in the neck and back. You only feel tension in your arms and legs. The “lotus pose” is known to many to be effective. A man is sitting on the floor. It is advisable to place a yoga mat or towel under your feet. Legs crossed in lotus position. Hands on knees. Close your eyes and try to press your legs lower to the floor. Hold the position for 3-4 seconds. Take a break. Repeat three more times.
Yoga for pregnant women preparing for childbirth
Yoga for pregnant women has become very popular lately. Pregnant women try not only to preserve and increase their health and the health of their baby, but also to maintain their appearance in beautiful condition. Even a pregnant woman can have a toned body if she works with it correctly. Yoga for pregnant women should be performed with strict restrictions so as not to harm the fetus. You should refrain from exercising if you feel unwell or if your doctor prohibits you from performing certain asanas.
Yoga for pregnant women helps cope with swelling and relieves tension in the back and neck. To achieve significant results, you should exercise regularly. If you feel discomfort during exercise, you should stop exercising and inform your doctor. Sudden movements are completely excluded. All asanas are performed softly and smoothly. Yoga classes should be different for women in the first, second and third trimester. For example, yoga in the first trimester is very similar to classical yoga, while in the third trimester the focus is on opening the pelvis and improving sprains.