Overlay Features
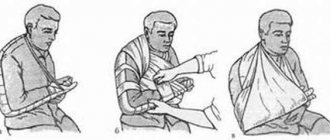
When consulting a surgeon about joint damage, the first rounds of such a bandage are applied just below the damaged area. The principle of formation comes down to alternating circular tours with figure-of-eight movements, as a result of which all the skin over the damaged joint is closed. The procedure can be compared in technology to the use of an elastic bandage, which is applied after a ligament or joint injury.
During the first rounds, the dressing material is stretched so that it does not strongly compress the soft tissue. Subsequent rounds are aimed at ensuring uniform compression of the joint. The latter is applied in a circular manner a little higher so that the stretching of the bandage is minimal, and the end of the bandage is secured with a pin. Unlike the method familiar to many, experts do not recommend inserting the end of the bandage under the previous round. This can cause uneven pressure on the skin and cause persistent pain.
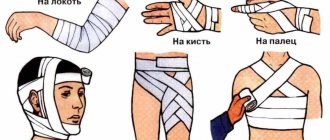
The classic method of applying a figure-of-eight bandage is practiced mainly for the ankle and wrist joints, but this method can also be used for bandaging, for example, the collarbone. The bandaged area will look like a peculiar figure, reminiscent of a figure eight.
Causes of ankle injury
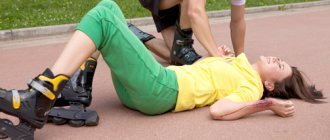
There is a misconception that ankle injury is a professional problem for athletes. In fact, injuries to the ligamentous apparatus are also observed in the everyday life of an ordinary person. Sudden movements, incorrect position of the foot when walking, excess weight, sedentary lifestyle - all this creates conditions for foot injury. Thus, the most common causes of dislocations include:
- sports involving jumping or running;
- wearing uncomfortable shoes;
- walking on wet or uneven surfaces;
- damage to the nervous system, as a result of which a person’s coordination is impaired;
- strong pressure or impact, leading to joint sprain.
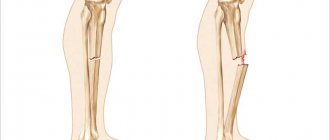
An ankle sprain occurs when the foot suddenly turns inward or outward. This leads to overload of the internal or lateral ligaments and displacement of the bones. In addition, twisting the foot can lead to a sprain or fracture.
How a figure-of-eight bandage is applied to different parts of the body
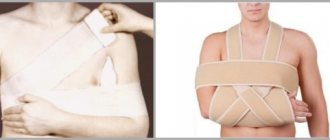
The peculiarity of the figure-of-eight bandage is that it can be applied both to a massive part of the body, such as the chest, and to a small part, such as the eye. In the first case, bandaging begins with securing movements in the lower part. The bandage is then moved across the right side from the back to the top of the left shoulder girdle. The dressing material is lowered down to make a similar turn around the chest. It is fixed in a circular motion around the chest, securing it with a pin.
Application to the eye also begins with fixing it in the area of the eyebrow. The bandage is drawn towards the back of the head and passed directly above the ear, and then slowly rises to the top of the head and closes the injured eye. Then it moves towards the back of the head.
Cross-shaped bandage for the wrist and ankle joints
29.1 Cruciate bandage on the wrist joint
Equipment.
Bandage 10 cm wide, scissors.
Target.
Fixation of dressing material, partial immobilization of the joint.
1. Conduct psychological preparation of the patient. 2. Wash your hands. 3. Wear rubber gloves. 4. Invite the patient to take a position that is comfortable for him (sitting). 5. Stand facing the patient. 6. Hold the head of the bandage in your right hand, the beginning of the bandage in your left. 7. Unwind the bandage from left to right with the back to the surface, without taking your hands off it and without stretching the bandage in the air. 8. Unwind the bandage without forming folds. 9. Make two circular tours in the lower third of the forearm. 10. Move onto the hand, bending around its palmar and dorsal surfaces, and return to the forearm. 11. Having gone around its back surface, repeat similar moves of the bandage several times. 12. Finish the bandage in a circular manner on the forearm. 1Z. Upon completion of bandaging, cut the end of the bandage with scissors along the bandage. 14. Cross both ends and tie around the limb. 15. Check that the bandage is correct so that it securely covers the damaged area. 16. Disinfect used equipment. 17. Wash and dry your hands. 18. Make a note in the appropriate medical document.
29.2 Cruciate ankle splint
Equipment.
Bandage 10 cm wide, scissors.
Target.
Fixation of dressing material and partial immobilization of the joint.
1. Conduct psychological preparation of the patient. 2. Wash your hands. 3. Wear rubber gloves. 4. Invite the patient to take a position that is comfortable for him (sitting). 5. Stand facing the patient. 6. Hold the head of the bandage in your right hand, the beginning of the bandage in your left. 7. Unwind the bandage from left to right with the back to the surface, without taking your hands off it and without stretching the bandage in the air. 8. Unwind the bandage without forming folds. 9. Apply the bandage to the joint with the foot to the shin at a right angle. 10. Make two circular rounds in the lower third of the shin. 11. Place the bandage obliquely on the opposite side of the foot, go around it and move in an oblique direction to the lower leg. 12. Repeat the previous rounds several times. 13. Make two circular tours around the middle of the foot. 14. Return to the shin and secure the bandage in two circular rounds. 15. Upon completion of bandaging, cut the end of the bandage with scissors along the bandage. 16. Cross both ends and tie around the limb. 17. Check that the bandage is correct so that it securely covers the damaged area. 18. Disinfect used equipment. 19. Wash and dry your hands. 20. Make a note in the appropriate medical document.
Headbands
30.1 Circular headband
Equipment.
Bandage 10 cm wide, scissors.
Target.
Fixation of dressing material.
1. Conduct psychological preparation of the patient. 2. Wash your hands. 3. Wear rubber gloves. 4. Invite the patient to take a position that is comfortable for him (sitting). 5. Stand facing the patient. 6. Hold the head of the bandage in your right hand, the beginning of the bandage in your left. 7. Unwind the bandage from left to right with the back to the surface, without taking your hands off it and without stretching the bandage in the air. 8. Unwind the bandage without forming folds. 9. Make circular moves of the bandage around the head at forehead level. 10. Upon completion of bandaging, cut the end of the bandage to length with scissors. 11. Cross both ends and tie around the head. 12. Check that the bandage is correct so that it securely covers the damaged area. 13. Disinfect used equipment. 14. Wash and dry your hands. 15. Make a note in the appropriate medical document.
30.2 Cross-shaped bandage on the back of the head
Equipment.
Bandage 10 cm wide, scissors.
Target.
Fixation of dressing material.
1. Conduct psychological preparation of the patient. 2. Wash your hands. 3. Wear rubber gloves. 4. Invite the patient to take a position that is comfortable for him (sitting). 5. Stand facing the patient. 6. Hold the head of the bandage in your right hand, the beginning of the bandage in your left. 7. Unwind the bandage from left to right with the back to the surface, without taking your hands off it and without stretching the bandage in the air. 8. Unwind the bandage without forming folds. 9. Make two circular passes of the bandage around the head at forehead level. 10. Place the bandage over the left ear obliquely down to the back of the head, then around the neck and obliquely onto the head (behind the ear up), then alternate the above-mentioned moves of the bandage. 11. Finish the headband with two circular rounds. 12. Upon completion of bandaging, cut the end of the bandage to length with scissors. 13. Cross both ends and tie around the head. 14. Check that the bandage is correct so that it securely covers the damaged area. 15. Disinfect used equipment. 16. Wash and dry your hands. 17. Make a note in the appropriate medical document.
30.3 Cap bandage
Equipment.
Bandage 10 cm wide, gauze strip 60-80 cm long, scissors.
Target.
Fixation of dressing material.
1. Conduct psychological preparation of the patient. 2. Wash your hands. 3. Wear rubber gloves. 4. Invite the patient to take a position that is comfortable for him (sitting). 5. Stand facing the patient. 6. Hold the head of the bandage in your right hand, the beginning of the bandage in your left. 7. Unwind the bandage from left to right with the back to the surface, without taking your hands off it and without stretching the bandage in the air. 8. Unwind the bandage without forming folds. 9. Place the middle part of the strip on the crown of the head, lower the ends along the cheeks in front of the ears. These ends are held by the patient or a nursing . 10. Apply two layers of bandage around the head. 11. Then wrap the bandage around the strip and insert it obliquely, covering the back of the head. 12. Next, wrap the bandage around the strip on the other side and cover the forehead area. 13. Repeat the above steps, gradually moving to the crown, and cover the entire area of the arch with a bandage. 14. Finish the bandage by tying the end of the bandage with a strip, and tie the last one under the chin. 15. After finishing the bandaging, check that the bandage is correct so that it covers all damaged areas of the head and at the same time does not cause circulatory problems. 16. Disinfect used equipment. 17. Wash and dry your hands. 18. Make a note in the appropriate medical document.
30.4 Headband “Hippocrates Cap”
Equipment.
2 bandages 10 cm wide or a double-headed bandage, scissors.
Target.
Fixation of dressing material.
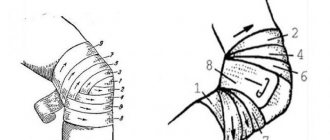
The numbers indicate the sequence of rounds of the bandage when applying the bandage
1. Conduct psychological preparation of the patient. 2. Wash your hands. 3. Wear rubber gloves. 4. Invite the patient to take a position that is comfortable for him (sitting). 5. Stand facing the patient. 6. Hold the head of the bandage in your right hand, the beginning of the bandage in your left. 7. Unwind the bandage from left to right with the back to the surface, without taking your hands off it and without stretching the bandage in the air. 8. Unwind the bandage without forming folds. 9. Prepare a double-headed bandage: unwind the bandage on one side to the middle, and then roll it in the direction of the first half. 10. Take both heads of the bandage in your hands and unwind from both sides of the head, passing over the ears under the occipital protuberance. 11. Grasp the heads of the bandage in opposite hands and return to the frontal area. 12. In the middle of the forehead, cross the bandages and change the direction of the lower bandage by 90°, cover the area of the head through the center of the back of the head, and continue the circular tour with the other head of the bandage. 13. Next, changing the direction, cover the area of the arch with one head of the bandage (or one bandage), and move the second bandage (head) around the head, securing the anteroposterior tours. 14. Upon completion of bandaging, cut the end of the bandage with scissors along the bandage. 15. Cross both ends and tie around the head. 16. Check that the bandage is correct so that it securely covers the damaged area. 17. Disinfect used equipment. 18. Wash and dry your hands. 19. Make a note in the appropriate medical document.
30.5 Bridle bandage
Equipment.
Bandage 10 cm wide, scissors.
Target.
Immobilization of the lower jaw (in case of a jaw fracture, after reduction of a dislocation).
1. Conduct psychological preparation of the patient. 2. Wash your hands. 3. Wear rubber gloves. 4. Invite the patient to take a position that is comfortable for him (sitting). 5. Stand facing the patient. 6. Hold the head of the bandage in your right hand, the beginning of the bandage in your left. 7. Unwind the bandage from left to right with the back to the surface, without taking your hands off it and without stretching the bandage in the air. 8. Unwind the bandage without forming folds. 9. Make two circular passes of the bandage around the head. 10. In the area of the back of the head, apply the bandage obliquely to the side of the neck and under the lower jaw. 11. Cover the jaw and direct the bandage through the cheek in front of the auricle vertically upward to the middle of the parietal region. 12. Next, move the bandage down the opposite cheek in front of the ear to the lower jaw. 13. Make several (3-4) such vertical rounds (do not block the auricle!). 14. After this, move the bandage from under the chin obliquely to the back of the head, and then to the jaw, fixing it. Do several of these tours. 15. Finish the bandage with two circular rounds at forehead level. 16. Upon completion of bandaging, cut the end of the bandage with scissors along the bandage. 17. Cross both ends and tie around the head. 18. Check that the bandage is correct so that it securely covers the damaged area. 19. Disinfect used equipment. 20. Wash and dry your hands. 21. Make a note in the appropriate medical document.
Note.
The victim should be transported to the maxillofacial department of the hospital.
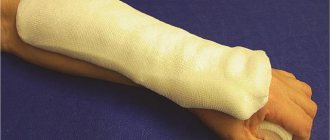
Features of care
A bandage applied in this way requires increased attention. The patient needs to ensure that it remains in place and does not slip, and if this happens, bandage the upper part of the wound without removing the dressing that has already been applied. It is equally important to keep the bandage clean. If a finger is damaged, a special finger cap is put on top of it, and if a hand is damaged, a clean mitten or sterile gloves are put on. If you follow these simple rules, the bandage will reliably protect the wound from infection and help the damaged joint to recover quickly.
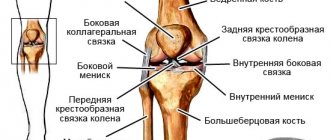
Cruciate ligament injury
The term “cruciate ligaments” refers to the fibers that connect the joints of the femur and tibia. There are two of these ligaments: anterior and posterior, and they keep the lower leg from excessive mobility. Anterior cruciate ligament injury can occur when there is a blow to the back of the leg below the knee. The posterior ligament suffers, respectively, if the blow falls on the front of the ankle. Such impacts and injuries occur most often during sports.
Tears and sprains of other knee joints are less common. The most severe form is considered to be damage to the lateral, medial and cruciate ligaments, accompanied by a meniscus tear.
How can you tell if the bandage is applied incorrectly?
There are several signs that the bandaging was incorrect and should be redone. These are the following signs:
- Blueness of the toes that does not go away even after moving the toes. Indicates that the bandage is very tight and venous blood flow is impaired.
- The toes and the foot itself are cold and pale. A symptom of deterioration in arterial blood circulation.
- The leg goes numb and throbs under the bandage. If such sensations do not go away within half an hour, then the bandage is too tight.
- The leg walks and the bandage falls off. This indicates insufficient immobilization of the ankle. The bandage was not tightened properly or the bandaging technique itself was incorrect.
The presence of at least one of the symptoms requires urgent removal of the bandage.
After this, it is recommended to take a lying position, put your leg on a pillow and massage it a little, this will help normalize blood circulation. After this, the ankle can be re-bandaged according to the instructions and do not forget about the force of compression of the joint with the bandage.
Permissible duration of wearing a bandage
The question of how long elastic bandages should be worn should be decided by the attending physician (traumatologist or orthopedist). The period of time directly depends on how severe the damage is and on the characteristics of the recovery period.
For a first-degree sprain (accompanied by mild swelling and tolerable pain on exertion), the bandage is worn for 7 days. For grades 2 and 3 (pain is severe and swelling is more extensive) you will have to use bandages for about 2 or 3 months. Usually, along with applying bandages, patients are simultaneously prescribed the use of medicinal gels or ointments.
As for daily wearing of the bandage, it should be removed whenever there is an opportunity to rest and give your feet rest. You cannot wear the bandage for more than 12 hours without a break. Ideally, continuous use of the dressing should be reduced to two hours. It is also prohibited to sleep in an elastic restraint.
May be interesting: Arm splint: types, types, features and differences
Selecting a latch
When choosing a corrective, medicated or compression shin bandage for a particular patient, the doctor takes into account the degree of injury. When a ligament is sprained, wearing an elastic brace is sufficient, but when a tendon ruptures, it is necessary to use a semi-rigid and sometimes a rigid product. In some cases, a contraindication is the patient’s individual sensitivity to the materials from which the bandages are made. For example, people with dry skin often experience signs of allergies when coming into contact with synthetics. For such patients, the use of cotton products is recommended. What else does the doctor take into account before choosing an ankle brace:
- anatomical structure of the joint;
- degree of hardness;
- length of the foot, lower leg, circumference of the ankle, ankle, sometimes knee;
- the presence of fasteners with which the degree of rigidity is adjusted.
Soft and semi-rigid orthoses are easily removed, cleaned, and can be worn without a sock, stocking or knee socks. When using hard products, the patient does not have this opportunity. In case of severe injury, immobilization of the leg lasts several days and sometimes weeks.
The use of orthopedic devices has a positive effect not only on the physical, but also on the psychological state of a person. The patient does not need to constantly monitor the load on the ankle joint or monitor the intensity of movements. This allows you to mobilize to fight joint pathology and significantly speed up recovery.
Indications
Elastic bandage
Wearing an elastic bandage may be indicated as a preventive measure for people who constantly lift and carry heavy objects or spend the whole day on their feet. Typically, the headband is recommended for bodybuilders to wear during training. Also, an elastic bandage is recommended for use in the following cases:
- For inflammatory diseases of the joints and periarticular tissues, for example, arthritis, bursitis, periarthritis, tendinitis;
- For osteoarthritis and degenerative disorders in the joint;
- For bruises;
- For dislocations and subluxations;
- When stretched;
- With an ankle fracture.
When the joints become inflamed, their motor activity is impaired and pain appears. With arthritis, pain usually appears in the morning and goes away after sleep. Such a disease must be treated under the supervision of a doctor, otherwise the risk of relapses and complications increases, in addition, the disease can affect other joints over time, destroy them, making a person incapacitated.
With bruises, mild pain appears; a person can step on the leg, but the mobility of the joint is impaired due to swelling. A hematoma may appear at the site of the injury. With dislocations, the pain is more pronounced and can be very sharp. If the ligaments are damaged, a hematoma appears.
When sprained, the pain is sharp and swelling appears in the ankle joint. A fracture is usually accompanied by very sharp pain, it is impossible to step on the leg, it swells greatly and turns blue. In this case, the leg may sag and cannot be moved.
For any ankle injuries, you should definitely consult a doctor, since in some cases serious dislocations pass painlessly, but if the dislocation is not corrected immediately, serious complications will arise. Complicated dislocations are treated exclusively surgically, since they cannot be set manually.
Useful tips
When using an elastic bandage, pay attention to the following points:
- Do not use the product immediately after physical activity. You should give your body a rest for half an hour. This eliminates the possibility of swelling.
- By tightening the bandage as tightly as possible, blood circulation can be disrupted. Therefore, when using the product, the main thing is not to overdo it.
- When applying an elastic bandage, do not rush. You need to approach the task carefully, observing the correct technique.
- When applying the device to a limb, there should be no gaps in the skin or any folds.
- After removing the bandage, the leg should be lightly massaged for several minutes to improve tissue sensitivity and tone the muscles.
- If, half an hour after applying the elastic bandage, a feeling of tingling or pulsation occurs in the limb, the product should be removed. Such effects indicate that the device has been tightened too tightly.