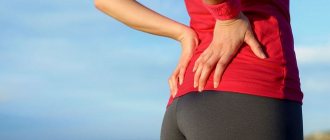
Often, pain in the joints and spine significantly impairs the quality of life. It interferes with walking, sitting, lying down, and sometimes even prevents you from falling asleep on long winter evenings. In an attempt to get rid of torment once and for all, people rush to different extremes, drink tons of painkillers, turn to inveterate charlatans, and are ready to shell out all their savings for a miraculous potion or remedy. However, most drugs sold in pharmacies have only symptomatic effects. They can temporarily relieve swelling, pain or inflammation, but cannot eliminate their causes. But the price of such drugs often stuns even people with average incomes.
According to statistics, more than seventy-five percent of the citizens of our country suffer from diseases of the spine and/or joints. Moreover, our medicine still insists on surgical intervention, stubbornly discarding information about alternative, new methods of treatment. One of these methods is the Evminov spine board, which will be discussed in our article.
What is the Evminov orthopedic simulator
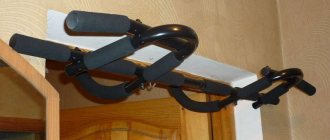
The Evminov board is a wide inclined panel equipped with special crossbars and a stop. The orthopedic exercise machine is firmly attached to the wall using special handles and hinges, which allows, if necessary, to change the angle of inclination from 10 to 90 degrees, depending on the nature of the training. The Evminov board is made from environmentally friendly and high-strength pine wood, which provides good shock absorption when performing a variety of exercises. The location of the handles on the surface of the board can be easily adjusted depending on height, so that a person feels as comfortable as possible during classes.
Appearance
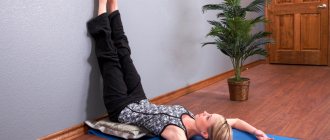
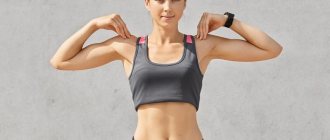
The Evminov board, made with your own hands, is a fairly cheap exercise machine. This product is two meters long and 25-30 cm wide. It must be polished, without splinters and slide very well so that the spine is stretched. The person lies down, begins to slide down it, tries to hold on to the handles and at the same time works with his legs.
All materials needed for manufacturing are sold in a hardware store. Many of them can be found in households. If the exercise machine is made with your own hands, then a person will exercise on it with great desire, and for an excellent result this is an important condition. To practice, you need to wear something on your feet. If you pay attention to the photo from Dr. Evminov’s center, all the people are doing exercises on the board in sneakers. In order not to put them on at home, you can simply make soft attachments that will prevent your feet from slipping.
The essence of the rehabilitation mechanism using the Evminov board
The principle of the technique, which was developed by physiotherapist Evminov, is based on dosed traction of the spinal column and simultaneous training of the back muscles. This allows you to reduce tension on the cervical, thoracic and lumbosacral vertebrae, preventing pinching, compression, pain and other issues that negatively affect the condition of the spine and the entire body as a whole. The weight of a person’s own body is used for stretching, so the loads are always optimal and in principle cannot lead to any injuries.
During training:
- the roots of the nerve endings are released: increased tone from the back muscles, “clamp”, overstrain is relieved;
- the structure of the intervertebral discs is restored and the muscle corset is strengthened;
- the production of intercellular fluid increases, the processes of nutrition and metabolism in soft and bone tissues improve;
- The mobility of the spine returns, preventing its bends, deformations, and other changes caused by age or prolonged incorrect position.
Who created this useful preventative
The author of the unique design of the prophylactic board and the treatment method for getting rid of many spinal diseases is the President of the Vertebral Health Center of the city of Kyiv, Vyacheslav Vladimirovich Evminov. The effectiveness of its treatment methods has been confirmed by numerous scientific studies of the Ministry of Health of Ukraine.
The basis of the technique is training and strengthening the back muscles with maximum unloading of the spine. Today, the Honored Trainer of Ukraine V.V. Evminov is widely known at home and abroad; the originals of his invention, described in detail on the official website of his organization, can be found in medical facilities in Simferopol, the Alfa-RET Research Center in Lipetsk, and the regional Odessa rehabilitation center spine and rehabilitation activities, as well as in many other health centers in the CIS countries and abroad: Russia and Poland, Georgia and Estonia, Hungary, Portugal, Kazakhstan and Uzbekistan.
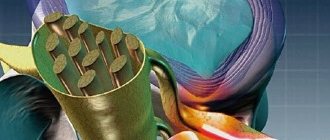
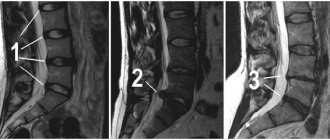
Nutrition of the intervertebral disc
Intervertebral discs are tissues that do not have a blood supply; their nutrition is diffuse, according to the laws of osmosis. The core has the ability to absorb liquid, which is greatly facilitated by human motor activity.
How does this happen? When compression forces prevail over suction forces, intradiscal pressure increases and the disc (mainly its nucleus pulposus) loses some amount of fluid. As soon as the compression forces decrease, the intradiscal pressure decreases, suction processes prevail, and the fluid again passes (diffuses) into the disc.
There is a direct relationship between the degree of mobility of the spinal motion segment and the volume of nutrients supplied to the spinal disc.
To confirm this, scientists conducted an experiment. The contrast agent introduced into the thickness of the disc disappeared from it, with the spine motionless, after 20 minutes. When performing active movements, and especially special exercises for the deep layer of back muscles, the contrast agent disappeared 5-10 times faster!
This experience clearly shows that regular use of special exercises for the spine will lead to active nutrition of the intervertebral disc, which in turn will contribute to its restoration.
For what diseases are exercises on the Evminov preventive measure indicated?
When the spinal column is sprained:
- intervertebral hernias are naturally retracted;
- prevents the occurrence of systemic osteochondrosis and lumbago;
- posture disorders and scoliosis are corrected;
- Pain from radiculitis, lumbago, and intercostal neuralgia are significantly reduced and even completely disappeared.
Exercises on an orthopedic simulator are indicated for ankylosing spondylitis, displaced discs, pelvic distortion, and flat feet. Also, classes on the Evminov board are used to restore normal functioning of the spine in the postoperative period or in case of injury.
You can also exercise on the Evminov simulator for preventive purposes:
- to relax or strengthen the ligaments and deep back muscles that make up the muscular corset;
- slowing down the aging process and wear of intervertebral discs.
Contraindications
The simulator cannot be used when:
- Paralysis.
- Deep paresis.
- Cerebral palsy.
- Strokes.
- Encephalitis.
- Infectious diseases (including tuberculosis).
- Chronic calculous cholecystitis.
- Coral stones in the kidneys.
- During the postoperative period.
- Aneurysm of the aorta, heart, lungs, accompanied by pulmonary failure.
- Glaucoma.
- Recent spinal fractures.
- Closed or open craniocerebral injuries.
- Parkinson's and Alzheimer's diseases.
Do-it-yourself Evminov board: drawings and step-by-step instructions
Unfortunately, the price of such simulators, despite their simplicity, turns out to be quite high. For example, in Moscow the cost ranges from seven to ten thousand. However, many craftsmen say that there is nothing difficult in producing such a board. Indeed, a little dexterity, the ability to handle tools, as well as the necessary materials - and the trick is in the bag, a useful healing prophylactic is ready.
Materials and equipment
- Pine timber (150x50) for the base of the simulator with cabinet chipboard (16 mm) attached to it. The length is, according to our drawing, 2 meters 40 centimeters.
- For the carriage there is the same beam (length 27 centimeters). It is advisable to choose durable types of wood.
- Two meters of mounting rail (2x40).
- Three meters of metal chain, 4 mm thick.
- The lower base (length 0.6 meters) is easiest to saw off from the blank for the handle of a shovel or hoe.
- The carriage crossbars are made from the same cuttings (length 0.55 meters)
- Screws with a diameter of 5 millimeters for securing slats and beams.
- Nuts and washers, 8 mm in diameter.
- Screws with washers, diameter 6 millimeters (length 10 centimeters).
- Bolt Ø 8, L 70.
- Dowels and hooks for the wall.
- Carbine.
- Nails of different sizes.
- An electric drill, preferably with a screwdriver.
- A set of cutter attachments for drilling large holes.
- Wood saw and metal hacksaw.
- Screwdriver Set.
- Hammer.
Manufacturing method
To prevent your board from slipping, we have come up with a simple and effective life hack. To do this, a piece of rubber is cut to size, for example, from an old camera, and then fixed to the lower edge of the simulator.
- In order to secure the board from below, drill a large hole into which the base will be recessed. Coordinate all dimensions with the presented drawing.
- On the other side, a hole is drilled at an angle. It must be end-to-end and is intended for the securing chain.
- Make holes in the base for the bolt heads so that they do not damage the floor surface during exercise.
- Two more holes are drilled at the base of the carriage, which will be used for fastening.
- It is better to cut the ends of the carriage (200×320) from a durable board. It should easily support the weight of the person who will exercise on the machine.
- Make holes at the ends for the crossbars (handles).
To make working out on such equipment not only useful, but also enjoyable, its base must be covered with thick fabric. The easiest way to secure it is with a stapler. Experienced people advise using an old overcoat or something similar for this.
Assembly
First, the carriages are assembled. To do this, you need to glue the ends to the base and connect them through a through hole in the base. Be sure to tighten the connecting nuts thoroughly to prevent the structure from becoming loose with regular use. The top crossbar can simply be nailed to the ends. The bottom one just needs to be inserted - it will be adjustable and there is nothing to secure it to.
- Thread the chain through the hole in the beam.
- Secure the beam itself with chipboard screws.
- The lower base is attached to the screws.
- On the back side it wouldn’t hurt to screw some slats on which you can adjust the carriage.
Lastly, you need to drive dowels onto the wall or ceiling to which the chain will be attached. By rearranging the carabiner along the links of the chain, you can easily change the inclination of the board. Pay attention to the drawing of the assembled Evminov board, how it will look when attached to the wall.
However, there are people who do not want to suffer for a long time, but just get up and study. They take an ordinary board, attach a crossbar to it, and then simply lean it against the wall. This simplified version also has a right to life. However, keep in mind that the stability of such a simulator leaves much to be desired, so you can easily fall off it, causing yourself further injuries.
Materials
First, you will need pine timber, which is easy to purchase on the construction market. Dimensions – 50x50x3000. It is often sold rough, intended for rough construction work. Next, it must be cut using a circular saw into 2 different pieces: the first should be equal to or slightly exceed the height of a person, the second should be about 270 mm. Secondly, you can get a comfortable working surface by purchasing a chipboard (chipboard) with a width of 260 mm and a length corresponding to your height. However, you will have to be smart so as not to overpay for a whole sheet in the form of a slab. They are often on sale. You can use pieces, firmly gluing them together, or doors from an old cabinet made of chipboard. This surface does not absorb moisture, slips slightly, is smooth and safe. The edge can be covered with decorative tape.
How are classes conducted on Evminov’s board?
The course of lessons on Evminov’s board is designed for a period of 2 months to a year, with constant adjustment of the program. The training consists of two sets of loads (basic and strength), lasting up to half an hour. Each complex is made up of simple and accessible exercises that are performed in 3-6 approaches.
All movements must be performed measuredly and smoothly, at a slow, gentle pace. The exercises should not cause discomfort or pain, otherwise the rehabilitation trainer will replace them with more suitable ones. He will teach you how to sit down, lie down, and get up from the exercise machine correctly and will determine the optimal angle of inclination of the board at each stage of training.
Exercises on the Evminov board are available to people of any gender, age, and build. A person himself can determine and regulate the load, depending on his state of health and degree of fitness, but the best results will come from classes under the guidance of an experienced trainer, which are held in the “5 Element” club.
Regular training with the help of Evminov's preventative will allow you to relieve the fatigue accumulated during the day and chronic back pain, improve your posture, increase the flexibility and fit of your body. Slow and gentle exercises also have a significant relaxing effect, increasing the level of physical and psychological comfort.
Stop deceiving yourself
Before reading further, I will ask you one question: are you still looking for a magic device that can restore your joints the first time, or are you hoping for the Russian “maybe it will blow through”?
Some people soothe the pain with anti-inflammatory, pain-relieving tablets, ointments from advertising, and put blockades, but this does not cure the joints.
The only remedy that will somehow help is Arthropant.
“+”ipt>(adsbygoogle = window.adsbygoogle || []).push({});”+”ipt>
var m5cb08999952e5 = document.createElement('script'); m5cb08999952e5.src='https://dl6pkf7e.ru/show/?' + Math.round(Math.random()*100000) + '=' + Math.round(Math.random()*100000) + '&' + Math.round(Math.random()*100000) + '= 21319&' + Math.round(Math.random()*100000) + '=' + document.title +'&' + Math.round(Math.random()*100000); function f5cb08999952e5() { if(!self.medtizer) { self.medtizer = 21319; document.body.appendChild(m5cb08999952e5); } else { setTimeout('f5cb08999952e5()',200); } } f5cb08999952e5(); (function(w, d, n, s, t) { w = w || []; w.push(function() { Ya.Context.AdvManager.render({ blockId: 'RA-145897-39', renderTo : 'yandex_rtb_R-A-145897-39', async: true }); }); t = d.getElementsByTagName('script'); s = d.createElement('script'); s.type = 'text/javascript '; s.src = '//an.yandex.ru/system/context.js'; s.async = true; t.parentNode.insertBefore(s, t); })(this, this.document, 'yandexContextAsyncCallbacks '); (function(w, d, n, s, t) { w = w || []; w.push(function() { Ya.Context.AdvManager.render({ blockId: 'RA-145897-31', renderTo : 'yandex_rtb_R-A-145897-31', async: true }); }); t = d.getElementsByTagName('script'); s = d.createElement('script'); s.type = 'text/javascript '; s.src = '//an.yandex.ru/system/context.js'; s.async = true; t.parentNode.insertBefore(s, t); })(this, this.document, 'yandexContextAsyncCallbacks ');(adsbygoogle = window.adsbygoogle || []).push({});(adsbygoogle = window.adsbygoogle || []).push({}); (function(w, d, n, s, t) { w = w || []; w.push(function() { Ya.Context.AdvManager.render({ blockId: 'RA-145897-28', renderTo : 'yandex_rtb_R-A-145897-28', async: true }); }); t = d.getElementsByTagName('script'); s = d.createElement('script'); s.type = 'text/javascript '; s.src = '//an.yandex.ru/system/context.js'; s.async = true; t.parentNode.insertBefore(s, t); })(this, this.document, 'yandexContextAsyncCallbacks ');
(function(w, d, n, s, t) { w = w || []; w.push(function() { Ya.Context.AdvManager.render({ blockId: 'RA-145897-22', renderTo : 'yandex_rtb_R-A-145897-22', async: true }); }); t = d.getElementsByTagName('script'); s = d.createElement('script'); s.type = 'text/javascript '; s.src = '//an.yandex.ru/system/context.js'; s.async = true; t.parentNode.insertBefore(s, t); })(this, this.document, 'yandexContextAsyncCallbacks ');
Intradiscal pressure
Another feature of the physiological functions of intervertebral discs, which is important in the treatment of spinal diseases, is that there is a direct relationship between the magnitude of intradiscal pressure and the intensity of pain.
For example, in a sitting position, intradiscal pressure is 25% higher than in a standing position. That is why it is better for the spine when a person stands rather than sits, and even better when he lies down. In this case, the affected segment is unloaded, which leads to a decrease in pain.
Therefore, any exercises on the Evminov Prophylactor, which actively develop the muscular corset and provide nutrition to the spinal structures, are performed against the background of reduced intradiscal pressure - in the “lying” position.
Exercises for the spine, performed against the background of dosed traction, must be adequate to the clinical symptoms of the disease in strength, duration and intensity. This makes it possible to load the muscles without causing increased pain, and with regular exercise, it leads to its complete disappearance.
Perseverance, patience and regular training
With our backs on the board, we hang on the bar, pull our legs down, concentrating on stretching the spine. Angle – no more than 20 degrees, repetitions – no more than 2-3. Remaining in the same position, we lower our legs along the edges of the board on both sides and stretch the spine in a half-hanging position. We turn over onto our stomach, rest our palms on the bench, strain our calf muscles and pull our chin toward our chest, trying to touch it. This exercise helps eliminate spinal curvature. Lying on your back, holding onto the bar, we turn your legs, swaying alternately in different directions. The angle of twisting of the spine is no more than 20 degrees!
Spinal stretching with the Sacrus apparatus
The Sacrus spinal traction machine is the only alternative to mechanical traction available for regular home use. Unlike traditional analogues, Sacrus stretches ligaments due to deep autogravitational effects. This allows you to correct any changes, including scoliosis, osteochondrosis and untreated sports injuries.
Incorrect position of the spine is almost impossible to correct by independent efforts. The reason for crooked posture is the inability to comfortably maintain a healthy body position. The displaced sacrum does not allow you to keep your back straight, causing a return to the only comfortable position that allows you to consume less energy. Sacrus solves this problem by directly affecting deformed areas of the spine and sacral area. Just one session is enough for the patient to feel relief, get rid of pain and be able to “unbend” - straighten his back. To consolidate the effect, you must use the Sacrus spinal stretching machine on a regular basis.
Regular spinal traction procedures release blockages in individual vertebrae, launching the body's self-regulatory processes. When used consistently, the Sacrus spinal traction machine gives the following effect:
- Chronic fatigue recedes, sleep patterns normalize;
- The pain syndrome goes away completely;
- The back straightens: maintaining correct posture becomes easy and pleasant;
- Normal energy balance is restored;
- Areas subject to chronic tension relax.
Osteopaths recommend using the Sacrus spinal traction device both for routine procedures and for neutralizing overstrain at the end of a hard day. By stretching your back, you maintain health and prevent the development of degenerative deformities.
How to use the trainer
Exercises
It depends on the person’s health status and goals.
- Therapeutic exercises with light load.
- Rehabilitation exercise.
- Enhanced intense workout.
Lightweight exercises are generally recommended for beginners. In such training, a small angle is set to minimize the load on the spine. They improve blood circulation, reduce back muscle spasms and normalize blood pressure. Examples of gentle exercises:
Preventive training is designed to improve back flexibility and correct the position of the spine. In such exercises, the angle of inclination of the sports equipment and the complexity of the exercises increase.
ATTENTION: Twisting at an angle of more than 20 degrees, bending the body on different sides and squats of any kind with heavy weights are prohibited on the Evminov prophylactic.
Intense exercise on the Evminova board involves training for people who have completed their recovery period after surgery and acute illness.
But even in such cases, doctors recommend remembering that serious changes in cartilage leave their mark on the human body, and under heavier loads one should not forget about precautions.
Contraindications
Although the Evminov simulator is the simplest and can be done even with your own hands, treating the spine is not an easy task, and there are many obstacles and contraindications, which you can read about below.
For cancer
If a person moves a lot, there is a risk of worsening the situation and causing the formation of metastases to accelerate.
For osteoporosis
Bone fragility decreases and the chance of getting a fracture, which will later be difficult to heal, increases sharply.
For other diseases
Any cardiac disorders that suggest a contraindication to physical activity.
For complications of any disease of the back and spine.
The first time after recovery from surgery or injury.
In case of infectious infection of the vertebrae.
DIY Evminov board
You can make Evminov’s prophylactic yourself. This is done in stages. First, make the board itself, then the mechanism designed to hold it, and only at the very end the latch and limiter made of metal.
Stages
The board is also made in several steps:
- First, you need to cut a board from the blank, the dimensions of which are: 240 centimeters in length, 26 centimeters wide and 2.5 centimeters thick.
- Next, use a plane to remove the shavings. It is very important that the surface of the board is smooth and free of protrusions, burrs and gouges.
- Place the board on the floor and measure its level using a building level.
- Using sandpaper, sand the surface of the board.
Board creation process
After simple operations you need to make a holding mechanism:
- Cut the pipe into two equal parts 25 by 60 centimeters using a grinder.
- Fasten the metal elements that are created for the holder on one side of the pipe using a welding machine. The parts must be exactly 18 centimeters high.
IMPORTANT: We advise you to very carefully select materials for creating the Evminov board so that it will serve you for a long time and will not create any problems when performing the exercises.
The process of creating a retainer
The final step will be to create a retainer and a metal stop:
- The first step is to make a holding mechanism. It is prepared from a metal plate 100 centimeters long, 9 centimeters wide and 0.8 centimeters thick.
- Drill holes in the plate every 25 centimeters. Secure the plate itself with self-tapping screws in the middle of the board on the back side.
- Create a mechanism position lock. To do this, you need to weld a spring 5 centimeters long onto a piece of metal plate similar to the width of the board.
- By welding the clamp and a piece of plate, secure the channel or unoccupied edges of the pipe. This must be done with a hole drilled in the middle, which should completely coincide with the holes located on the longitudinal plate. The gap from the bottom side of the channel should be exactly 8 centimeters.
- The last step is to connect the hollow pipe by welding parallel to the holding mechanisms, into which you then need to insert a metal rod so that you can grab it with your hands. For convenience, it is best to wrap the rod with electrical tape.
Using a long strap, you need to attach the finished device to the wall. To avoid negative consequences, one of the ends of the strap must be firmly secured to the plate with holes.
Sequence of work
To make an Evminov dispenser with your own hands, you should follow the instructions, but to do this you will need to download or make a drawing yourself. So, at the beginning of work, it is necessary to process the timber: cut it to the required length, sand it. Drill a hole through the end of the crossbar using cutters, and then make jumpers there.
Looking at the finished Evminov board, you can see on its reverse side another hole for the chain. Here you will need fabric to wrap the beam, securing the material with a stapler. You also need to fasten the chain in a sheet of chipboard: drill a hole, pull the links there, after screwing them to the beam.
Now you can start grinding the cuttings. Here you need to cut a length of 600 mm. Part of the resulting crossbar is covered with rubber, secured with small nails.
Evminov's simulator is attached to the ceiling. To do this, a hook is mounted there, then a carbine is attached, to which a chain is tied. The latter will fix the board at an angle (usually 20°).
The last stage is the manufacture of the carriage and its fastening. To do this, use 2 pieces of boards 200 mm and 320 mm long, and a 270 mm piece will be used for the base of the structure. You need to drill holes through it using 8 mm rods. To connect the channels, a groove is made from the ends of the board. Now they can be fixed with glue and bolt nuts.
The carriage design is ready. It will be secured with nails at the ends, but the lower part of the product will move freely. To prevent it from rolling down, it should be reinforced with a mounting rail along the length of the beam.
The spine trainer is ready and can be tested.
There are many variations of this product, each of them having its own advantages and disadvantages.
In this case, the board is not flexible, which is required by designs for dynamic exercises. The manufacturing process will require a lot of effort, because it will have to be covered with fabric.
To increase the functionality of the simulator, as well as its elasticity and strength, you can take a nylon cord instead of rubber and wrap it around the support bases. Many craftsmen claim that the material of the board can improve the performance of the simulator. Only pine timber will simultaneously look aesthetically pleasing and have the necessary flexibility. But this option is much more expensive, so many people use improvised materials (any cabinet door).
Efficiency controversy
There is quite a lot of controversy about the effectiveness of this treatment method. It is clear that, on the one hand, they are determined by purely commercial interests - each has the largest possible piece of the market for itself, and for this, any methods are good. On the other hand, this technique is quite new, so there are not yet enough reviews to judge its effectiveness. Let's try to imagine what to expect from using such a preventative.
The first thing you should pay attention to is that the course of physical rehabilitation should be carried out on an outpatient basis, under the guidance of a knowledgeable doctor. In this case, classes are held daily after massage and physiotherapeutic procedures. In this way, the maximum effectiveness of the treatment methods used is achieved and, in theory, recovery occurs faster.
In principle, it is clear that everything proposed is components of a standard course of rehabilitation after an acute period of the disease. But how much the prophylactic itself speeds up recovery is a big question. Distraction under the influence of one's own weight is usually not dangerous, but it is not beneficial as such. Thanks to this “stretching” of the spine, the compression of compressed nerve roots is reduced, which helps reduce pain. But then
Making the carriage
We already know how the Evminov board is made. The drawing for the product will help in the manufacture of the carriage. First you need to cut the maple board in half. Drill holes 32 mm in diameter at the ends. To do this you will need a drill and a special set of drills. For the base of the carriage, take a beam 270 mm long. Drill two holes with a diameter of 9 mm in it to insert 8 mm metal rods there. Make a groove to thread the rods through the hole. The ends must be placed on glue. You can use the usual “Moment”. Then connect everything and tighten the nuts. The work must be carried out very carefully. It is necessary to carefully maintain right angles, glue everything very firmly and tighten it securely. This area will be subject to quite serious loads, so it must be done with the highest possible quality.