Making a Glisson loop yourself at home
It is quite possible to sew a Glisson loop with your own hands at home.
Traction loop (Gleason loop) is a hardware simulator that is designed to stretch the spine. You can buy it or make it yourself. The device can be used in a lying, sitting and standing position. It is used to treat pathologies such as:
- osteochondrosis;
- osteoarthritis;
- scoliosis;
- herniated intervertebral discs;
- other disorders of the spinal column.
Sewing a simple Glisson loop
To make a traction loop yourself, you will need a drawing of the device, which is easy to find on the Internet.
The design of the loop can be as simple as possible. There is no need to create a pattern in this case. Such a device consists of dense belt tapes (slings) or other dense, but elastic and elastic fabric. To make the simplest Glisson loop, you will need 2 strips 7–10 cm wide and up to 50 cm long, tapes up to 2 cm wide and a rope.
The design is a bandage bandage. On each of the ribbons at the ends it is necessary to form loops; for this, 7–10 cm are folded on both sides and secured with tailor’s pins. For stitching, use the “X-box” seam (“window” with a cross of diagonals). To do this, step back 0.6 mm from the edges of the folded tape and draw a square or rectangle depending on the width of the tape, the sides of which should not be shorter than 5 cm.
To facilitate the stitching process, both the window and the intersection of the diagonals can be drawn with a pen or pencil. The ribbons must be connected to each other with laces or narrow slings about 75-80 cm long. The ends of the laces (ribbons) must be sewn together, forming rings. Before sewing, the laces can be pulled through metal rings to attach the hanging rope, or they can be fastened with one ring of narrow sling.
One of the strips must be sewn to the lace (ribbon) and remain in a stationary position. It serves as a support for the back of the head. The second strip will hold the chin, it must be left movable. You can attach pieces of wide elastic or adjustable straps between the strips to make the design comfortable and not slip.
Making a pattern
There is another option for how to make a Glisson loop yourself. In this case, you cannot do without a pattern. Its scheme is quite simple, but construction will require some skills. To make a traction loop, an elastic dense fabric is taken, the width of which is equal to the width from the chin to the condyle of the occipital bone. The length of the cut is measured from crown to crown through the chin. The design narrows towards the ends, and in the center there is a figured cutout for the head and ears.
The occipital part may have semicircular protrusions reaching the chin, to which adjustable straps or strips of wide elastic are attached for more comfortable and reliable fixation of the device on the head. This is especially important for full hangs. For fixation, you can also use textile Velcro fasteners.
For convenience, the design should be lined with soft fabric. Thin pads can be placed in the area of the chin and back of the head. The edges of the product must be covered with hard fabric, bag tape or a strip of thin leather to avoid stretching the traction loop during use. To assemble such a product, you will need a special walking foot or Teflon foot, with a roller for stitching leather and its analogues.
At the narrow ends of the product, loops are made using an “X-box” seam, after having previously inserted large metal rings into them. For this type of device, you can additionally use a straight clothes hanger made of stainless steel, to the ends of which hooks or laces are attached for hanging a Glisson loop.
You can make a similar design yourself from available materials: steel rod, wood.
The Glisson loop is an effective design for the treatment of spinal diseases
Home » Methods » Glisson loop - an effective design for the treatment of spinal diseases
The risk of damaging the vertebrae of the cervical spine, for example, with aging and wear and tear of the body, a high risk of injury and other unfavorable factors, increases significantly.
In this case, the Gleason loop will avoid the development of pathological changes in the spine. This device is easy to use at home; regular exercises will relieve the patient of the need to regularly visit doctors.
What is the design
The classic version of the Glisson loop is a strip of dense but elastic material, equipped with slits for the ears and covering the head at the very bottom, chin, sides and back of the head. The reinforcement is attached to the very ends - with a heavier load, fixing it on the simulator. The straps themselves can be secured with a lock or Velcro.
On the market you can find a variety of modifications of the Glisson device - with a spring mechanism and weighting, which will allow you to treat and correct problems not only with the cervical, but also with the thoracic and lumbar spine.
Mechanism of action
As the patient uses the Glisson loop, the vertical diameter of the opening between the vertebrae increases.
Due to this, compression of nerve endings is relieved, swelling is eliminated and the patient’s general condition is alleviated. In the process of stretching the segments of the spine, high muscle tension is also reduced, the load on the tendons is relieved, as is the excessive excitability of various parts of the central nervous system, which occurs with pathological pulsation of the muscular frame supporting the spine.
Pulling can be either horizontal or vertical, and can be carried out in water, most often in a pool or without it, with or without weights. It all depends on the diagnosis, diagnostic results, and doctor’s recommendations.
Purpose of the device
Stretching the vertebrae in the affected parts of the spine using a Gleason device is indicated in the following cases:
Existing contraindications
Doctors call the following contraindications:
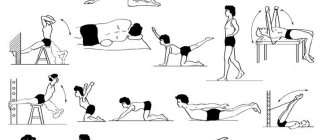
Set of exercises
Partial hang.
In this version of the exercises, it is worth considering that the weight in this case, the weighting should not cause discomfort and pain. After fixing it on your head, you should smoothly and without sudden movements bend your knees by a third of your body weight, gradually lifting them off the floor. Jumping during the exercise is prohibited. After 3-5 seconds, return smoothly to the starting position. At the very beginning, you should do no more than 3-5 squats, gradually increasing the number. When practicing partial hanging, you can supplement it with exercises to train the muscles of the spine. The latter are selected by the doctor, but in any case, you should listen to your body - if you feel dizzy or feel ill, stop the exercises.
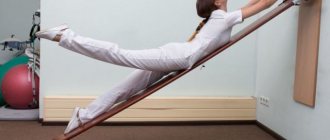
Full hang. Perform the exercises at a moderate pace - bend your knees smoothly and without sudden movements and lift your body off the floor. Stay in this hanging position for a certain period of time - the time can vary from 5-10 seconds. and up to the minute. But no more than 3 times a day.
Assembly of the structure
To use the traction loop in a lying position, it is enough to install 2 hooks yourself on the floor or other flat hard surface, to which the device is attached. Ideally, the surface should be inclined so that the spine extends under its own weight.
If you plan to use a Glisson loop for vertical stretching of the spinal column, you need to figure out how to make a suspension for it. You need to calculate its length yourself. To do this, you will need a diagram taking into account the selected support point. Usually the support is a door leaf, a wall bars or a horizontal bar.
You can make a hanging hook yourself; for this you need to select a suitable metal that can withstand the weight of a person and not deform.
Typically, the Gleason design drawing provides for 2 methods of spinal retraction: under the influence of a load and with the help of the patient’s own hand. To do this, attach to the upper ring:
- A suspension consisting of a section of rubber cord - a shock absorber, to which the rope is attached. A leather strap with holes for hanging the load is sewn to the end of the latter.
- A rope to which a piece of rubber shock-absorbing cord is attached; a loop of waist tape for the arm is sewn to it.
It is important to securely fasten the parts of the product.
The rope and rubber cord must be strong enough to support the patient's body weight. Instead of a rope, you can use a thin cable or strong rope.
Description
This is one of the hardware simulators with the help of which traction (extension) of the spine is carried out. This device is easy to use, can be used independently, does not require the participation of other persons during installation, is affordable, and is usually available in any medical centers, dispensaries, and even massage rooms. The Glisson loop is named after an English doctor who lived in the 17th century and proposed using his invention for medicinal purposes.
Manipulation can be carried out both in a horizontal position on a special bed, and in a vertical position, sitting on a hard surface. The first method is used exclusively in medical institutions, since special devices for fixation are required. The second can be done at home.
How to choose
Modifications of the Gleason loop
Designs may vary in size:
- for small children;
- for teenagers;
- for adults.
Fastening strips on the back of the head and chin
Glisson loops, which are strips for fixation on the back of the head and chin.
A belt or cable goes up from them, attached to the hook of the room door. This design has a block through which a cord with a free end is passed. Spinal traction is carried out by the patient pulling this end down.
You can increase or decrease the tension by adjusting the degree of force.
A prerequisite for traction is smoothness and movement without jerking. A spring is provided for this purpose.
If the patient seeks help from a medical institution, he will encounter another version of the simulator. This modification can not only treat, but also be used to prevent osteochondrosis.
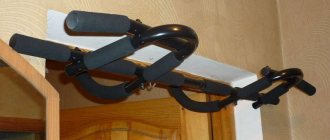
Glisson slings
They have a block, a door fastener, and a spring in their device, which is not found in Glisson hinges.
Slings are an addition to the main simulator. They allow you to treat not only the cervical, but also the thoracic and lumbar regions. It is also used for prevention.
The slings are two strips. One is placed on the torso, where the iliac bones are, and the other under the ribs.
The strips are attached to the exercise machine. As a result of stretching, the forces are in opposite directions - the upper strip moves towards the head, and the lower towards the feet.
Where to buy and cost
You can purchase a Glisson loop in online stores, pharmacies or specialized places.
The price depends on several factors - the model, the presence of a weighting agent, material, etc. A simple design will cost from 3,100 rubles, with traction - from 3,400 rubles.
Buy on Aliexpress =>>
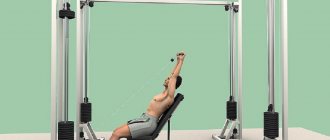
How does the Gleason loop device work?
A person sits down and puts on a Glisson loop, suspended on a hook using a strong rope or cable, at the other end of which a load is attached. At home, you can use a bottle of water or sand or pebbles. The weight must be previously calculated by a doctor. The weight goes down and traction is carried out. The chin is fixed with a wide panel.
An even simpler option is to do without a load and pull the free end of the strap by hand. In this case, you need to carefully monitor the sensations and perform the movement smoothly, without jerking. If pain appears, it means that the exercise is being performed incorrectly and should be stopped immediately.
Preparation for execution
The optimal time for traction is in the evening, about 1.5 hours after dinner. After completing the procedure, it is advisable to immediately go to bed. You need to lie on your back without a pillow at all or purchase an orthopedic one so that the stretched neck does not return to the reverse curved position.
Before starting, it is necessary to warm up the muscles of the neck and upper spine so as not to injure them. To warm up, apply a warm heating pad or heated towel for a few minutes, then perform a light massage and rubbing the muscles.
You may feel a little dizzy during the process. This is explained by the fact that the vessels were freed and began to allow more blood and, accordingly, oxygen into the brain. If the dizziness does not increase and remains at an acceptable level and does not cause discomfort, then everything is fine.
Recommendations and precautions
1. All movements should be performed slowly and not cause discomfort.
2. In the first week after classes, painful sensations may appear in the muscles of the neck and jaw due to their stretching. They should go away by the middle of the second week. If pain persists, consult a doctor.
3. When performing the procedure without a chair, in full or partial hanging, you need to squat smoothly and carefully, controlling the weight. The load should last from 5 seconds to a minute, depending on fitness and well-being, followed by a return to the starting position.
4. It is optimal to conduct 1-3 classes per day.
5. You can carry out the procedure in a special hard collar-collar, quilted with cotton wool, and also wear a mouth guard - this will reduce pain in the neck and jaw.
How to use the simulator, basic recommendations and rules
The classic traction loop is a strip of dense material with ear holes that fits the chin, sides of the head and the back of the head. The end of the strip is secured and tensioned using a weight or other similar method.
The device is made of dense fabric, which has a rigid fabric or leather edging on the sections that prevents the loop from stretching. The inside of the product is often covered with a soft layer, and the straps are fastened with Velcro or locks.
Loops come in a variety of sizes and modifications depending on the indication for use or patient characteristics. There are also different types of traction: vertical and horizontal, dry and water. But most often vertical dry is used.
The most optimal time for traction is in the evening, before bed, at least an hour and a half after the last meal.
Warm up your neck and upper spine muscles first to avoid possible injuries. You can warm up the muscles with a heating pad or a heated towel, or perform a light massage.
Method 1
Full hang:
- The patient performs all the necessary steps to comfortably attach the device to the head.
- After this, you need to smoothly and slowly begin to bend your knees until you feel maximum stretching of the cervical spine, then lift your knees off the floor.
- Depending on your preparation, you should be in this position for 5-10 seconds to 1 minute.
- Straighten your legs and return to the starting position.
- You can repeat the exercise 3-4 times or more depending on the patient's level of training.
You may feel dizzy during the exercise. This suggests that the vessels have become free and begin to allow more blood and oxygen into the brain. If dizziness does not cause discomfort and does not increase, this is a completely normal reaction and there is no need to worry.
Method 2
Partial hanging - used to relax the neck muscles and automobilize:
- Attach the devices to your head.
- Gently bend your knees to a third of your body weight.
- Secure your body with your arms, for example, by placing them in a doorway.
- Perform exercises on the muscles of the cervical spine: smoothly rotate your head from side to side, bend back and forth.
- to the starting position.
- Repeat 2-3 times.
During the first sessions, discomfort or pain in the jaw and neck may be observed for 7-10 days. This is normal until the muscles get used to this kind of load.
After completing the procedure, it is recommended to immediately go to bed, lying on your back without a pillow or using a special orthopedic pillow. This is necessary so that the effect of the loop is consolidated and the neck does not return to a curved position.
1. All movements should be performed slowly and not cause discomfort.
2. In the first week after classes, painful sensations may appear in the muscles of the neck and jaw due to their stretching. They should go away by the middle of the second week. If pain persists, consult a doctor.
3. When performing the procedure without a chair, in full or partial hanging, you need to squat smoothly and carefully, controlling the weight. The load should last from 5 seconds to a minute, depending on fitness and well-being, followed by a return to the starting position.
4. It is optimal to conduct 1-3 classes per day.
5. You can carry out the procedure in a special hard collar-collar, quilted with cotton wool, and also wear a mouth guard - this will reduce pain in the neck and jaw.
The straps are attached in two ways:
- With fixation on the chin;
- With fixation at the back of the head.
The procedure requires little preparation:
- Stretch your neck muscles. Do some simple warm-up exercises. This can also be done by massage or applying a heating pad. If you experience slight dizziness, do not be alarmed; you need to pause the exercise for a while;
- Check blood pressure;
- Fasten your head to the straps;
- Install the weight and secure the simulator;
- Gradually begin to squat so that you feel a stretch in the neck, which should not be accompanied by pain or other unpleasant sensations;
- Stand up. Wait a few seconds;
- Repeat squats 3-4 times.
The procedure should be carried out a maximum of 2 times a day, morning and evening, between meals.
Standing exercise
In some cases, it is possible to use the simulator in a supine position.
Important rules to follow during traction:
- Do not make sudden movements;
- Repeat the exercise no more than 2 times a day according to doctor’s indications;
- The exercise should not last longer than 1 minute;
- If the patient suffers from hypertension or his condition is not stable, when there are contraindications for outpatient treatment, this traction procedure is prescribed in a hospital setting.
Diagnostics
The following manipulations will help determine whether it is necessary to use traction using a Glisson loop:
- Ask someone to place one hand on the back of the head, the other under the lower jaw, and gently pull the head up as gently as possible. If relief is felt, the method can be used. If it becomes painful or uncomfortable, then you shouldn’t.
- Press down on your head from above, just as gently and smoothly. Traction is indicated if the patient experiences discomfort.
- Be sure to take a photo of the area of concern.
Indications for use
Spinal traction using a Gleason loop can be used for the following indications:
- osteochondrosis of the cervical (less often thoracic) spine (this is familiar to the vast majority of office workers, those who lead a predominantly sedentary, sedentary lifestyle);
- scoliosis of varying severity, congenital or acquired;
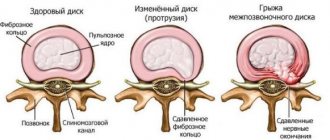
- protrusions of any etiology, not accompanied by pinched vessels and/or nerves, not progressive, without additional complications;
- intervertebral hernia;
- chronic pain (aching or nagging, but not sharp, sharp) and/or neck deformation resulting from spinal injuries;
- the need for rehabilitation after surgical operations of varying degrees of complexity;
- constant spasms or a feeling of muscle stiffness, numbness of the arms, shoulders, resulting pain, problems with neck mobility;
- subluxations of the cervical vertebrae, bulging vertebral discs in this area.
In each case, it will not be possible to get by with Glisson loop traction alone. To get rid of the problem, an integrated approach is required, including physical therapy, physiotherapy, and other measures prescribed by an orthopedist.
The main indications for the use of the Glisson loop are osteochondrosis, scoliosis, protrusions, intervertebral hernias
The simulator is also used during the rehabilitation period after surgery.
This is an effective prevention of chronic pain resulting from spinal injuries.
Is it possible to make a device?
How to make a Glisson loop at home? Many people ask this question.
In essence, it is just a bandage made of dense fabric, preferably elastic and springy, tapering towards the ends and with a cutout in the middle. Therefore, it is quite possible to make the device with your own hands. The loop should be wide enough to secure the chin and the back of the head. It is better to sew elastic bands or straps to the area of the bandage under the ears to connect the pieces of fabric between the jaw and the back of the head. This is done so that the bandage does not move from the back of the head.
You can do it even simpler - take two strips of fabric about the width of your palm and about 25 cm long, sew them up at the ends, thread two laces - and the loop is ready. If necessary, the laces are tied at the top of the head. The angle between the stripes on the chin and the back of the head should be approximately 45 degrees. Is a pattern necessary for such an apparatus as the Glisson loop? Such a product can be sewn without a pattern; it is enough to have an example before your eyes.
Next you will need straight hangers for clothes. You need to drill holes at the ends and attach ropes or straps in them that hold the loop itself. They must, of course, be strong enough to support your body weight. This is not the best option, but you can use it.
It would be more convenient to make a hook from thick wire or a metal rod, attach it to the door, and hang a Glisson loop on this hook.
The downside is that metal of such strength is very difficult to bend as needed. But, in the end, you can find suitable metal for the device in hardware stores.
Here's how to make a Gleason loop at home.
How to make it yourself
It is not difficult to sew a Glisson loop yourself. Instructions for its manufacture:
- Take two strips of dense fabric about half a meter long and 8-10 cm wide. Fold and hem the edges so that loops 2-3 cm wide are formed.
- Thread laces approximately 80 cm long into them. They must be strong enough to hold a load of the required weight and not stretch under its weight.
- Pull their ends through a metal ring and sew them together.
- Sew one of the strips to the laces to create support for the back of the head. On the second, free one, the chin will rest.
- Connect the strips with 3-4 pieces of wide elastic or straps.
A homemade Glisson loop is not the best option compared to those that can be purchased in orthopedic salons and pharmacies. Doctors recommend using it only as a last resort, in the absence of an alternative. And it’s better to sew with a sample in front of your eyes, at least a picture, to imagine what a real Glisson loop looks like. Otherwise, such a “makeshift” device can seriously damage the spine.
Contraindications
Under no circumstances should you use traction at home, especially while hanging, in the following cases:
- diseases of the spine in the acute stage;
- weakness of intervertebral discs, cartilage;
- pregnancy;
- severe vegetative-vascular dystonia and disorders of the cardiovascular system;
- lesions of the vestibular apparatus;
- old age from 70 years;
- hypertension 3 degrees;
- spondylosis;
- the presence of neoplasms, both malignant and benign.
What is the Gleason loop used for?
The Glisson loop is a soft simulator for stretching the cervical vertebrae under load. Naturally, it is used for the prevention and treatment of diseases of the upper spine - cervical and thoracic. It is no secret that our spine daily receives serious static loads, which over time can lead to osteochondrosis, displacement of the vertebrae, the appearance of protrusions between them and hernias. However, these consequences can be avoided if you periodically restore blood circulation between the vertebrae and relax the muscles. It is for these purposes that the Glisson loop is used, which allows you to “hang” your head to a crossbar or horizontal bar and relax the neck muscles under load.
The trainer is a fabric collar that hangs on a carbine and works both with and without a load. Without a load, the loop gives the effect under the influence of the gravity of your own body and is regulated by the step of the loop tension. If you use a weighted exercise machine, then in contrast to the collar you create a load with your hands or a third-party heavy object (behind your back).
Indications for use
The Glisson loop can be used both under the supervision of a doctor and at home. Indications for use of the simulator are:
- osteochondrosis of the cervical and thoracic spine;
- protrusion and hernia between the vertebrae;
- protrusion of vertebral discs in the neck;
- atrophy of the deep muscles of the neck.
What is
A Glisson loop, also called a traction loop, is a fairly wide strip of material, sufficient to wrap around the chin from below, the back of the head and the sides of the head (approximately to the level of the temples). It is sewn from dense fabric, additionally “reinforced” on the sections with a stiffer leather edging so that the product does not stretch. Inside the Glisson loop there is a strip of soft material (fleece, flannel) - this ensures the comfort of its use and prevents the item from rubbing the skin upon contact. There are also slits for the ears.
Glisson loops are made for children, teenagers and adults. You can individually “tailor” them to your needs using straps secured with locks or Velcro. The adjusting straps are connected at the bottom, in the neck area. There are models with elastic bands that independently “adjust” to each person, but they quickly become unusable - the ties simply stretch and no longer provide the necessary tightness.
In addition to the Glisson hinge, a hook is included that allows you to attach it to a door or something similar, and a block. When it is put on correctly, it securely fixes the cervical spine. On one of the straps, thrown over the block, a load is hung, located relatively low above the head. Its mass, height and time spent in the “simulator” ensure traction of the spine in Glisson’s loop. At the same time, the neck seems to overcome the resistance of the load.
Knowing what Glisson loops look like and what they are used for, it is not difficult to understand. Spinal traction reduces pressure on the intervertebral areas and discs. As a result, the patency of blood vessels is restored, which is necessary to supply organs and tissues with oxygen, chronic muscle spasm is relieved, and ligaments are strengthened. A pleasant “bonus” is improved vision, memory, and ability to concentrate.
Exercises with the Glisson loop are not prohibited from being done at home. But this is only possible after consultation with your doctor and several sessions in a hospital or rehabilitation facility in order to understand the method of its use and master the technique of implementation. You also need to “adjust” the loop to suit yourself, which is also carried out by a specialist.
The Glisson loop is made of dense fabric, duplicated on the sections with a rigid edging
Additionally, the loop comes with a hook that allows you to secure the product.
The main purpose of the medical device is spinal traction
Glisson loops are manufactured for children, adolescents and adults
Instructions for using the simulator
A set of exercises with the Glisson loop
When using the simulator, be very careful - our spine requires very careful handling and it is easy to injure it. Therefore, you should strictly follow the instructions when performing a set of exercises with the Glisson loop. There are 2 types of simulator - with and without weight. If you use a loop with a load, then start with a small load of 2-3 kilograms, gradually increasing it to 15-20 kg. If without a load, then gradually adjust the degree of tension. In addition to the load, it is important to consider the duration of the exercises: start with 3 minutes, gradually increasing the duration of the stretch - up to 5-7-9-10 minutes over the course of a week.
Spinal traction can be performed either in a horizontal position, hanging a loop on a bar, or in a semi-vertical and vertical position - lying on your back at an angle, placing your head in the collar under load.
Contraindications for use
Contraindications to training on the Glisson loop are: - rupture of ligaments in any part of the spine; - pronounced curvature of the spine; — congenital defects of the spine; - acute inflammation of the bone, cartilage and muscle structures of the spine; — arthrosis (deformation of the joints of the spine).
If you have initial osteochondrosis and you don’t know whether the Gleason loop can be used for this disease, consult a neurologist or at least a therapist, do an MRI of the neck and thoracic spine.
Reviews
Reviews from doctors show that this method is recognized as effective, and the design itself is widely used in physical therapy programs.
Feedback from patients using the loop:
Natalya, 35 years old: “I have a sedentary job and my neck and shoulders constantly hurt. I ordered the Glisson loop online. This is a metal structure that simply hangs on the door; no special fastenings are required. I worked out for a month, and did it irregularly - every other day, or even a couple of times a week. Within a month, I felt that headaches and muscle pain appeared much less frequently, and even my blood pressure returned to normal.”
Sergey, 40 years old: “My problem is osteochondrosis. I took 2 courses in traction, I did it using a loop while lying on a special apparatus. Briefly about the result: symptoms of osteochondrosis such as dizziness and headache, numbness in the hands began to appear much less frequently. I can say for sure that if you do not use other methods and improve your lifestyle, the results of the procedure will quickly fade away. Overall, I definitely recommend this method.”
Andrey, 42 years old: “The procedure is excellent, but not everyone can afford it and requires an integrated approach, as well as regularity.”
How to choose the right Gleason loop and where to buy it?
As we have already said, there are now three types of loops on the market - a simple version that works under the gravity of your own body, and two types that work under load - either with your hands in front or with a load behind your back. If this is your first time using a simulator, we recommend choosing a simple option - a collar under your neck, which is attached to any crossbar or horizontal bar with a carabiner. This option will be inexpensive and at the same time will allow you to most accurately regulate the load on the spine, gradually increasing it and the duration of classes. Similar advice to those who already have protrusions between the vertebral discs, which are not recommended to be subjected to serious stress. And if you have no contraindications and you already keep your spine in good shape by exercising on the same horizontal bar, then you can use a Glisson loop with a counterweight. This option will ensure maximum effect from the exercises.
If you decide to buy a Glisson loop, then the SportPanda store is ready to offer you a very inexpensive and practical option. You can find out more about the products in our catalog. We remind you that we provide a guarantee for all goods, we are located in Krasnodar, but we deliver goods throughout Russia.
By the way, if you don’t know how to hang a loop, then we suggest you choose a horizontal bar with wall mounting, which is suitable even for the most compact apartment. The horizontal bar can withstand a load of up to 250 kilograms and is ideal for performing soft traction of the cervical vertebrae using a Glisson loop.
conclusions
The spine is a very complex structure and restoration takes a lot of time and effort. Glisson's device requires regularity and patience from the patient. Pulling can be vertical, horizontal, in water, in a pool, with or without weights.
This design is used very effectively for neck deformities, pinched nerve roots, and interdisc hernias. There are positive reviews for eliminating muscle spasms in the cervical vertebrae. The Glisson loop relaxes the muscular system, restores flexibility and mobility of the body.
This orthopedic device is simple, safe and inexpensive. But, it is only an additional tool in the treatment of vertebral pathologies and, unfortunately, will not eliminate all problems. The Glisson loop is an excellent preventative measure and does not eliminate the need to seek help from a specialist.
Buy on Aliexpress =>>