Home — Social networks — Top 5 exercises for stooping for any age
Slouching is unsightly: the shoulders are rounded, the height becomes visually smaller, in girls the breasts seem saggy, the tummy sticks out. And it seems like nothing, it’s just a matter of appearance, but incorrect posture also harms health, deforming internal organs, worsening the functioning of the cardiovascular and respiratory systems.
There are many reasons for this disease: congenital, acquired, physical and psychological. But don’t worry, in most cases everything can be corrected with exercises for stooping, even at home.
The effects of spinal traction
After 2-3 sessions, improvements are noted:
- back pain stops,
- muscle tone is normalized,
- blood circulation in the spine increases,
- blood circulation to the brain increases,
- There is an improvement in blood circulation in the spinal cord.
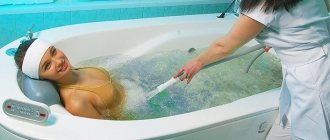
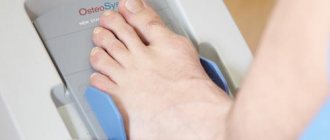
Treatment is carried out at a special orthopedic complex “ORMED-professional” . The effectiveness of the technique is combined with a complete absence of pain.
The Ormed device for mechanical therapy of a professional level allows you to perform traction - dosed traction of the spine. Exposure to heat and vibration can achieve significant results.
This type of roller massage has been clinically tested. Medical reports of working with devices of the ORMED series show how effective traction equipment can be:
- in the prevention of spinal diseases,
- during treatment,
- during the rehabilitation period.
"Pass" to the exercise equipment
If you decide to quit physical inactivity and join a gym, start by consulting with a doctor who monitors and treats your spine: a neurologist, a chiropractor, a specialist in physical therapy.
Often, a visit to a specialist begins not with the question “I want to strengthen my back, what do you advise me?”, but with the request: “Give me a certificate.” At the same time, the condition of the applicant’s spine can be so deplorable that, before receiving such a certificate, he must undergo a thorough examination and x-ray diagnostics.
ORMED devices
Ormed devices allow for axial dosed traction of the spine with vibration and mechanical effects on the entire muscular-ligamentous apparatus. The effect on the spine and joints is invaluable during rehabilitation, and is important in the prevention of diseases of the neurological spectrum. Possible impact:
- on the cervical
- chest,
- lumbar spine.
The ORMED device is effective in the treatment of osteochondrosis, incl. joints. The complex is primarily used by specialists who place high demands on medical equipment. A special feature of the ORMED device is the possibility of traction of the spine in alternating mode.
The process is controlled by reflecting the treatment procedure on the screen during the process; it is possible to change the method of influence. The traction levers are responsible for influencing at different angles - vertically and horizontally.
The device supports complex procedures - for example, paravertebral vibration massage, in which you can perform traction on the lumbar and cervical spine, as well as traction on the joints of the arms and legs.
Exercises on an inversion table
How to use it correctly?
According to doctors, for first-time users, in order to adapt, it is necessary to exercise for about 2 weeks, then consult with a physiotherapist and check your own health status. The duration of the exercises should not exceed 15-20 minutes.
For best results, it is recommended to exercise 2 times a day.
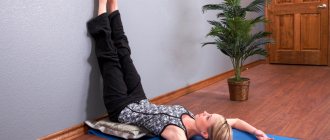
When you exercise on an inversion table, you relax the supporting muscles and ligaments of your back that are usually tense, “suspending” your spine. When you return from inversion to your normal position, your back muscles are still slightly vulnerable for about 30 minutes. In order for them to return to normal, you should not strain after exercise during this time. Therefore, the ideal time to practice is before bed.
In addition, it is important to remember that a position 45 degrees below the horizontal line for an inexperienced user can lead to injuries that provoke serious pathologies of the musculoskeletal system. The position of inversion tables in an oblique position between 20 and 30 degrees is the optimal load option for beginners.
Before you start training, you need to adjust the table. To do this, adjust the height depending on your height using a special screw. Be sure to check the reliability of the fixation. Then adjust the leg mount so that the position remains comfortable. While performing the exercises, you must follow safety precautions: lean firmly against the back, do not try to raise your head or torso, or stand up suddenly.
Inversion
It is necessary to position your hands so that your body assumes a vertical position. After a few minutes you should return to the original state. Repetition frequency 10-15. If you remove the restraint strap or angle lock, the body can be turned in a more extreme position (full inversion).
Balancing
You need to sit on the inversion table and be sure that your position is stable. Next, try to maintain the position so that the body is horizontal.
Rotation
Rotation is accomplished by gradually rotating the entire body. While hanging, you need to keep your right arm across the upper half of your body, holding onto your left side. Then slowly pull yourself in a specific direction and rotate. Repeat the same procedure with your left hand and the right side of the table. The frequency of execution should be 10-15 repetitions.
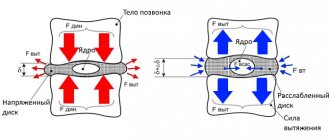
The result of spinal traction
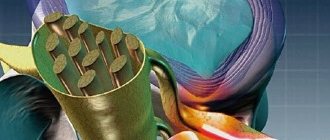
The complex effect allows you to get rid of functional blockades in the intervertebral joints in just one procedure. The position of the vertebrae is restored, the distance for the intervertebral disc increases, and the pressure inside the intervertebral discs decreases.
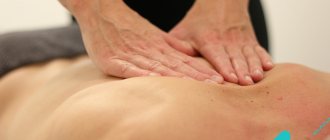
In total, this gives a greater chance of correcting the main problem of the intervertebral discs—reducing the prolapsed hernia. Massage with traction on the spine helps relieve symptoms of compression of the spinal nerve roots.
Do-it-yourself Evminov board: drawings and step-by-step instructions
Unfortunately, the price of such simulators, despite their simplicity, turns out to be quite high. For example, in Moscow the cost ranges from seven to ten thousand. However, many craftsmen say that there is nothing difficult in producing such a board. Indeed, a little dexterity, the ability to handle tools, as well as the necessary materials - and the trick is in the bag, a useful healing prophylactic is ready.
Materials and equipment
- Pine timber (150x50) for the base of the simulator with cabinet chipboard (16 mm) attached to it. The length is, according to our drawing, 2 meters 40 centimeters.
- For the carriage there is the same beam (length 27 centimeters). It is advisable to choose durable types of wood.
- Two meters of mounting rail (2x40).
- Three meters of metal chain, 4 mm thick.
- The lower base (length 0.6 meters) is easiest to saw off from the blank for the handle of a shovel or hoe.
- The carriage crossbars are made from the same cuttings (length 0.55 meters)
- Screws with a diameter of 5 millimeters for securing slats and beams.
- Nuts and washers, 8 mm in diameter.
- Screws with washers, diameter 6 millimeters (length 10 centimeters).
- Bolt Ø 8, L 70.
- Dowels and hooks for the wall.
- Carbine.
- Nails of different sizes.
- An electric drill, preferably with a screwdriver.
- A set of cutter attachments for drilling large holes.
- Wood saw and metal hacksaw.
- Screwdriver Set.
- Hammer.
Manufacturing method
To prevent your board from slipping, we have come up with a simple and effective life hack. To do this, a piece of rubber is cut to size, for example, from an old camera, and then fixed to the lower edge of the simulator.
- In order to secure the board from below, drill a large hole into which the base will be recessed. Coordinate all dimensions with the presented drawing.
- On the other side, a hole is drilled at an angle. It must be end-to-end and is intended for the securing chain.
- Make holes in the base for the bolt heads so that they do not damage the floor surface during exercise.
- Two more holes are drilled at the base of the carriage, which will be used for fastening.
- It is better to cut the ends of the carriage (200×320) from a durable board. It should easily support the weight of the person who will exercise on the machine.
- Make holes at the ends for the crossbars (handles).
To make working out on such equipment not only useful, but also enjoyable, its base must be covered with thick fabric. The easiest way to secure it is with a stapler. Experienced people advise using an old overcoat or something similar for this.
Assembly
First, the carriages are assembled. To do this, you need to glue the ends to the base and connect them through a through hole in the base. Be sure to tighten the connecting nuts thoroughly to prevent the structure from becoming loose with regular use. The top crossbar can simply be nailed to the ends. The bottom one just needs to be inserted - it will be adjustable and there is nothing to secure it to.
- Thread the chain through the hole in the beam.
- Secure the beam itself with chipboard screws.
- The lower base is attached to the screws.
- On the back side it wouldn’t hurt to screw some slats on which you can adjust the carriage.
Lastly, you need to drive dowels onto the wall or ceiling to which the chain will be attached. By rearranging the carabiner along the links of the chain, you can easily change the inclination of the board. Pay attention to the drawing of the assembled Evminov board, how it will look when attached to the wall.
However, there are people who do not want to suffer for a long time, but just get up and study. They take an ordinary board, attach a crossbar to it, and then simply lean it against the wall. This simplified version also has a right to life. However, keep in mind that the stability of such a simulator leaves much to be desired, so you can easily fall off it, causing yourself further injuries.
How to stretch the thoracic region with scoliosis
The thoracic spine has functional stability because the costal arches are attached here. Between them is the respiratory intercostal muscles. It also maintains the stable position of the vertebral bodies and prevents the destruction of intervertebral discs. Therefore, thoracic osteochondrosis and accompanying complications in the form of protrusion, extrusion and disc herniation are relatively rare.
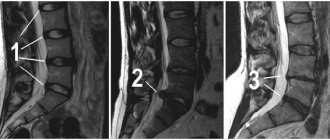
But very often in adolescence, a lateral curvature of the spinal column in the thoracic region begins to form. This is precisely due to rigid fixation with costal arches. Gradually, lateral displacement of the vertebral bodies leads to scoliosis of varying degrees. This condition entails deformation of the chest and disruption of the position of internal organs (heart, lungs, esophagus). There is excess pressure on the kidneys, liver, spleen and pancreas.
Before stretching the thoracic spine, it is necessary to conduct a detailed examination and exclude the possibility of developing curvature in one plane or another. It is worth understanding that an incorrectly selected set of gymnastic exercises can significantly worsen the patient’s condition in a short time by increasing the angle of curvature of the spinal column.
Only an orthopedist or vertebrologist can give individual recommendations on how to stretch the spine with scoliosis, since there are different types and degrees of this curvature. Sets of exercises for various types are published on the Internet; you should not blindly apply them. In our practice, we often encounter situations where patients, with the help of an incorrectly selected set of exercises, brought the degree of curvature to 3-4 in just six months.
Features of the classes
The stereotype is quite widespread that it is enough to hang on the crossbar for a short time; there is no need to use more complex structures. It is worth noting that if you weigh more than 100 kg, doing this is strictly prohibited; the method will help to achieve simple muscle stretching.
Hanging on a bar requires preliminary warming up of the muscles in the gym; at the age of over 45, it is not recommended to risk your health.
Contraindications
Before therapy, the doctor decides whether the treatment will be safe and appropriate for a particular patient. The specialist takes into account all the circumstances and aggravating ailments.
Traction cannot be performed when:
- high blood pressure;
- inflammatory and infectious diseases;
- tumors and tuberculosis;
- decompensated diabetes mellitus;
- sequestered hernia of the spine;
- overweight;
- vascular diseases;
- mental disorders.