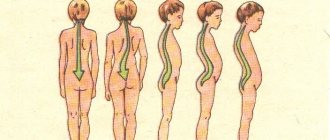
Why is it important to take care of your posture from an early age?
Because most problems with the spine are associated with incorrect motor habits, and they are usually formed in childhood.
For example, many tall people slouch, having become accustomed in their youth to hiding their height, as it were, by leaning slightly forward or sitting bent over at a desk. The sooner you teach your child to keep his back straight, the more likely he is to maintain good posture as he grows up. This is also beneficial from a health point of view. “With poor posture, the lungs, heart and diaphragm suffer,” explains Yulia Shesheneva , certified Iyengar yoga instructor, teacher at iSoulClub studio. “Tension accumulates in the neck, and blood supply to the brain is disrupted.”
What exercises do for a straight back
Stretching, bending, and bending help to stretch the spine and effectively distribute the load across different areas. Asanas help strengthen the muscles of the back and core; loosening the shoulder girdle, increasing the mobility of the spine.
All this has a beneficial effect not only on physical well-being, but also affects the mental state and spiritual sphere. Scientists have long proven that working with the emotional state affects the body. Thousands of cases have been described where, after working through any negative emotions, a person got rid of various diseases.
The opposite also works: through asanas and the body we influence emotions, bringing them to a more blissful and purer state. Exercises for beautiful posture help to harmonize energy centers and bring more lightness and awareness to life.
Can you improve your posture by doing yoga?
Yes. In youth, regular practice can be a prevention of postural disorders and a way to correct them. The same goes for adults. “Your posture needs to be corrected. The older a person is, the more difficult it is to do this, but if you practice regularly, you will definitely get results,” comments Yulia Shesheneva.
However, you should not count on instant results. “As a rule, stooped people cannot maintain a straight back position for a long time: the muscles that are accustomed to the previous position still need to be retrained, and this can take a lot of time. But, as in any other business, the main thing here is to be patient and persistently move towards the intended goal,” says our expert.
It is also important to choose the right set of asanas. If you have scoliosis, protrusion or hernia, an experienced yoga therapist should create a lesson plan for you. If your spine is generally healthy, then the problem of stooping can be solved by regular practice according to the program compiled by Yulia Shesheneva.
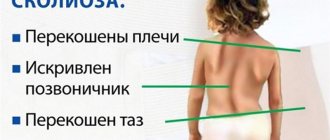
What does poor posture lead to?
- Lack of oxygen.
With a curved spine, the lungs do not work at full capacity. Breathing is shallow and superficial. The acidity level of the body increases, which leads to rapid aging and stress. - Poor brain function.
Due to incorrect posture, the human brain does not receive enough oxygen. This impairs memory, concentration, and attention. You may experience panic attacks and lack of energy. - Painful sensations.
Pinched nerves and spasmed muscles are inevitably the companions of a stooped person. Often people feel pain not only in the back, but also in other parts of the body. - Anxiety and depressed mood.
Due to incorrect posture, blood circulation to the brain and its supply of oxygen deteriorate. Biochemical processes change. This affects the balance of hormones and neurotransmitters that are responsible for emotions, behavior, and decisions. And even for the level of happiness. - Reduced immunity.
When you slouch, some muscles are overextended and others are severely contracted. Contracted muscles compress lymph ducts, nerves and blood vessels. This leads to an imbalance in the body's functioning. The removal of toxins, cell nutrition and transport of nutrients worsen.
How to build a lesson
* Start your practice with joint gymnastics. 5-10 minutes is enough to warm up the muscles. Finish the session with savasana.
* Perform asanas consistently.
* Take your time - consistency implies static (not dynamic) work. It is also important to monitor your breathing, keep it calm and deep.
* Do this program 4-5 times a week.
To perform a set of asanas, you will need a mat, a yoga belt, a chair with a backrest, a bolster or folded blankets.
Ready to start class? Lay out the mat and repeat after Yulia Shesheneva.
[new-page]
Exercises for a straight back: main accents
During exercises, breathe through your nose, do not hold your breath. If in any position you feel discomfort or it becomes difficult, then try to relax all possible parts of the body as you exhale, mentally exhale through the places where you feel the greatest discomfort and tension.
Do not carry out asanas for posture to the point of severe pain and tremors in the body. When you feel tired, allow yourself to rest and relax in any comfortable position.
So, you are ready to perform exercises for straight posture. Take a few deep relaxing breaths and exhalations, let go of all thoughts and worries. Maximum attention - in the body and on the breath. Movements are smooth and measured. Increase the load gradually. Do each pose consciously.
Ready to get to practice? Lay out your mat and let's get started! Important! If you feel pain or severe discomfort in the back area, or if you have chronic diseases, especially in the acute stage, be sure to consult a doctor before performing asanas.
Wrist strap exercise
Stand straight, place your feet hip-width apart. Take the belt, make a loop the diameter of which is equal to the width of your shoulders, and bring your arms back. Place the strap around your wrists and pull the loop with your hands as if you want to break it. Pull your shoulders back and retract your shoulder blades. Raise your arms up while stretching them strongly back, palms facing each other. Feel your upper back draw in and arch as your chest opens.
It is important not to push the pelvis forward and not to bend in the lower back - the bend should be in the thoracic spine. Then relax your arms and repeat the movement 3-4 times.
Yoga Basics
For beginners, yoga is a kind of quiet horror, of course. Having assumed the lotus position, the beginner realizes that he is tense to the limit: it’s hard to keep his back straight, he wants to bend into the “I’m tired, yoga is not my thing” pose. I want to immediately note before describing a course of preventive measures for good posture and exercise: there will be no miracle.
Let's start with the fact that yoga is really designed not only to strengthen your self-confidence, it allows you to calm down, find harmony and inspiration. It is also an excellent physical activity for both an unprepared body and an athletic one.
For beginners, there are many different simple exercises that are not only easy to use, but also extremely effective in practice. This is one of the most effective ways to strengthen your back muscles and correct a defect acquired over time.
Did you know that children up to a certain age walk with perfect posture? Their innate ability to “not hunch over” makes itself felt from 6-8 months from birth, when children are just mastering the technique of sitting.
Over time, due to increased load on the spine and low sports activity, the back muscles “lose” their position, the body becomes heavier, the spine cannot withstand the load and the back rolls into an arch. It becomes almost impossible to start supporting your back without exercise.
Urdhva hastasana with wrist strap
Stand straight, feet hip-width apart. Place the same loop around your wrists again and stretch your arms out in front of you, palms facing each other. While stretching the belt to the sides, inhale and raise your arms up. Press your wrists against the belt as if you are trying to break it, and pull your arms up, being careful not to raise your shoulders, making sure that your neck remains free. Do not lean your pelvis forward or arch your lower back. As you exhale, lower your arms and repeat 3-4 times.
Important! For beginners, this option can be performed against a wall - it will help control the position of the body: do not lose contact of the back surface of the body with the surface of the wall.
Runner's pose - 8 breaths on each leg
The asana stretches the hip and calf flexors and strengthens the torso.
- Start in plank pose. The wrists should be positioned directly under the shoulders.
- Bend at the knee, pull your right leg forward and place it on the outside of your right arm. The ankle should be located strictly under the knee. Turn the toe out 45 degrees.
- Pull your stomach in and feel the stretch in your hip flexors. Take 8 breaths.
- Perform on the other leg.
Urdhva badhanguliasana
Stand straight, feet hip-width apart, keep your spine straight. Interlace your fingers and extend your arms out in front of you, palms facing away from you. Pull your elbows in and widen your palms. Inhale and raise your clasped palms upward. Breathe calmly. Keep your elbows tucked in and your fingers intertwined tightly. With each inhalation, stretch up, lowering your shoulders down. Fix for 2-3 seconds at the top point.
As you exhale, lower your arms, change the interlacing of your fingers (the index fingers of the other hand should be on top) and perform the exercise again.
It is useful to perform this exercise while standing with your back to the wall: the wall will not allow you to move your pelvis too far back and will help you control the deflection in your lower back. Hold the back of your legs, sacrum and shoulders against the wall, pointing the sides of your waist towards the wall.
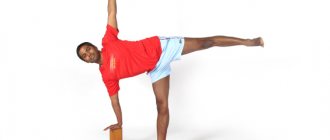
Supported fish pose – 2-5 minutes
This relaxing asana is effective for stretching the chest and shoulder muscles.
- Place the support block across the mat, at the top edge. Need a small or medium height. Place the second block lower along the rug. The blocks should form a T, but not touch.
- Leaning on your hands, lie with your head on the top block. The bottom one should be between the shoulder blades.
- Stretch your legs, place your arms along your body, palms up.
- Close your eyes and relax for 2-5 minutes.
Gomukhasana (variation)
Stand straight, with your feet hip-width apart, bend your left arm at the elbow, place your palm behind your back and press it against your back with the back of it, moving it closer to your right shoulder blade. Stretch your right arm up, turn it palm back, bend it at the elbow and clasp your fingers behind your back. Gradually roll your left shoulder back and retract your left shoulder blade as you point your right elbow up toward the ceiling. You should feel the work not only in your arms and shoulders, but also in your upper back. To do this, direct your thoracic spine forward, keep your legs, pelvis and lower back in a level position. Stay in the asana for 20-40 seconds. Come out of the pose and do the exercise on the other arm.
Important! If you can't clasp your fingers, use a belt.
Child's Pose
Following cobra pose, child's pose will help relieve discomfort from extreme arching of the back. To do this, sit on your heels with your knees slightly apart. Inhaling, raise your arms up, then, holding their position, while exhaling, gradually tilt your torso forward. Lowering your hands, touch your forehead to the floor and hold this position for a few seconds while breathing steadily.
In the second phase of the execution, the arms are pulled back to the feet, the shoulders are at knee level, the back is arched and relaxed. At the same time, it is important to feel comfort that promotes measured breathing and maximum muscle relaxation.
Holding Child's Pose relieves tension from the spine. This asana is usually done when moving on to more complex exercises or at the end of a workout.
Triangle pose is performed with a sufficient level of stretching. From a standing position, legs wider than shoulders, arms spread to the sides parallel to the floor. Without changing their position, you need to turn your torso so that your left hand touches the ankle of your right leg. This yoga exercise targets the lower back and can relieve pain in the lower spine and strengthen the abdominal and pelvic muscles.
Paschimanamaskarasana
Stand straight, feet hip-width apart. Place your hands behind your back and fold your palms in namaste in front of your shoulder blades. Push your shoulder blades forward and try to align your palms so that the bases of your index fingers and thumbs are pressed against each other, and the outer edges of the palm (from the little finger side) press on the spine. Stand straight and do not arch in the lower back, even if it is difficult for you to move your shoulders and elbows back, opening your chest. Hold the asana for 30 seconds to a minute. Then gently lower your arms down.
How to benefit from yoga?
To get the most benefit from yoga, it is important to decide what kind of results you want to get from your classes. Why did you decide to do this? What do you want to change in your own life?
When you honestly answer these questions for yourself, you can begin to practice.
Now many schools and clubs have been formed to teach yoga. There are special yoga classes for men, women, and children. Men's yoga includes more strength exercises. Many people prefer to practice yoga at home.
But before independent training at home begins, beginners need to learn the basic basics in lessons with an experienced instructor.
So, you will feel the atmosphere, the style of doing the exercises, learn to breathe correctly, etc.
Several basic asanas will be described below.
Bharadvajasana on a chair
Sit on a chair with your right side to the back. Place your feet hip-width apart. Stretch your spine up and turn your body to the right, grab your back with your hands. As you inhale, stretch upward, and as you exhale, twist further to the right. Pull your shoulders back, keeping your pelvis fixed. Press your feet to the floor. Hold the pose for 1-2 minutes, then perform it in the other direction.
Important! For grade 3-4 scoliosis, perform this asana only under the supervision of an instructor.
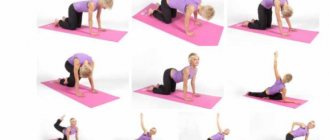
Cat pose
Cat pose, one of the basic and easy asanas, is performed from a starting position on all fours, hips and arms at right angles. Next, you need to master the technique of slowly bending your back up and down with a delay of a few seconds in extreme positions.
The first phase is performed while inhaling with arching of the back. The head moves up all the way, the gaze is fixed on the ceiling, the front of the neck is extended, the shoulders are spread apart. The parallel feet of the legs press forcefully into the floor. At the same time, the buttocks rise and the abdominal muscles relax.
The second phase - arching the back while exhaling - is performed by simultaneously lowering the head while relaxing the neck muscles and drawing in the abdomen, while focusing on the arch of the back, the formation of which will be facilitated by moving the tailbone in the direction of the abdomen, while the leg muscles must be brought into a relaxed state.
Uttanasana with supported elbows (variation)
Stand facing the back of a chair, kneel down. Place your knees hip-width apart. Lean your body forward, bending at the hip joints, place your elbows on the back of the chair and clasp your palms together. Relax your neck, face, head, stomach. Point your shoulder blades down and arch your upper back. Keep your lower back flat. Lock in this position for 30-60 seconds.
Cobra pose
A more complex cobra pose can also be performed while lying on your stomach. The palms of the bent arms should be placed under the shoulders so that upon further straightening they are in a straight line. The movement begins with inhalation; during the process, you need to maintain a measured breathing rhythm and return to the starting position as you exhale.
When performing this asana, you need to gradually tense the muscles of the neck, shoulders, torso and abdomen with lifting the upper body. Moreover, the arms need to be connected only at the last stage as an additional, but not the main support.
At the maximum point of tension, the head should be thrown back to the limit, the back should be arched, and the pubic region of the pelvis should be pressed to the floor. After holding the asana, you need to gradually return to the starting position, relaxing the muscles in the reverse order.
Chatushpadasana
Lie on your back, bend your legs and place your feet closer to your pelvis, turning them slightly inward. Leaning on your shoulders, lift your pelvis and back off the floor. Arch your upper back and grab your ankles with your hands. As you exhale, lift your pelvis and back as high as possible. Push off with your feet and direct your shoulder blades and back up so that you feel an active arch in your upper back. Stay in the pose for 10-15 seconds, then repeat again.
Important! If you can't grab your ankles with your hands, use a belt.
Asanas for posture
Basic exercises for beginners: warm-up
- Starting position: sitting on a chair . Press your chin to your chest while trying to squeeze your shoulder blades together. Stay in this pose for half a minute.
- This exercise can be performed both standing and sitting . Try to straighten your back as much as possible and make circular movements with your arms (first back, then forward).
- Tadasana (mountain pose) . Starting position: standing. Stand straight: legs together, arms hanging freely along the body. Straighten up and stretch your head up as much as possible. Continue stretching for 20-30 seconds. If you find this exercise difficult at first, you can do it while leaning against a wall. In the future, the duration of stay in the tadasana pose should be increased to a minute.
- A stretching exercise familiar to many from school : stand up straight and stretch your arms down, trying to reach the floor. If you find it difficult to keep your legs together, you can spread them slightly (no wider than shoulder width). Alternatively, you can not stretch your hands to the floor, but clasp your elbows with your palms and try to pull the entire body.
- Model Walking : Move around the room with books on your head.
This warm-up will help you stretch your spine and help you “remember” the correct position of your torso. After warming up, you can proceed directly to performing yoga poses.
Video: “Yoga for stooping: technique for performing asanas”
Want to know more about how to correct your posture? Read the following articles:
- Types of orthopedic chairs and the principle of their operation can be found here
- What is the importance of correct posture formation at an early age for children’s health?
- You can read more about magnetic posture correctors on the page
- You can find out about the indications for using an electronic posture corrector by following this link
Top 5 asanas
- Marjariasana (cat pose) . Get on all fours so that your limbs are perfectly perpendicular to the floor (that is, your palms should be directly under your shoulders and your knees should be directly under your hips). As you inhale, stretch your chest toward the floor. The gaze should be directed upward. Use the back of your head to reach your tailbone. Keep your hands straight. As you exhale, you need to stretch your spine upward. The abdominal muscles are tense, the head is pulled towards the knees.
Cat pose
- Dandasana (staff pose) . Sit on the floor with your legs straight. Stretch your body up, your back should be perfectly straight and perpendicular to your legs. Stretch your toes towards you. Your arms should be on the sides of your body, with your fingers facing forward.
Asana Dandasana
- A combination of Downward-Facing Dog and Upward-Facing Dog poses . Lie on your stomach with your legs slightly apart. Place your arms bent at the elbows with your palms under your shoulders (as if you were about to do push-ups). As you exhale, straighten your legs and body, stretching your heel upward. For beginners, you can bend your legs a little or even get on all fours, but be sure to keep your back straight. Next, while inhaling, “crawl” your body along the floor: you should bend slightly, as if leading your body behind the top of your head stretching forward. As a result, you should stand like this: your head is stretched up, your torso is raised on straightened arms, your back is slightly arched, your legs are straight. Ideally, your hips should also be slightly raised (only your shins and palms should remain on the floor), but beginners may not want to do this at first.
Combination of up and down facing dog poses
- Balasana (child's pose) . Kneel on the floor, then sit with your buttocks on your heels (your feet should touch). As you exhale, lower your torso until your forehead touches the floor. Your arms should be along your body and your shoulders should be relaxed.
Performing Child's Pose
- Savasana (corpse pose). Completion of the workout, maximum relaxation pose. Lie on the floor on your back with your arms and legs a comfortable width apart. Now your task is to relax. Relaxation should be targeted: you should feel how every cell of your body relaxes and fills with warmth, from the tips of your toes to the top of your head. When you have managed to relax your whole body, lie in this position for another minute.
Savasana - corpse pose
Video: “Set of exercises for straightening the back”
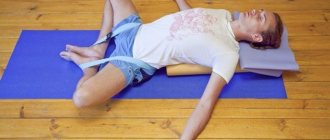
Shavasana
Lie on your back, bend your knees, place your feet on the floor. Touch your lower back with your palms and, as it were, lengthen it, moving your hands towards your legs. Stretch your legs one at a time, lowering them to the floor. Open and lift your chest, turning your shoulders up from the inside out, feel the spine retract and rise from the floor. As you exhale, relax and allow your feet to turn away from each other. Feel how your shoulders and arms fall with all their weight to the floor. Relax the right and left sides of your back. Pay special attention to relaxing your arms and shoulder girdle. Stay in the pose for 5-10 minutes.
Important! If you feel stiffness or tension in your lower back, place a blanket or bolster under the backs of your thighs and knees.
Teach your teenager these asanas, or even better, practice them together: regular practice will help improve posture and take care of the health of the spine.
Hatha yoga asanas for the back
Below are brief instructions and photos for self-practicing yoga for the back, torso and abdomen, which will help correct posture and stimulate blood circulation and metabolism.
Synchronizing the rhythm of movements and breathing and focusing on the muscle groups involved will ensure rapid mastery of the asana technique and a positive effect from their implementation. Alternating asanas and 3-5 repetitions should be accompanied by a short rest with muscle relaxation.
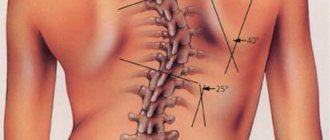
Causes of spinal curvature
Scoliosis is the medical name for a problem called a curved spine. From the Greek word for "crooked", scoliosis is divided into three categories:
- congenital scoliosis;
- acquired;
- post-traumatic.
Let's talk about each subcategory. Spinal deformity can be congenital - incorrect position of the child inside the womb, problems at birth, etc. Scoliosis can also be acquired.
Often in adults, the spine cannot support its own body weight, which is weak due to the physiological characteristics of a particular person.
There is also post-traumatic scoliosis - as a result of external influences, a person receives a curved spine, which becomes impossible to straighten without surgical intervention. Scoliosis is becoming more and more common in adolescents, and this problem is becoming global.
Yoga allows us to cope with such an ailment as acquired scoliosis, that is, by performing physical exercises, we provide a weak spine with good support in the form of trained spinal muscles. Every self-respecting person should have correct posture.