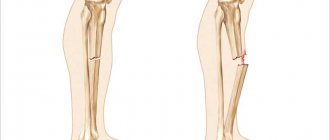
The skeletal apparatus of the forearm consists of two tubular bones: the ulna (medial or median location) and the radius (lateral or lateral location, according to the anatomical classification).
Below is an image of the components of this system and the anatomy of how the bones connect to each other.
Injuries to large tubular bones require preliminary fixation before the ambulance arrives or a trip to the hospital using your own means. At the same time, the patient must be given an anesthetic and cold applied.
How can I help?
First of all, it is necessary to carry out pain relief in order to avoid the development of pain shock - a condition that is extremely dangerous not only for the health, but also for the life of the victim.
For these purposes, painkillers and analgesics are used. Moreover, the fastest results are obtained by injection. An ice compress can be applied to the affected area to reduce pain and prevent bruising and swelling. With an open fracture, the first thing you need to do is stop the bleeding. After this, immobilization is carried out to reduce pain and prevent the occurrence of shock.
Traumatologists identify the following rules for immobilization for fractures:
- Before applying the splint, the patient must be administered an analgesic drug.
- When a fracture is accompanied by an open wound, it is necessary to treat it with an antiseptic solution to avoid possible infection, and then cover it with a clean, sterile bandage.
- If there are appropriate indications, a tourniquet is applied, under which a note with the exact time of application must be placed to prevent necrotic processes.
- Immobilization agents are applied over clothing or shoes. There is no need to remove them from the victim; this may cause additional injury. In any case, in those areas where the splint comes into contact with the skin, it is necessary to place a soft cloth or gauze bandage. This softens the pressure on the joints, reduces the risk of pinching blood vessels, and therefore numbness, circulatory disorders, blood supply to the damaged area, and bleeding.
- Bandaging the splint too tightly should be avoided, as this can impair circulatory processes and develop a number of dangerous complications. It is necessary to achieve fixation to ensure absolute immobility of the damaged bone area and the joints located near it.
- During the immobilization process, it is important to act accurately and carefully so as not to move or displace bone fragments.
- In case of protrusion of a broken bone, it is necessary to apply a splint on the other side without attempting to correct the bone deformity, since such actions increase the risk of developing a shock state.
- If necessary, the first aid person adjusts the tire on himself. It is strictly contraindicated to perform such manipulations on the victim, since they can lead to displacement of the bone area and additional injury to the soft tissues. In this case, the splint is modeled with reference to the patient’s healthy limb.
- When applied to the upper or lower extremities, the splint should cover the joints located above and below the injured area.
- The fingers or toes should remain open so that it is possible to control the blood circulation in the area of injury.
- It is necessary to try to fix the limb in a physiological, functional position (with the exception of episiphus injuries and tendon ruptures).
- If there are bony protrusions, it is recommended to place a layer of cotton wool or gauze under the splint to prevent bedsores, chafing, etc.
- In the autumn-winter period, the immobilized area must be insulated to prevent possible frostbite.
Experts recommend carrying out this procedure together - it is more convenient and allows you to act as accurately as possible. For example, while shifting a patient, an assistant will be able to hold the injured limb.
First aid
What to do if a person is faced with such a trauma?
Emergency assistance instructions are as follows:
- Calm the victim, give him water and sit him in a comfortable position.
- To relieve severe pain, give him an analgesic tablet. Freezing sprays can also be used if there are no skin lesions.
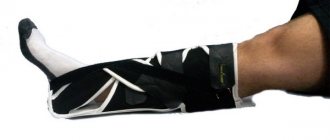
- Immobilize the limb. Immobilization for an antibrachium fracture is performed by applying a splint to the arm.
- If the fracture is open, care must first be taken to reduce bleeding and treat the wound.
After providing first aid, call an ambulance for the victim or take him to a medical facility yourself.
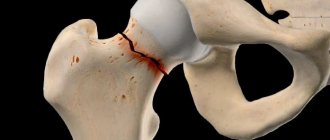
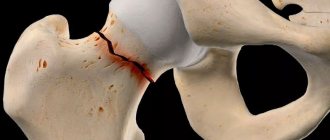
Principles of splinting for hip fractures
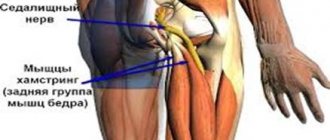
Fractures of the femur occur in the area of the head, neck, area between or below the trochanters. Readers are interested in which joints should be fixed in case of a hip fracture. This injury often involves damage to the hip joint. It is formed by the lunate surface of the acetabulum of the pelvic bone and the articular surface of the head of the femur. He is subject to immobilization, that is, immobilization.
When providing emergency care for an injury to the diaphysis or epiphysis of the femur, care must be taken to ensure that the damaged area is motionless. This reduces pain and prevents further displacement of the bone. This can be done by applying an immobilizing bandage to the injured person. They best immobilize the joint.
The principles of splinting for a hip fracture are as follows.
- The thigh should be fixed in the same position as the injured leg.
- The splint is applied so as to firmly fix the joints above and below the fractured area.
- The leg should be placed in the most gentle position possible.
- When splinting, the possibility of blood loss should be taken into account. Constant monitoring of the patient's condition is mandatory in any case.
- For open fractures, reduction is not performed. A sterile bandage should be applied to the affected area
- Place clothing, cotton wool or a towel under the tire. Immobilization cannot be done without a layer of cotton wool.
Signs of a forearm bone fracture
To accurately determine the presence of a fracture, pay attention to the following symptoms:
11
- the presence of pain and swelling in the area of injury;
- any movement provokes severe pain;
- the joints in the area of injury have sharply changed their position;
- the appearance of pathological mobility in the area of the crack.
These signs require prompt immobilization of the affected limb and taking the patient to a doctor.
How is the procedure performed?
Traumatologists offer the following optimal algorithm for immobilization, which should be followed when providing pre-medical care to a patient with fractures of the upper or lower extremities:
- Bend the patient's injured arm or leg at a right angle.
- Place a soft fabric roller in the armpit or popliteal area.
- Apply 2 splints, simultaneously fixing the elbow, wrist and shoulder joints (ankle, knee, hip). It is recommended to bandage the splint towards the center.
- Hang your broken arm on a scarf.
If for some reason it is not possible to find available means suitable as a splint, then it is recommended to simply bandage the injured limb to the body, thus providing the necessary fixation.
In case of damage to the femur, the splint should be applied from the inner surface so that the ankle and knee joints are as fixed and motionless as possible. A fabric roller must be placed in the groin area. The second splint is applied from the outside so that the ankle, knee and hip joints are well and securely fixed.
An almost similar technique is used for tibia fractures. The splint is also applied on the inner and outer surfaces, so as to fix the knee and ankle. If a foot fracture occurs, a Cramer splint is used. It is applied up to the upper part of the ankle joint.
In case of damage to the clavicle bone, the victim’s hand is suspended on a scarf. If for some reason it is not possible to go to the emergency room within an hour, then it is recommended to apply a bandage that resembles the number 8 in appearance, allowing you to abduct the forearm and fix it in this position.
In case of rib fractures, a fixing bandage is required to be applied to the patient's chest area. It is recommended to bandage during exhalation. Such immobilization allows you to minimize pain and significantly reduce the risk of soft tissue injury.
Assisting with severe fractures
Extreme caution should be exercised when immobilizing the most severe and dangerous injuries, which experts include fractures of the pelvic bones and spine. In the first case, the victim should be laid on his back, his legs half-bent and soft fabric pads placed in the popliteal area.
In case of spinal fractures, the victim is carefully placed on a hard surface, very carefully to avoid possible bending of the spinal column, and then they are fixed in a stationary position, using soft straps for this purpose. Fabric cushions are placed under the neck.
The procedure for fixing with household materials
Often injuries occur at a time when the victim does not have access to basic medical supplies.
In this case, you can make do with improvised materials:
- For immobilization in case of forearm fractures, the injured arm can be fixed with two slats, pressed to the skin and wrapped with ordinary rope. To prevent the structure from injuring your hand, you can place a soft cloth between the stick and the skin.
- A broken forearm can be fixed by tying the hem of a jacket under the injured arm. It can be attached with a pin or hairpin.
It does not matter how the immobility of the limb is maintained. The main thing is that the hand moves as little as possible.
The order of applying the splint
In case of a hip fracture, immobilization is performed with a special device that allows you to fix and slightly stretch the joint. For a hip fracture, a Dieterichs splint is used. The device is constructed of outer and inner wooden crutches, a footrest and a twist stick attached to the tire with a cord. Crutches consist of two fragments that regulate the length of the apparatus.
Before applying the splint, injections of painkillers are given. To secure the device you need a bandage and scissors. Before starting immobilization measures, it is necessary to reassure the patient and explain what it is.
The procedure for applying the device:
- It is necessary to free the damaged area from clothing (cut things at the seams).
- Adjust the length of the crutches on the victim’s healthy leg.
- Without taking off the patient's shoes, fix the foot and bandage it in a figure-of-eight pattern to the foot pad. The outer fragment of the device is applied to the injured leg, the upper part should reach the armpit, the lower part should be 8-10 cm longer.
- The outer part of the device is inserted into a special hole in the footrest. The inner part of the device is placed in the groin area of the injured leg and secured with a bridge under the foot. Both ends of the side tires are fixed in the footrest.
- Place cotton wool or bandages under the ankle, knee, and hip joints so that the soft tissue is not compressed.
In addition, a Kramer splint is used to avoid sagging of the tibia and additional displacement of bone fragments.
- Belts are attached from the armpit to the opposite shoulder girdle and at hip level.
- You need to pass the cord through the hole in the jumper and secure the twist stick.
- By turning the twist stick, the limb is stretched (the diametric bars of the device reach the groin and armpit).
- After the twist is fixed under the foot by the protrusion of the outer tire.
- The parts of the device are secured with a bandage in a spiral from the foot to the hip joint.
When applying different types of splints, you must strictly follow the rules. If this is not done, unnecessary pain will be caused to the patient. Additional displacement of the bones complicates subsequent treatment.
For the purpose of immobilization, ready-made products are used. They may not always be at the site of injury. The first aid provider must be able to apply a device from available material. It could be a board, stick, cane, piece of plywood, etc.
Consequently, in case of a hip fracture, a temporary cessation of mobility of three joints is practiced - the hip, ankle and knee. Splinting should be carried out even if it is not possible to determine whether there is bone destruction or not.
When carrying out manipulations, it is forbidden to make even the slightest attempt to fix broken bones. This causes severe pain to the victim. Even minimal displacement of the bones aggravates the injury.
In case of an open injury, the trousers are cut, the bleeding is stopped and only then a bandage is applied. You need to take 2 large boards or similar materials. You need to calculate the optimal length: so that one end reaches the armpits, and the opposite end is slightly behind the foot. This element is placed on the outside of the leg. The same splint is placed on the inner surface of the leg: one end comes from the perineum, and the other also protrudes beyond the foot.
The splints are secured with any dressing material. To prevent them from putting pressure on the tissue, you should use cotton or other soft pads.
This splint has two crutches for the thigh, elements for holding the foot, and nuts for tightening. She immobilizes and stretches the limb. Its use is also justified for various lesions of the hip joint. It is called so by the name of the doctor who invented it.
The sequence of actions when using a Dieterich bus is as follows.
- Give the victim a sedative and pain reliever, explain the purpose and course of the procedure.
- Cut the clothing if it fits tightly on your leg.
- Inspect the affected area.
- Place the crutches on the uninjured leg, adjusting its length.
- Strengthen the sole and foot of the affected limb with a figure-of-eight bandage in case of a hip fracture. In this case, the shoes are not touched.
- Place an external crutch in the armpits on the side of the broken limb. Strengthen it so that it is longer than the sole, about 8 centimeters.
- Insert the outer part of the tire into the eye from the sole side.
- Place another part of the Dieterichs device in the groin area (affected limb), pass it through the eyelet located near the sole, and secure the jumper.
- Place spacers under the tires.
- Tighten the straps from the armpit on the side of the affected leg to the opposite shoulder girdle, and thread the cord through the hole in the jumper. Tighten the twist, extending the limb until the bars rest against the groin and armpit areas.
- Secure the twist.
- Secure the splint with a bandage in a spiral pattern from the ankle to the hip joint.
One tire bends along the back of the thigh, lower leg, and foot. An indentation is also made for the heel and calf muscles. In the area intended for the popliteal region, you need to bend so that the leg is slightly bent at the knee. The lower end curves in the shape of the letter G. At the same time, it captures the foot completely.
The next two tires are tied together along their length. The lower end is bent L-like. It should be laid along the outer surface from the armpit to the foot. Its lower edge is bent in the shape of the letter G. The last splint is placed along the inner femoral side. Its bottom also curves. The splints are secured with gauze bandages. They must remain throughout the entire duration of immobilization for a hip fracture.
Errors when immobilizing with a Kramer splint:
- weak fixation of the long part of the splint, which leads to ineffective fixation of the hip joint;
- incorrect folding of the ladder tire along its entire length;
- no bending under the knee;
- foot drop;
- small layer of gasket.
If there are no immobilization materials, then the affected limb is tied to the healthy one. Standard fixing products are used as soon as possible.
How improvised means are used:
- board;
- paddle;
- stick;
- umbrella;
- a large piece of cardboard;
- blanket or pillow;
- broom.
Anesthesia should be administered before immobilization. Immobilization can be carried out using Dichteris or Kramer splints. Just as with a hip injury, three joints are fixed.
The procedure for applying a fixator, other manipulations and transportation are the same as for a hip fracture.
Improper implementation of immobilization measures threatens damage to the hip joint. A person’s ability to move, and sometimes his life, depends on how well emergency care is provided.
Symptoms and features
Only a doctor can reliably determine the fracture and its severity. However, by certain signs you can independently recognize such injuries.
The following symptoms may indicate a violation of the integrity of antibrachium bones:
- swelling of the hand at the site of injury;
- limited mobility;
- sharp severe pain;
- hematoma (when blood vessels are damaged);
- bone crepitus (characteristic crunching);
- limb deformity.
Initially, the hand may become slightly numb and pale, but as time passes, the discomfort begins to increase. Such fractures occur quite often in people of all ages. However, most cases are associated with traumatic causes rather than pathological ones.
The forearm is designed in such a way that it consists of two parts - the radius and ulna. Their upper end connects to the humerus and forms the elbow joint.
In the lower part, the wrist joint is formed at the junction of the forearm and hand. Absolutely all areas can be damaged, with the diaphyses most often being displaced.
What to use for immobilization?
Modern means for immobilization are special splints, which may differ in design and size. They are usually used to immobilize injured arms or legs. The following types of materials are used to produce tires:
- Wire.
- Steel mesh.
- Tree.
- Thick cardboard.
- Plastic structures.
- Plywood.
If the victim requires long-term transport immobilization, then the use of splints and plaster bandages is recommended. This type of splint is made according to an individual design, providing maximum fixation and a tight fit to the body. In situations where there are no special splints, improvised means of immobilization are used, such as boards, cardboard, thick rods, bandages, pieces of fabric.
Cloth and fabric bandages can be used for fractures of the clavicle, shoulder blades, and injuries to the cervical spine. A cotton-gauze collar is also used, which is made from a gauze bandage with a thick cotton layer. The structure is fixed with bandages. This product ensures a state of rest for the patient’s cervical region and head during transportation.
If there are no materials at hand to make a splint, then the fabric can be used to bandage an injured limb to a healthy one or to the victim’s torso, which allows for the necessary fixation in emergency situations.
Immobilization is a necessary first aid measure for victims in the event of fractures and other types of injuries. The use of splints and other structures fixes the damaged area, alleviates the patient’s condition, and prevents the development of possible complications during transportation to the trauma department.
Further help
If immobilization is performed correctly, transporting the patient to a medical facility will not be difficult. After this, it can be transferred to the hands of doctors, who will conduct a more thorough diagnosis through a physical examination and x-rays.
Subsequent treatment is as follows:
- Reposition of bone fragments. If there is displacement, bone fragments are moved to the correct position. This can be done closed or through surgery. After this, a plaster cast is applied to the arm for several weeks. In some cases, additional osteosynthesis is required.
- Prescribing medications. To recover from injury, painkillers and anti-inflammatory drugs, antibiotics and vitamin-mineral complexes are required.
- Procedures. As the bones heal, various physiotherapy procedures, therapeutic massages, balneological procedures, gymnastics, etc. are introduced.
- Diet. For complete tissue regeneration, the body requires high-quality food in the diet, rich in vitamins and minerals involved in the processes of bone formation.
You can get more information on the topic of transport immobilization from the video in this article.