With injuries and various diseases of the joints, the upper limbs often suffer. For successful treatment, immobilization of the affected part of the body is indicated. The most convenient way to ensure limb immobility is a special fixator for a broken arm.
A bandage on the arm for a fracture provides protection against re-injury during the recovery process and helps speed up recovery. In some cases, a hand brace for a fracture can be constructed independently, with the participation of an assistant. Therefore, it is useful to familiarize yourself with the rules for applying such dressings and find out what materials can be used for this.
Rules to follow when constructing a bandage for a broken arm
An immobility bandage for a broken arm is considered the most common method used to treat a variety of injuries. Its main task is to ensure the limbs are in the correct physiological position. Therefore, its application must be carried out by a specialist.
When providing first aid, a bandage for an arm for a fracture can be done independently; the limb is fixed or a splint is applied. But after first aid is provided, the victim must be taken to a doctor as quickly as possible. Timely, qualified medical assistance will help prevent complications.
If you need support for a broken arm or for arthrosis, minor injuries, or during rehabilitation, bandages are a great help.
When applying an arm brace after a fracture, you must follow some rules:
- Before tying the bandage, it is necessary to ensure that the hand is in a comfortable position that is correct from a physiological point of view. As a rule, the limb is bent at a right angle at the elbow joint;
- In case of dislocations and fractures, it is not recommended to independently reduce the joint or allow displacement of bone fragments. Apply bandages over the area of injury;
- If the skin is damaged, no external agents should be used without a doctor’s prescription;
- After the bandage is applied, it is necessary to monitor the condition of the patient's skin. If it becomes numb, the patient feels tingling, coldness, and the bandage should be loosened.
Diagnostics
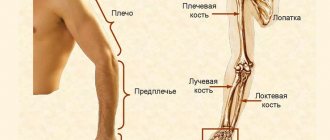
Symptoms of any fracture are pain, swelling, dysfunction, and limited movement in adjacent joints. The hand is very characterized by rapidly growing swelling, especially if 2 or more bones are broken. Due to swelling, the deformation caused by the displacement of fragments is often not noticeable, so some patients consider such injuries to be simply severe bruises and put off seeing a doctor. The standard test to detect a fracture is an x-ray. Computed tomography (CT) can be used to more accurately determine the position of fragments or identify intra-articular fractures of the base of the metacarpal bones.
Types of arm bandages
Supportive bandages for the arm can be different. They differ in material, area of application and purpose for which they are created. To provide first aid, both ordinary bandages and improvised materials can be used.
In medical institutions, a hand holder for a fracture can be made of different materials. Fixation is carried out using plastic splints, plaster casts, and splints.
During the rehabilitation period after injuries of varying severity, in pathological conditions, a variety of orthoses and bandages are often used. The doctor decides what type of fixation bandage should be used on the arm in case of a fracture or disease.
Depending on the type of injury, area and complexity of the injury, the following types of hand supports exist:
- Orthopedic protective or fixing orthoses;
- Ready-made support bandages;
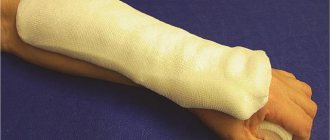
- Plaster splints, plaster bandages;
- Plaster made of plastic;
- Delbe rings;
- Deso bandage;
- Handkerchief for a fractured arm.
There are different techniques for applying bandages for a fractured limb. They can be spicate, spiral, eight-shaped, tortoiseshell. This type of bandaging is performed when providing first aid, applying a cast if necessary, and when treating minor injuries.
Headband
To isolate the damaged area from external factors, a scarf is often used. With its help, you can securely fasten the damaged limb after careful treatment. Anyone can use such a retainer, since this does not require special knowledge or medical education. A bandage for a fracture is very convenient when you need to fix the injured arm until the ambulance arrives. Scarves for headbands can be different:
- for fixing an injured hand;
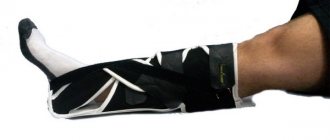
- for injured shin;
- for fixing the shoulder joint;
- bandages that are applied to the mammary glands, head and buttocks.
The hand scarf is applied as follows:
- The victim must be in a sitting position. The arm is positioned so that the hand and wrist are above the elbow joint. After this, all ends of the scarf are connected at the corners to obtain a triangular shape. The bandage is placed under the elbow near the shoulder joint.
- The upper part of the scarf is circled around the neck, after which it goes down to the injured arm. The remaining end of the bandage on the other side must be lifted and circled around the forearm. The knot is tied on the same side where the damage is located.
- To ensure that the arm is in a comfortable position, the fabric near the elbow is left slightly pulled back. The bandage is fastened using special devices or tape. When the bandage is properly secured, blood circulation is not impaired, and the patient feels comfortable.
What types of bandages are there to support a fractured arm?
The most difficult is considered to be a sling for a broken arm. It must be created by a doctor. If fixation is performed by a non-professional, bone fragments often become displaced. In this case, blood vessels and nerves can be damaged, there is a danger of muscle rupture, often these circumstances lead to incorrect fusion of bones. Bandages for fractures to immobilize are performed only based on X-ray results.
A scarf for a broken arm is used as first aid to fix a limb. You can purchase it at a pharmacy or make it yourself. Also, a scarf to support an arm during a fracture can be made from any available means - a piece of fabric, a headplate, or even a shirt. Basic requirements - the fabric must have a triangular shape, the sides of the piece must be at least 80 cm, and the base must be a meter long.
How to apply a bandage
If the injury is simple or first aid is provided, a fixing bandage may be applied to the injured limb. It is necessary to strictly follow the application technique and ensure uniform tension of the material.
Do not pull the bandage too tightly - this leads to problems with blood circulation, and the tissue may atrophy. Weak tension will not provide the functions that the bandage is supposed to perform.
If there are open wounds in the area of the fracture, ulcers, or other damage to the skin, it is necessary to re-bandage every day or two. If there is no such problem, you can change the bandage only when it becomes loose or dirty.
It is very difficult to build a holder for a broken arm if a dressing needs to be applied to the shoulder joint. Indications for this may be as follows:
- Osteoarthritis;
- Dislocation;
- Injury;
- Sprain.
Most often, the arm bandage for a fracture is spica-shaped. Its main feature is that it allows you to fix the joint as rigidly as possible. The bandage is wound from below onto the shoulder, the coils are placed on the chest and passed under the armpit of the second, uninjured arm.
On the shoulder, the turns of the bandage are crossed in the area of the deltoid muscle, so they overlap each other, the finished bandage takes on the appearance of an ear of bread.
For various injuries and joint diseases, it is necessary to apply a so-called “turtle” bandage to the elbow. Its peculiarity is that the bandage is applied slightly above and below the elbow joint. The turtle armband is divided into converging and diverging varieties. The choice of technique to be used to apply the coils will depend on the type of injury and the degree of its complexity.
You can create a hand holder for a fracture yourself in case of wounds, bruises, and sprains. This bandage is called figure-of-eight because of the peculiarities of its application.
It is better to entrust the process to a specialist, but if this is not possible, it is better to perform the procedure yourself.
Bandaging should begin with the wrist joint. Then they rise to the fingers along the back surface of the hand, several turns of the bandage are passed along their base. After this, they return to the wrist, also moving along the back side. You will need to repeat these steps several times.
In case of injury, it is sometimes necessary to apply a spiral bandage to the finger. It is especially effective for sprains, fractures, and can help fix external medications (for example, ointment) for panaritiums, arthritis or wounds.
Start bandaging from the wrist area. Then slide the bandage down the back of your hand to the end of your injured finger. Then spiral turns are made from the upper phalanx of the finger to its base. To secure the bandage, the bandage is brought back to the wrist along the back side and is already tied on it.
Bandage
Patients are often faced with the problem of what to choose: a scarf or a bandage for a broken arm. Both devices have the same purpose - fixing the position of a broken limb until it heals completely.
Significant differences between a bandage and a scarf cannot be determined - these devices are presented in the form of a cover for the injured arm, into which it is placed in a bent position. The convenience of the bandage lies in the fact that it is attached to the shoulder with straps, the length of which can be adjusted to suit your physiological needs.
The entire design of the bandage has more advanced characteristics, in contrast to the scarf bandage. They are usually made of soft fabrics that easily allow air to pass through, allowing the skin to breathe fully. The appearance of this device on the hand is more attractive. Some models of bandages have additional clamps to more securely support the arm in a given position. If the recovery course requires a lot of time, then it is better to opt for comfort and practicality and purchase a special bandage.
Available materials for constructing a sling
It is not always possible to access qualified medical assistance on time. For example, if by an unfortunate accident you were injured while hiking and you still need to get to the doctor, it is better to temporarily immobilize your arm using improvised means. You can use the following options:
- Clothes with long sleeves. Tie a shirt or sweater with the sleeves behind your head, and insert your hand into the resulting loop. This will help transfer the weight of the injured limb to the neck or back. The length of the sling can be adjusted.
- Belt. Make a loop of the required size, secure it with a buckle, put your hand through it and put the belt around your neck so that the metal elements do not put pressure on the skin.
- Tie. Using a simple knot, make a loop out of the tie and hang the injured limb around your neck. You need to adjust the loop so that your hand is at an angle of 90 degrees.
- An improvised bandage can be made from adhesive tape, wound in several layers.
DIY bandage
Almost everyone who has ever been actively involved in sports or often went on hikes can make a bandage. Knowing how to make a bandage for an injured limb with your own hands, you can provide first aid to the victim in a timely manner, and then take him to a medical facility for a full examination by a doctor. To make a bandage yourself, you should follow a few simple recommendations:
- if the damage is open, it is necessary to treat it with an antiseptic;
- one edge of the bandage is located on the shoulder, and the second on the wrist;
- both ends are tied;
- a wide area of fabric should be behind the victim's neck.
Rules for wearing slings
If you injure your upper limb while wearing a fixing bandage, you must follow some rules - this will help speed up recovery.
With the help of dressings, it is possible to transfer part of the weight of the injured arm to the neck and back. But this must be done extremely carefully to prevent them from stretching. The load can cause discomfort in the area of the shoulder blades and cervical spine. To reduce the unpleasant effect, try to keep your back straight.
Here is a small list of instructions, following which will help you not experience problems with posture:
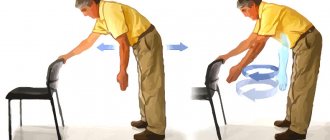
- If your arm is in a sling and you have to stand for some time, try to keep your back straight, relax your shoulders and pull them back slightly. Keep your chin up and don't slouch.
- When sitting for a long time, try to keep your back parallel to the back of the chair. Ideally, the spine should be vertically straightened, the head raised so that the neck remains straight. Your feet should be firmly on the floor. Try not to hunch over or relax your spine.
- If you wear a brace and experience pain in your neck or back, be sure to consult your doctor about this. You should not wear bandages if you have problems with your neck or back.
The use of different types of fixators for injured limbs is very common. When choosing a suitable sling, you should consult your doctor. A competent specialist will help you choose the option that is suitable for your situation.
Applying a fixative bandage at home
Sometimes the bandage can be applied independently at home, without the help of medical personnel. To know how to make a brace for an injured limb, you should familiarize yourself with the following recommendations:
- If it is an open fracture, then before bandaging it is necessary to wash the wound and thoroughly treat it with an antiseptic.
- If dirt or other foreign objects get into the wound, they must be removed using tweezers.
- Do not use adhesive materials for bandaging. It is worth using a fabric that can completely cover the area of damage.
- The hand needs to be given a fixing position: bend it at an angle of 90°. In this case, it should be horizontal relative to the floor, and the end of the material should be thrown over the head.
To fix the hand in the correct position, use a fixing bandage. It can be made from different materials using different devices. Elastic fabric fixators are applied to open injuries in the joint area, which allows the person to feel comfortable and recover quickly.