Immobilization is understood as ensuring the immobility of a certain part of the body in case of damage (bruise, dislocation, fracture) or disease.
Types of immobilization Immobilization is usually divided into transport and therapeutic. Transport immobilization is temporary immobilization for the safe movement of the victim to a medical facility. Properly performed transport immobilization is the key to the success of therapeutic immobilization and rapid recovery. Therapeutic immobilization - ensuring immobility of a limb or other part of the body for healing and tissue restoration. Most often used in the treatment of fractures.
During transport immobilization, various means are used: these can be a) a manufactured arm scarf (shoulder bandage), an arm splint (Kramer splint), a joint splint, etc. or b) means of immobilization from improvised means (scarves for the arm and splints for the arm/leg can be made from thick fabric, belts, planks, bandages, cotton wool).
Means of therapeutic immobilization - various plaster casts, corsets, splints, as well as metal and plastic structures for traction and fixation of bone fragments. Auxiliary means of therapeutic immobilization include a soft splint on the arm, a scarf for the arm: they help relieve joints and limit mobility in certain segments of the body.
Indications for transport immobilization:
- bone fractures,
- soft tissue damage,
- damage to large blood vessels, nerve trunks,
- deep burns,
- some acute inflammatory processes, etc.
The need for transport immobilization: 1) immobility of damaged tissues helps prevent aggravation of injury (secondary displacement of bone fragments, damage to blood vessels, development and spread of infection); 2) reducing pain, preventing traumatic shock; 3) preparing the victim for transportation to the hospital.
Principles of transport immobilization:
- External fixation of a limb segment: at least two joints (below and above the injured area) adjacent to the injured area must be immobilized. If a hip fracture is suspected, all joints of the leg are fixed.
- Traction of the damaged limb segment.
What you need to remember when carrying out transport immobilization
- Transport immobilization is performed at the scene of the incident as part of pre-medical care for the victim.
- Clothes and shoes should be removed from the victim only if necessary, starting with the injured area. For example, with a closed fracture, clothing does not interfere with immobilization and can serve as a soft lining under the splint.
- Depending on the extent of the damage, anesthesia may be necessary, since when a transport splint is applied, the pain in the damaged area intensifies (this applies primarily to injuries of the musculoskeletal system). Here you can resort to the method of novocaine blockades, nitrous oxide anesthesia, etc.
- If necessary, apply a hemostatic tourniquet. The tourniquet is applied in such a way that it can be removed without disturbing the immobilization (bandages, splints should not cover the hemostatic tourniquet).
- Open fractures and wounds should be covered with an aseptic bandage until fixed with a splint. There is no need to straighten the protruding ends of bone fragments - this can aggravate the injury and lead to deep penetration of infection.
- The injured area must be securely fixed, and the splints must be firmly secured.
- Before applying a rigid splint to an arm or leg, the limb must be covered with cotton wool, wrapped in a bandage, or use improvised means (clothing, towel). There is no need to allow excessive pressure from the splint on soft tissue or compression of large blood vessels.
- The transport splint on the limb must be secured along its entire length with soft bandages.
- If indicated, the splinted arm, bent at the elbow, should be secured with an arm scarf.
- During the cold season, the injured limb should be insulated to avoid frostbite during transportation.
The rules and principles of transport and therapeutic immobilization are similar.
Additional information on immobilization and first aid for injuries: Immobilization First aid for injuries First aid for shoulder dislocations and fractures Immobilization. Hand scarf as a component of treatment and rehabilitation
Application of a polymer bandage
The technology for applying this material is the same as when using a plaster cast. However, rigidity is acquired when the polymer fiber comes into contact with water. The bandage must be moistened before application, then use it to secure the damaged limb. A few minutes after application, the material hardens, thereby ensuring reliable fixation.
This method does not require special skills, as it is completely identical to applying a plaster cast. But it is simpler and “clean” - there is no need to prepare a solution. All you need is clean water.
Advantages of polymer immobilization
The application of a polymer bandage is a more modern method of immobilization, which is literally replacing the traditional plaster bandage in modern clinics. This popularity is explained by the advantages of the new method:
- A polymer bandage is several times stronger than plaster; it does not crumble during wear.
- Thanks to its elasticity, it fits tightly to the surface of the skin, following the curves of the body. This ensures reliable fixation of the limb.
- The ability of the material to transmit x-rays allows radiography to be taken without removing it.
- The material is much lighter than a plaster cast, which makes the entire rehabilitation period much easier. Thanks to this property, there are no significant restrictions on the patient’s mobility, and the process of wearing the bandage itself is not so burdensome.
- The polymer bandage can be wetted. Unlike plaster, this dressing is not afraid of moisture. When it hits the surface, it does not get wet and does not lose its properties. The bandage is also easy to clean with a sponge soaked in water.
- The structure of the bandage allows the skin to breathe, due to which there is no diaper rash, skin irritation and itching. This is one of the most important benefits for patient comfort.
- Polymer immobilization allows the application of a less bulky layer of fixation material, which also provides more comfort for the patient.
- The aesthetic component is another advantage over gypsum. In addition to the fact that the polymer bandage is more compact and neat, it can be of various colors. This helps to move away from the traditional white and select the dressing according to the wishes of the patient.
The properties of the bandage expand the scope of application: it is used not only for the treatment of fractures, but also as an orthopedic bandage for other injuries: dislocations, sprains and others.
All these qualities make polymer immobilization much more effective in accelerating recovery and comfortable for the patient. Therefore, most competent and highly qualified orthopedic traumatologists choose this material for rehabilitation after fractures and other injuries.
If you have questions about the use and benefits of polymer immobilization, please contact me by phone +7 (905) 640-64-27 or via a message that can be sent in the “ Contacts ” section.
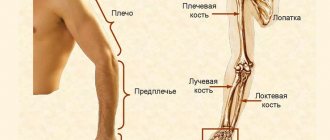
Transport immobilization for upper limb injuries
Injuries to the shoulder girdle and upper extremities include scapula fractures, collarbone fractures and dislocations, injuries to the shoulder joint and shoulder, elbow joint and forearm, wrist joint, bone fractures and damage to the joints of the hand, as well as ruptures of muscles, tendons, extensive wounds and burns of the upper extremities.
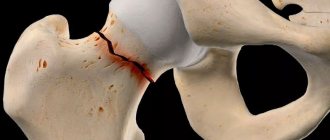
Immobilization for clavicle injuries. The most common injury to the clavicle should be considered fractures, which, as a rule, are accompanied by significant displacement of fragments. The sharp ends of the bone fragments are located close to the skin and can easily damage it.
With fractures and gunshot wounds of the clavicle, nearby large subclavian vessels, nerves of the brachial plexus, pleura and apex of the lung can be damaged.
Signs of a clavicle fracture: pain in the collarbone area; shortening and changing the shape of the collarbone; significant swelling in the collarbone area; movements of the hand on the side of the injury are limited and sharply painful; pathological mobility.
Immobilization for clavicle injuries is carried out with bandage bandages. The most accessible and effective method of transport immobilization is to bandage the arm to the body using a Deso bandage.
Immobilization for scapula fractures. Significant displacement of fragments in scapula fractures usually does not occur.
Signs of a scapula fracture: pain in the scapula area, aggravated by moving the arm, loading along the axis of the shoulder and lowering the shoulder; swelling above the shoulder blade.
Immobilization is carried out by bandaging the shoulder to the body with a circular bandage and hanging the arm on a scarf (Fig. 48) or by fixing the entire arm to the body with a Deso bandage.
Immobilization for injuries to the shoulder, shoulder and elbow joints is carried out for shoulder fractures, joint dislocations, gunshot wounds, damage to muscles, blood vessels and nerves, extensive wounds and burns, and purulent-inflammatory diseases.
Signs of shoulder fractures and injuries to adjacent joints: severe pain and swelling in the area of injury; pain increases sharply with axial load and movement; changes in the shape of the shoulder and joints; movements in the joints are significantly limited or impossible; pathological mobility in the area of the shoulder fracture.
Rice. 48. Transport immobilization of the arm for a fracture of the scapula
Immobilization with a ladder splint is the most effective and reliable method of transport immobilization for injuries of the shoulder, shoulder and elbow joints. The splint should cover the entire injured limb - from the shoulder blade of the healthy side to the hand on the injured arm and at the same time protrude 2-3 cm beyond the fingertips. Immobilization is performed with a ladder splint 120 cm long. The upper limb is fixed in a position of slight anterior and lateral abduction of the shoulder (a soft roller is inserted into the axillary region on the side of the injury), the elbow joint is bent at a right angle, the forearm is positioned so that the palm faces the stomach. A roller is placed into the brush (Fig. 49).
Rice. 49. Position of the fingers during immobilization of the upper limb
Tire preparation:
• measure the length from the outer edge of the scapula of the healthy side of the victim to the shoulder joint, and bend the splint at an obtuse angle at this distance;
• measure the distance from the upper edge of the shoulder joint to the elbow joint along the back surface of the victim’s shoulder and bend the splint at this distance at a right angle;
• the person providing assistance additionally bends the splint along the contours of the back, back of the shoulder and forearm (Fig. 50);
• it is recommended to bend the part of the splint intended for the forearm into a groove;
• having tried the curved splint on the victim’s healthy arm, make the necessary corrections;
• if the tire is not long enough and the brush hangs down, its lower end must be extended with a piece of plywood tire or thick cardboard. If the length of the tire is excessive, its lower end is bent;
• two gauze ribbons 75 cm long are tied to the upper end of the splint wrapped in cotton wool and bandages.
The splint prepared for use is applied to the injured arm, the upper and lower ends of the splint are tied with ribbons, and the splint is strengthened with bandages. The hand along with the splint is suspended on a scarf (Fig. 51).
To improve the fixation of the upper end of the splint, two additional pieces of bandage 1.5 m long should be attached to it, then pass the bandage around the shoulder joint of the healthy limb, make a cross, circle it around the chest and tie it (Fig. 52).
Rice. 50. Modeling of a scalene splint for transport immobilization of the entire upper limb
Rice. 51. Transport immobilization of the entire upper limb with a ladder splint: a — applying the splint to the upper limb and tying its ends; b - strengthening the splint with bandaging; c - hanging a hand on a scarf
Rice. 52. Fixation of the upper end of the ladder splint when immobilizing the upper limb
Mistakes when immobilizing the shoulder with a ladder splint.
• The upper end of the splint reaches only the shoulder blade of the affected side, very soon the splint moves away from the back and rests on the neck or head. With this position of the splint, immobilization of injuries to the shoulder and shoulder joint will be insufficient.
• Lack of tape at the upper end of the tire, which does not allow it to be securely fixed.
• Poor tire modeling.
• The immobilized limb is not suspended in a scarf or sling.
In the absence of standard splints, immobilization is carried out using a medical scarf, improvised means or soft bandages.
Immobilization with a medical scarf. Immobilization with a scarf is carried out in the position of slight anterior abduction of the shoulder with the elbow joint bent at a right angle. The base of the scarf is wrapped around the body approximately 5 cm above the elbow, and its ends are tied on the back closer to the healthy side. The top of the scarf is placed upward on the shoulder girdle of the injured side. The resulting pocket holds the elbow joint, forearm and hand. The top of the scarf on the back is tied to the longer end of the base. The damaged limb is completely covered by a scarf and fixed to the body.
Immobilization using improvised means. Several planks and a piece of thick cardboard in the form of a trench can be laid on the inner and outer surfaces of the shoulder, which creates some immobility during a fracture. The hand is then placed on a scarf or supported by a sling.
Immobilization with Deso bandage. For shoulder fractures and damage to adjacent joints, immobilization is carried out by applying a Deso-type bandage. Correctly performed immobilization of the upper limb significantly alleviates the condition of the victim, and special care is not required during evacuation. However, the limb should be periodically examined so that if the swelling in the area of injury increases, tissue compression does not occur. To monitor the state of blood circulation in the peripheral parts of the limb, it is recommended to leave the terminal phalanges of the fingers unbandaged. If signs of compression appear, the bandages should be loosened or cut and bandaged. Transportation is carried out in a sitting position, if the condition of the victim allows.
Immobilization for injuries of the forearm, wrist joint, hand and fingers. Indications for transport immobilization should include all fractures of the forearm bones, injuries to the wrist joint, fractures of the hand and fingers, extensive soft tissue injuries, deep burns, and purulent-inflammatory diseases.
Signs of fractures of the bones of the forearm, hand and fingers, damage to the wrist joint and joints of the hand: pain and swelling in the area of injury; the pain increases significantly with movement; movements of the injured arm are limited or impossible; change in the usual shape and volume of the joints of the forearm, hand and fingers; pathological mobility in the area of injury.
Immobilization with a ladder splint is the most reliable and effective type of transport immobilization for injuries of the forearm and extensive injuries to the hand and fingers. The ladder splint is applied from the upper third of the shoulder to the fingertips, the lower end of the splint protrudes 2-3 cm. The arm should be bent at the elbow joint at a right angle, and the hand should be facing the stomach and slightly retracted to the back (Fig. 53). A cotton-gauze roller is placed in the hand to hold the fingers in a semi-flexed position.
A ladder splint 80 cm long, wrapped in cotton wool and bandages, is bent at a right angle at the level of the elbow joint so that the upper end of the splint is at the level of the upper third of the shoulder; the section of the splint for the forearm is bent in the form of a groove. Then they apply it to the healthy hand and correct the defects of the modeling. The prepared splint is applied to the sore arm, bandaged along its entire length and hung on a scarf.
The upper part of the splint intended for the shoulder must be of sufficient length to reliably immobilize the elbow joint. Insufficient fixation of the elbow joint makes immobilization of the forearm ineffective. In the absence of a ladder splint, immobilization is carried out using a plywood splint, a plank, a scarf, a bundle of brushwood, or the hem of a shirt.
Rice. 53. Transport immobilization of the elbow joint and forearm: a — with a ladder splint; b - using improvised means (using planks)
Properties of a polymer bandage
In modern treatment of fractures, this material has a significant advantage due to its qualities. The composition of the bandage is a mesh-like fiber impregnated with polyurethane. It looks and feels no different from a regular bandage. It's just as easy to apply. However, its properties surpass it many times, and the fixation characteristics do not lag behind those of a plaster cast.
This material is light, durable, and pliable when applied. Therefore, it is easy to work with, and the fixation process does not take much time.
Functionality and versatility
Functional treatment of fractures with a shortened plaster cast is an original method that has been used for a long time. But it requires a certain qualification from the doctor; in our clinic we quite widely use this method of casting on different parts of the body for fractures. Most often it is used for fractures of the ankle, radius, metacarpal, and metatarsal bones. The bandage in this case can be made from either ordinary plaster or plastic, or modeling hard and soft plastic plaster at the same time. But they apply it in a special way.
Traditionally, traumatologists try to fix the damaged area as firmly as possible. For example, when a tibia is fractured, a bandage is often applied from the knee to the toes. In functional treatment, the doctor acts differently: a very small area directly above the fracture is placed in the cast. The nearby joints remain free.