Immobilization is understood as ensuring the immobility of a certain part of the body in case of damage (bruise, dislocation, fracture) or disease.
Types of immobilization Immobilization is usually divided into transport and therapeutic. Transport immobilization is temporary immobilization for the safe movement of the victim to a medical facility. Properly performed transport immobilization is the key to the success of therapeutic immobilization and rapid recovery. Therapeutic immobilization - ensuring immobility of a limb or other part of the body for healing and tissue restoration. Most often used in the treatment of fractures.
During transport immobilization, various means are used: these can be a) a manufactured arm scarf (shoulder bandage), an arm splint (Kramer splint), a joint splint, etc. or b) means of immobilization from improvised means (scarves for the arm and splints for the arm/leg can be made from thick fabric, belts, planks, bandages, cotton wool).
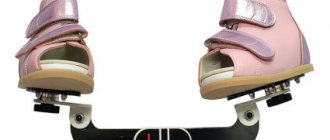
Means of therapeutic immobilization - various plaster casts, corsets, splints, as well as metal and plastic structures for traction and fixation of bone fragments. Auxiliary means of therapeutic immobilization include a soft splint on the arm, a scarf for the arm: they help relieve joints and limit mobility in certain segments of the body.
Indications for transport immobilization:
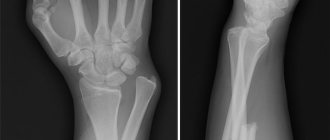
- bone fractures,
- soft tissue damage,
- damage to large blood vessels, nerve trunks,
- deep burns,
- some acute inflammatory processes, etc.
The need for transport immobilization: 1) immobility of damaged tissues helps prevent aggravation of injury (secondary displacement of bone fragments, damage to blood vessels, development and spread of infection); 2) reducing pain, preventing traumatic shock; 3) preparing the victim for transportation to the hospital.
Principles of transport immobilization:
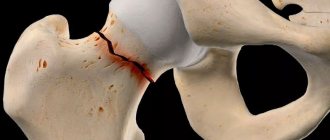
- External fixation of a limb segment: at least two joints (below and above the injured area) adjacent to the injured area must be immobilized. If a hip fracture is suspected, all joints of the leg are fixed.
- Traction of the damaged limb segment.
What you need to remember when carrying out transport immobilization
- Transport immobilization is performed at the scene of the incident as part of pre-medical care for the victim.
- Clothes and shoes should be removed from the victim only if necessary, starting with the injured area. For example, with a closed fracture, clothing does not interfere with immobilization and can serve as a soft lining under the splint.
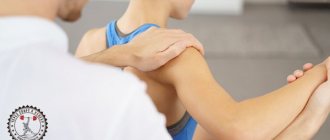
- Depending on the extent of the damage, anesthesia may be necessary, since when a transport splint is applied, the pain in the damaged area intensifies (this applies primarily to injuries of the musculoskeletal system). Here you can resort to the method of novocaine blockades, nitrous oxide anesthesia, etc.
- If necessary, apply a hemostatic tourniquet. The tourniquet is applied in such a way that it can be removed without disturbing the immobilization (bandages, splints should not cover the hemostatic tourniquet).
- Open fractures and wounds should be covered with an aseptic bandage until fixed with a splint. There is no need to straighten the protruding ends of bone fragments - this can aggravate the injury and lead to deep penetration of infection.
- The injured area must be securely fixed, and the splints must be firmly secured.
- Before applying a rigid splint to an arm or leg, the limb must be covered with cotton wool, wrapped in a bandage, or use improvised means (clothing, towel). There is no need to allow excessive pressure from the splint on soft tissue or compression of large blood vessels.
- The transport splint on the limb must be secured along its entire length with soft bandages.
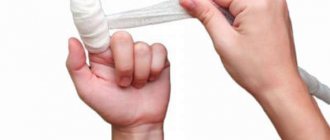
- If indicated, the splinted arm, bent at the elbow, should be secured with an arm scarf.
- During the cold season, the injured limb should be insulated to avoid frostbite during transportation.
The rules and principles of transport and therapeutic immobilization are similar.
Additional information on immobilization and first aid for injuries: Immobilization First aid for injuries First aid for shoulder dislocations and fractures Immobilization. Hand scarf as a component of treatment and rehabilitation
Areas of use of polymer immobilization
A polymer bandage can completely replace plaster in the treatment of fractures. This is an innovative material that significantly surpasses gypsum in its parameters.
In addition to fractures, it can be applied to dislocated joints to ensure their immobility, sprained ligaments and muscles. Thanks to its properties and proper use, this material allows you to:
- reduce rehabilitation time after fractures and injuries;
- create comfortable conditions for accelerated healing;
- facilitate the treatment of fractures and other injuries.
The recovery period with the use of a polymer bandage is faster and causes significantly less discomfort than a traditional cast.
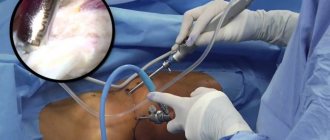
Immobilization procedure in the emergency room of the multidisciplinary clinic “Osnova”
The technique of applying a bandage depends on the material chosen by the patient together with the traumatologist. The general requirements for the procedure are:
- Creating a stationary position for the damaged joint;
- Provide free access to the site where the bandage is applied;
- A firm base must be placed under the mattress on the bed;
- Each layer of the dressing should lie evenly;
- Place non-absorbent cotton wool on the bone protrusions.
When using materials alternative to gypsum, it is necessary to use a special layer of fabric (with the exception of turbocast, which can be used repeatedly). Immobilizing dressings of all types are applied extremely quickly and reliably, which makes the procedure itself easy and reliable for the patient.
Properties of a polymer bandage
In modern treatment of fractures, this material has a significant advantage due to its qualities. The composition of the bandage is a mesh-like fiber impregnated with polyurethane. It looks and feels no different from a regular bandage. It's just as easy to apply. However, its properties surpass it many times, and the fixation characteristics do not lag behind those of a plaster cast.
This material is light, durable, and pliable when applied. Therefore, it is easy to work with, and the fixation process does not take much time.
Prices
| Name of service (price list incomplete) | Price |
| Immobilization with soft bandages, category I. difficulties | 550 rub. |
Signs of the need for immobilization:
- acute pain;
- forced position;
- inability to move at the site of injury;
- changing its anatomical configuration.
Carrying and transporting children with symptoms of fractures and dislocations without immobilization is contraindicated.
Application of a polymer bandage
The technology for applying this material is the same as when using a plaster cast. However, rigidity is acquired when the polymer fiber comes into contact with water. The bandage must be moistened before application, then use it to secure the damaged limb. A few minutes after application, the material hardens, thereby ensuring reliable fixation.
This method does not require special skills, as it is completely identical to applying a plaster cast. But it is simpler and “clean” - there is no need to prepare a solution. All you need is clean water.
Advantages of polymer immobilization
The application of a polymer bandage is a more modern method of immobilization, which is literally replacing the traditional plaster bandage in modern clinics. This popularity is explained by the advantages of the new method:
- A polymer bandage is several times stronger than plaster; it does not crumble during wear.
- Thanks to its elasticity, it fits tightly to the surface of the skin, following the curves of the body. This ensures reliable fixation of the limb.
- The ability of the material to transmit x-rays allows radiography to be taken without removing it.
- The material is much lighter than a plaster cast, which makes the entire rehabilitation period much easier. Thanks to this property, there are no significant restrictions on the patient’s mobility, and the process of wearing the bandage itself is not so burdensome.
- The polymer bandage can be wetted. Unlike plaster, this dressing is not afraid of moisture. When it hits the surface, it does not get wet and does not lose its properties. The bandage is also easy to clean with a sponge soaked in water.
- The structure of the bandage allows the skin to breathe, due to which there is no diaper rash, skin irritation and itching. This is one of the most important benefits for patient comfort.
- Polymer immobilization allows the application of a less bulky layer of fixation material, which also provides more comfort for the patient.
- The aesthetic component is another advantage over gypsum. In addition to the fact that the polymer bandage is more compact and neat, it can be of various colors. This helps to move away from the traditional white and select the dressing according to the wishes of the patient.
The properties of the bandage expand the scope of application: it is used not only for the treatment of fractures, but also as an orthopedic bandage for other injuries: dislocations, sprains and others.
All these qualities make polymer immobilization much more effective in accelerating recovery and comfortable for the patient. Therefore, most competent and highly qualified orthopedic traumatologists choose this material for rehabilitation after fractures and other injuries.
If you have questions about the use and benefits of polymer immobilization, please contact me by phone +7 (905) 640-64-27 or via a message that can be sent in the “ Contacts ” section.
Transport and therapeutic immobilization
6. If it is necessary to use a hemostatic tourniquet, the latter is applied to the limb before immobilization and in such a way that it can be removed without disturbing immobilization. The applied tourniquet cannot be covered with a bandage, placing a bandage over it. The harness lock should be located at the front and easily accessible.
7. An immobilizing device or splint is attached to the limb in most cases with bandages or special belts along its entire length. The bandage should cover the limb tightly enough without causing disruption of blood circulation in it.
8. When applying metal splints, they should first be wrapped with cotton wool and then with a bandage. This prevents the formation of bedsores, and in winter, local frostbite due to cooling metal tires.
9. Before transportation in the cold season, a limb with a splint is wrapped in warm objects to prevent frostbite and hypothermia.
10. Immobilization of the injured part of the body is carried out as early as possible from the moment of injury or illness.
11. In case of severe injuries, before applying an immobilizing bandage or splint, the victim is injected subcutaneously or intramuscularly with a narcotic painkiller (usually promedol) or non-steroidal anti-inflammatory drugs with a high analgesic effect (ketorol, nise, took, baralgin, etc.). The area of a closed fracture can be anesthetized by injecting a 1-2% novocaine solution into the fracture area or a case blockade with a 0.25% novocaine solution according to A.V. Vishnevsky.
12. Transport tires are usually placed on top of shoes and clothing. Undressing or removing the victim's shoes causes additional injury and should be avoided whenever possible.
According to the principle of operation, splints are divided into fixing and distraction, i.e. acting on the principle of traction. An example of a fixation splint is the ladder splint, and a distraction splint is the Dieterichs splint.
Means of transport immobilization are also divided into standard, non-standard and improvised or primitive made from improvised means.
Standard transport tires are means of transport immobilization, produced by industry to equip medical institutions, ambulances, paramedic stations and other first aid stations. Standard tires are ladder tires, plywood, Dieterichs distraction tires, plastic tires, pneumatic tires, vacuum immobilizing stretchers.
Non-standard means of transport immobilization are splints and devices used in individual institutions or departments, most often military medical ones, but not produced by the medical industry and not included in the set of standard splints (Elansky, Petrukhov, Bashmakov splint, etc.).
Improvised tires are made from improvised materials according to the principle of fixation tires (boards, skis, sticks, tree branches, etc.).
Ladder tires are produced in lengths of 120 cm and 80 cm. The width of the tire is 11 and 8 cm, respectively. The frame of the ladder tire is made of wire with a diameter of 5 mm, the rung (ladder) is made of wire with a diameter of 2 mm. These tires are wrapped in cotton wool and gauze. Currently, Kramer splints have appeared, placed in blind plastic covers, which allows them to be treated with an antiseptic solution after each patient.
The transport splint for the lower limb, the Dieterichs splint, is made of wood and, when folded, has a length of 115 cm. It belongs to the category of distraction splints. The tire consists of two sliding plank tires (branches) that look like crutches, a sole made of thick plywood that looks like a foot and is also called a footrest, a wooden stick-twist and two canvas belts. The outer branch is long, and the inner branch is short. Each branch consists of two strips (upper and lower) 7.5-8 cm wide, superimposed on one another. Both slats of the outer branch are longer than both slats of the inner branch. The lower bar of the inner jaw has a metal bracket, thanks to which it can slide along the upper bar without coming off it.
At the upper end of the bar of each branch there is a cap. At its lower end, along the inner side surface, a wooden peg is glued through a hole in the branch. In addition, on the upper bar of the outer branch there are two pairs of slots - one pair under the cap, and the second much lower. On the inner branch under the brace, the upper bar has two slots that serve for holding fabric fastening straps.
On the lower bar of the outer branch in its middle there is a row of holes intended for a wooden peg when adjusting the length of the splint according to the length of the immobilized limb. The lower end of this branch is cut off. The same holes are provided in the lower bar of the inner branch. A square board corresponding to the width of the tire is attached to the lower end of the inner branch with hinges, which has a hole with a diameter of 2.5 cm in the center. The square board is bordered by a metal frame and moves, as mentioned earlier, on hinges, like a window sash at the free end opposite to the attachment to the hinge the board has an eyelet formed by a metal frame into which the end of the outer jaw enters.
The plywood tire support on the lower surface closer to the heel has a wire frame that protrudes on both sides of the tire support in the form of rectangular lugs. The lower edge of the frame is slightly bent from the sole. At the point of attachment to the footrest, the frame is curved in the form of two hangers. There is also a twist, consisting of a cord and a wooden stick.
A wooden twist stick 7-8 cm long has a groove in the middle to which a cord is tied. The other end of the cord is tied to the metal eyes on the footrest.
When using a splint, first spread the upper and lower bars of the outer and inner branches of the splint to the required length. The slats of each branch are connected using a wooden peg nail and the connection is strengthened with a piece of bandage, and the pads and the inner surface of both branches are covered with cotton. The plywood sole (foot pad) is bandaged to the plantar surface of the foot. The lower ends of the outer and inner jaws of the tire are passed through the corresponding wire brackets of the plywood footrest and the lower end of the outer jaw is inserted into the groove of the movable transverse strip of the inner jaw. The area of the ankle and knee joints, as well as the area of the greater trochanter, is covered with a thick layer of cotton wool. After this, apply the inner branch of the splint to the lateral surfaces of the lower limb, and the outer branch to the outer lateral surface of the body and the lateral surface of the lower limb. The inner branch should rest against the inguinal-perineal region, and the outer branch should rest against the axillary region. The splint is attached to the injured limb and to the body with special fabric belts, trouser belts, gauze bandages or a scarf. A cord attached to the footrest is passed through a hole in the movable part of the inner jaw and a twist stick is inserted into its loop. Carefully stretch the injured limb lengthwise with your hands and secure the achieved position of the limb with a twist, shortening the length of the twist cord by twisting. A wooden twist stick is pulled with tension onto the edge of the outer jaw.
A plastic transport splint is a plastic strip reinforced with aluminum wire and is designed to immobilize the upper limb, lower leg and foot. There are holes along the edge of the tire, which are necessary for passing the cord intended for fixing the tire.
The tire has the following standard sizes:
Type I – length 900 and 1300 mm, width 115 mm;
Type II – length 900 and 1300 mm, width 100 mm;
Type III – length 750 and 1100 mm, width 85 mm.
The tire kit also includes a curtain cord 1500 mm long with pressed ends.
Type I splint is intended for immobilization for injuries of the lower leg and forearm. Type II splint is used to immobilize the upper limb. Type III splint is intended for immobilization in case of injuries to the upper or lower extremities in children.
When used, the transport plastic splint is bent according to the configuration of the immobilized limb and at an angle corresponding to the average physiological position in the area of large joints. No bedding is required. The end of the cord is inserted into the outer hole on the edge of the tire and tied. The second end of the cord is alternately passed through the hole at the edge of the tire, lacing-style. No additional bandaging of the splint to the limb is required.
All that is done is to hang the upper limb on a scarf or a piece of bandage.
A medical pneumatic tire (MPT) consists of: a two-layer sealed film plastic, polymer shell - a chamber, a zipper, a valve device with a tube for pumping air into the chamber. The tire is available in plastic bags in three sizes:
type I – for the hand and forearm;
type II – for the foot and lower leg;
type III – for the knee joint and hip.
The tire is used as follows: 1) the tire is removed from the package; 2)
open the zipper and carefully place the deployed splint under the injured limb; 3) close the zipper; 4) open the valve of the air supply device by turning the tube in a counterclockwise direction; 5) inflate the tire with your mouth or with a pump to moderate elasticity. After this, the valve is closed by turning the tube clockwise.
At an operating pressure in the chamber of 40-45 mm Hg. the splint acquires the rigidity necessary to implement immobilization and not interfere with blood circulation in the injured limb. The transparency of the shell makes it possible to monitor the condition of the limb, and the X-ray permeability of the material from which the splint is made allows for X-ray examination without removing it.
To remove the tire, the air is released from it and the fastener is opened. Before reusing the tire, wash it with warm water and soap and dry it.
The tire must be protected from punctures. If they occur, they are sealed with adhesive tape.
IMMOBILIZATION IN CASE OF INJURY
AND DISEASES OF THE HEAD AND NECK
Standard ladder splints can be used to make a splint for immobilization for head and neck injuries (Bashmakov splint). Military doctor K.M. Bashmakov proposed this splint during the Great Patriotic War, and it was used to treat those wounded in the head, neck and spine.
First, one stair rail 120 cm long is modeled along the contours of the head, neck and shoulder girdle in the form of the Greek letter Ώ (omega). A second stair splint of the same type is modeled in accordance with the contours of the head and neck along the midline, back surface of the head, neck and back. Then both splints are tied together, wrapped in cotton wool and bandages, the splint is inserted under the victim so that his head falls into the ring-shaped part of the splint, and it is bandaged to the victim. At least two people must apply the splint: one holds the victim’s head and lifts it, the second places and fixes the splint.
The Elansky tire is a non-standard tire; it is made of thick plywood and consists of two identical halves, fastened along the rear surface of the tire with metal loops. When unfolded, it represents the silhouette of the head and torso. The length of the splint is 60 cm, the width is 40 cm. In the upper part of the splint, corresponding to the occipital region of the head, there is an oval (11.5 x 8.5 cm) recess, on the edges of which a cotton-oilcloth roll 3-4 cm thick is stuffed. On the lower and On the side edges of the splint there are 6 slot-like holes for passing braid, belts or other soft long objects fixing the splint to the body.
The splint is placed behind the back and head. A cotton-gauze pad measuring 20 x 20 cm is placed under the occipital area. Below the back of the head, in the area of the back surface of the neck, a cotton-gauze roll is placed. The splint is attached to the head with a 10 cm wide bandage. The Elansky splint should be applied in a lying position. To fix the splint, two strips of fabric 1 m long are inserted into its side holes to secure the splint around the shoulder. The ends of these strips (ribbons) are tied on the chest or, if they are belts, they are fastened with a buckle. The two lower slits are used to hold a 1.5 m long braid, which secures the splint to the body. In approximately the same way, for injuries to the head and neck, the rubber pneumatic tire Gindin, which is the prototype of the Elansky tire, is used. To date, the medical industry of the Russian Federation produces splints made of polyethylene foam, the so-called “Adjustable Head Holder,” consisting of front and rear halves, which are connected to each other with Velcro fasteners, with the help of which the clearance of the splint is adjusted depending on the volume and thickness of the neck.
Less commonly, a non-standard splint proposed by A.P. is used for immobilization in case of fractures of the cervical spine, extensive damage to soft tissues and acute inflammatory processes of the neck. Petrukhov, consisting of two metal parts: headrest and backrest. In addition, the tire is equipped with a Glisson loop, usually used for traction by the head, two canvas belts and a mattress cover.
Primitive immobilization for injuries to the neck and cervical spine can be performed with a cotton-gauze collar (Schanz collar). Thick cotton-gauze pads or just a thick layer of gray cotton wool, and in their absence, any soft material (scarves, sheets, towels, etc.) are placed on the neck and secured with a bandage. Bandaging is performed with slight tension, without squeezing the vessels of the neck and trachea.
The width of the layer of bandaged material depends on the length of the neck; it should be such that the edges of the “collar” support the head, having the chin, lower jaw and occipital protuberance as support points.
TRANSPORT IMMOBILIZATION FOR INJURIES
AND DISEASES OF THE THORACIC AND LUMBAR
SPINE DEPARTMENTS
The standard means for immobilization for fractures of the thoracic and lumbar vertebrae are immobilizing vacuum stretchers. Civilian medical institutions are poorly equipped with stretchers of this type, so medical workers in these institutions are not sufficiently familiar with them.
For immobilization, the stretcher is laid unfolded next to the victim and the presence of a removable bottom with fastening elements for the victim is checked. The victim is transferred to a stretcher, the straps of the removable bottom are secured to him, and a bolster is placed under his head. A cord passed through special holes secures the rubber-fabric sheath around the body. Then a pump is connected and air is pumped out from the cavity of the rubber-fabric shell. Time required to create a negative pressure of 500 mm Hg. – 8 min.
The stretcher acquires a certain rigidity sufficient for good immobilization of the spine. If necessary, create an elevated head position for the victim and this should be maintained while the pump is operating. To carry a victim over a long distance, 4 people are needed, and when loading onto a vehicle, two.
Standard splints - ladder and plywood - can also be used for immobilization for fractures of the thoracic or lumbar vertebrae. To do this, three Kramer splints 120 cm long are placed on a stretcher in the longitudinal direction, so that they fall on the projection of the thoracic and lumbar spine, tied together and reinforced with three short transverse splints. Available materials (wooden slats, boards) can be used in the same way.
In order to reduce injury to the victim, a soft bedding (blanket, mattress and other soft objects) should be placed on the tires. Boards or other splinting material at hand are first firmly tied together, then the victim is carefully placed on them and secured with bandages, ropes or other soft, long objects. When using boards, it is permissible to lay and tie the victim on them. In this position, transport over short and long distances is possible.
You can use a regular stretcher with a tarpaulin panel if you put a sheet of plywood on it (the width of the stretcher) or one or two wide boards.
In all cases, the victim is placed in a supine position. A small cushion is placed under the lumbar curve of the spine.
In exceptional cases, for immobilization in case of fractures of the thoracic or lumbar vertebrae, you can use a regular soft stretcher, but in this case the victim is placed on his stomach.
TRANSPORT IMMOBILIZATION
IN CASE OF INJURY TO THE UPPER LIMB
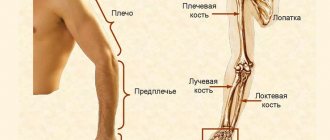
Transport immobilization for fractures of the humerus is performed using a standard ladder splint 120 cm long; its length should cover the entire injured limb from the fingertips to the inner edge of the opposite scapula. The splint is first wrapped in cotton wool and reinforced with a bandage. A gauze ribbon 75 cm long is tied to the proximal end of the splint. At a distance from the inner edge of the opposite shoulder blade in the projection of the elbow joint, the splint is bent at an angle of 90º.
In the future, the immobilizer can simulate the splint on himself. To do this, he places his elbow in the formed corner of the splint (of his right or left hand, depending on which side the victim has the injury), grabs the second end of the splint with his second hand from the back and bends it to the back so that the end of the splint reaches to the inner edge of the opposite shoulder blade. Leaning your elbow on the table, makes sideways movements with your body - you get a bend in the tire, the configuration corresponding to the curves of the shoulder, shoulder joint and back.
The splint is applied to the injured shoulder of the victim and the correct, most physiological position is created: the shoulder is brought 300 degrees forward; The ends of a gauze ribbon tied to the proximal end of the splint are tied around the healthy shoulder joint to strengthen it, and a cotton wool roll is placed in the armpit.
To maintain the natural position of the first finger in contrast to the others, a cotton-gauze swab is inserted into the space between the first and second fingers. The splint is fixed with bandages to the torso and to the limb from the wrist joint to the root of the limb with a spiral bandage, and the splint is fixed to the chest with a spica or cruciform bandage.
To better perform the immobilizing functions of the splint, the limb is suspended from the neck with a scarf or a piece of bandage, or the proximal and distal ends of the splint are tied with gauze.
IMMOBILIZATION FOR FOREARM INJURIES,
BRUSHES AND FINGERS
For forearm injuries, standard medical splints (pneumatic, ladder and plastic) are used.
A pneumatic tire, in this case the first type, is used as follows: first, the tire lock is opened, then it is put on the limb, grabbing the forearm and hand, the lock is closed and the tire is inflated with a special pump. The limb is extended at the elbow joint.
A Kramer ladder splint 80 cm long is modeled on a healthy limb; for this, it is placed from the middle of the shoulder to the fingertips, and then bent at an angle of 900 at the level of the elbow joint, wrapped with cotton wool and a bandage. The hand should be turned with the palm towards the body, i.e. stand vertically in relation to the surface of the tire. This position of the palm ensures a parallel, rather than cross, position of the ulna and radius, which prevents the displacement of fragments. Then the hand is fixed in dorsiflexion at the wrist joint. A cotton-gauze roll is placed on the palm side to hold the fingers in a semi-flexed position. The splint is bandaged to the limb along its entire length, then the arm is suspended around the neck using a scarf or a piece of bandage. Immobilization is also performed for injuries to the hand, but without gripping the elbow joint.
A plastic splint is applied in the same way as a stair splint. Here a softening layer of cotton wool is not required.
TRANSPORT IMMOBILIZATION
IN DAMAGE TO THE PELVIC AND FEMURAL BONES
In the absence of any immobilizing materials, the injured upper limb can be placed in a scarf or autoimmobilization can be performed by bandaging the arm to the body with a Deso or Velpeau bandage or any other long soft object. The Velpeau bandage is best suited for this, when applied, the arm is bent at the elbow joint and placed on the chest so that the hand of the injured arm lies on the shoulder girdle of the healthy side.
The standard splint used for injuries of the hip joint, thigh and injuries of the knee joint is the Dieterichs distraction splint, the application rules for which are described in the section “Transport immobilization and its means”
In the absence of a Dieterichs splint, you can use ladder splints, which are used for immobilization for fractures of the femur as follows: two splints are tied together along the length, bending the lower end of one of the splints at a distance of 20 cm from the edge in the transverse direction. An extended splint is applied along the outer surface of the injured limb along the lateral surface of the body to the armpit. The same stair splint is placed along the inner surface of the thigh. the elongated splint should be modeled so that there is a recess for the heel, calf muscles with a slight flexion angle in the projection of the knee joint and a footrest. It is applied along the back surface of the limb. All splints are carefully wrapped in cotton wool, placed on the limb and secured with a bandage. Plastic splints are applied in the same way.
A medical pneumatic splint (type III for the hip and knee joint) is used as follows. The splint is removed from the bag, the zipper is opened and carefully placed under the limb so that the knee joint is in the middle of the length of the splint. Having closed the lock, open the valve of the air supply device, unscrewing it one turn, and inflate the tire.
Improvised immobilizing agents are used in the absence of standard tires. These can be slats, skis, bundles of brushwood and other rigid objects of sufficient length to ensure immobilization in three joints of the injured limb: hip, knee and ankle.
If possible, the foot is placed at an angle of 900 and a soft bedding material is used, most often cotton wool, especially in the area of bony protrusions.
However, situations may arise when there are not only standard, but also no available means for carrying out transport immobilization, and then the autoimmobilization method should be used, i.e. “leg to leg” fixation. To do this, the damaged lower limb is connected in two or three places to the healthy leg, and the damaged leg is placed on the healthy leg so that the heel area of the damaged leg lies on the front surface of the ankle joint of the healthy leg. In this case, the average physiological position of the limb is achieved, and with careful straightening of the healthy leg, slight stretching occurs along the length of the damaged limb. In this position, the limbs are secured with a bandage, towel, belt or a piece of any long soft object. At the first opportunity, immobilization performed using the leg-to-foot technique should be replaced by immobilization with a standard splint. Immobilization performed using improvised means is replaced with a more advanced one only if it is unsuitable, since the process of replacing an immobilizing bandage is quite traumatic for the victim and can cause aggravation of the condition and the occurrence of complications.
The standard splint for pelvic fractures is an immobilizing vacuum stretcher. The stretcher is opened, the removable bottom is straightened, the victim is carefully transferred onto it and secured with a holder. Before pumping the air out of it, place a cushion in the transverse direction at the level of the knee joints under the rubber-fabric bag. After this, the stretcher is laced up, the victim’s torso is slightly raised and the air is pumped out of the bag. After giving the stretcher the necessary rigidity, the bolster is removed and the torso is no longer supported.
In the absence of immobilizing vacuum stretchers, for pelvic fractures, place the victim on a stretcher (preferably hard) and apply a tight bandage to the pelvis using wide bandages, towels, and sheets. The lower limbs are bent at the hip and knee joints at an angle of 450 and spread to the sides. A cushion from the victim’s clothing or a pillow, blanket, etc. is placed under the knees, creating the so-called frog position.
IMMOBILIZATION FOR INJURIES OF THE LIN,
FEET AND TOES
With the standard, most commonly used ladder splints, immobilization for lower leg injuries is performed as follows. A ladder splint is placed along the back surface of the lower leg and along the plantar surface of the foot, curved so that the foot is at an angle of 900 relative to the lower leg and there are bends corresponding to the convexities of the calf muscle and heel and the bend in the popliteal region. The top end of the splint should reach mid-thigh. Additionally, one splint is applied on the outer and inner sides. The splints are applied with a bedding and bandaged.
A plastic splint is applied in the same way as a ladder splint, placing it along the back surface of the lower leg and thigh, having previously been modeled as recommended above. The second and third plastic splints are placed along the lateral surfaces of the lower leg. The splints are secured to the lower leg and thigh with a cord.
A pneumatic ankle and foot splint (Type II) can be used to immobilize the leg and foot. The splint can be applied to the bare lower leg and foot, as well as to clothing and shoes. When applying the splint, open the zipper and bring the splint under the limb. In this case, the heel must be placed in the corresponding recess of the tire. The fastener is closed and the tire is filled with air.
For fractures and other injuries to the ankles, foot bones and toes, a short ladder splint is applied along the back of the leg and foot from the upper third of the leg to the tips of the toes. Only one tire is needed here. The latter should be bent at a right angle in the heel area and fixed in this position. The splint in the area of the calf muscle and heel is modeled in the same way as when applying a splint to the lower leg. In the absence of standard splints, improvised means (boards, slats, sticks, etc.) can be used, and even in their absence, autoimmobilization can be used by bandaging the injured limb to the healthy one in the lower third of the thigh, the entire lower leg and foot with any long soft objects.
THERAPEUTIC IMMOBILIZATION
For therapeutic immobilization, materials that harden after wetting are often used, in particular gypsum, but therapeutic splints of various designs can be used. To make a circular plaster cast, a plaster bandage is dipped into a basin of warm water. As the bandage soaks in water, it sinks to the bottom of the pelvis, releasing air bubbles. After the release of air bubbles is completed, the plaster bandage is grabbed from the end ends, wrung out, and a limb is bandaged with it to make a circular plaster bandage, or if a splint is needed, it is prepared on a special table
Unlined blind plaster circular bandages are applied directly to the exposed limb. It is possible to apply such a bandage to a pad of gray wool 1.5-2 cm thick. The latter is placed on the skin of the limb, and plaster bandages are applied on top, in the direction from the distal to the proximal part. To form a durable bandage on the limbs, it is necessary to apply 8-10 layers of bandage. For a better fit of the layers of plaster to each other, and for a uniform fit of the bandage to the body, from the third layer of the bandage it is ironed with the palm of the hand.
Plaster splints are made from wide plaster bandages, from 8 to 12 layers. After applying a circular plaster cast to a limb, the patient should be under round-the-clock hospital observation for 2-3 days, since the tissues of the limb can be compressed, both by the bandage itself and by its edges, which can cause circulatory problems up to gangrene. In this case, pain appears in the limbs, pallor and cyanosis of the skin of the fingers, impaired motor function, and coldness. With these symptoms, it is necessary to bend the edges of the bandage, and if there is no effect, the bandage is removed and a new one is applied.
Literature
1. Rusakov A.B. Transport immobilization / A.B. Rusakov.-L.: “Medicine”.-1989.-124 p.
Chapter 19.
⇐ Previous18Next ⇒
Recommended pages: