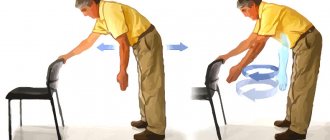
Home → Blog → Useful articles → First aid
First aid includes measures to eliminate the danger to the health and life of the victim and reduce the consequences of injuries. First aid is provided before the arrival of professionals. First aid, along with wound treatment and immobilization (immobilization), includes:
- emergency call for ambulance;
- taking measures to stop bleeding and restore the functioning of the heart and lungs (resuscitation);
- evacuating a victim from a dangerous area or transporting him to a place accessible to ambulance.
First aid is needed for:
- Eliminating the threat to the victim’s life (restoring cardiac activity and breathing, stopping bleeding)
- Prevention of complications (infection, frostbite, displacement due to fractures, etc.)
- Ensuring transportation of the victim.
Immobilization
Immobilization is the creation of immobility of the affected area of the body, the main measure to prevent painful shock. The victim cannot be transported without immobilization. Poor immobilization during fractures can lead to secondary displacement of fragments or secondary damage. There are transport and permanent immobilization. We are interested in transport.
Transport immobilization is carried out during the provision of first aid while the victim is being transported. For gunshot wounds, transport immobilization is always necessary, since rest prevents the development of infection. For transport immobilization, splints are used, and in the absence of splints, improvised means are used. During transport immobilization of the limbs, it is necessary to fix two joints (above and below the site of injury), and in case of a fracture of the shoulder and hip, three large joints of the limb must be fixed.
Immobilization is performed by immobilizing two adjacent joints located above and below the fracture site.
For open fractures, do not apply a splint to places where bone fragments protrude.
Immobilization using available means: a, b - for a spinal fracture; c, d — immobilization of the hip; d - forearms; e - collarbone; g - shins. If it is necessary to transport the victim, it is better to do this on a stretcher assembled from improvised means. If there are none, in some cases it is allowed to carry the victim.
Carrying the victim alone: a - in the arms; b - on the back; c - on the shoulder. Carrying the victim together: a - the “one after the other” method; b - “lock” of three hands; c - “lock” of four hands.
What not to do when immobilized
We have discussed in general terms how to provide first aid to a victim with fractures. Now, let's figure out how not to harm him.
Before immobilization, the victim should be checked for bleeding. If there is bleeding, first of all, you need to stop it.
After immobilization, your powers are over (even if you are a doctor, further work requires specialized conditions of a medical institution). This leads to an important conclusion: there is no need to try to set the bones. Also, do not try to carry the victim until the injured limb is fixed.
Transportation
The wounded are transported in a supine position, on the back with bent knees, on the back with the head down and lower limbs raised, on the stomach, on the side. Victims with head wounds, injuries to the skull and brain, spine and spinal cord, fractures of the pelvic bones and lower extremities are transported in a supine position. In the same position, it is necessary to transport all patients whose injury is accompanied by the development of shock, significant blood loss or unconsciousness, even short-term, patients with acute surgical diseases (appendicitis, strangulated hernia, perforated ulcer, etc.) and injuries to the abdominal organs.
Unconscious victims are transported in a prone position, with cushions placed under the forehead and chest. This position is necessary to prevent asphyxia. A significant proportion of patients can be transported in a sitting or semi-sitting position.
When transporting in the cold season, measures must be taken to prevent the victim from cooling down, because cooling in almost all types of trauma, accidents and sudden illnesses sharply worsens the condition and contributes to the development of complications. Particular attention in this regard requires wounded people with hemostatic tourniquets applied, victims who are unconscious and in a state of shock, with frostbite.
During transportation, it is necessary to monitor the patient, monitor breathing, pulse, and do everything to prevent aspiration of vomit into the respiratory tract during vomiting.
It is very important that the first aid provider, through his behavior, actions, and conversations, spares the patient’s psyche as much as possible and strengthens his confidence in the successful outcome of what is happening.
Help with fractures
Sequencing:
- if there is an open fracture and there is heavy bleeding from the wound, stop the bleeding (apply a tourniquet or a pressure bandage);
- applying a primary aseptic dressing to the wound;
- pain relief (give analgesics, if available);
- perform transport immobilization of the limb
- if everything is complicated by shock, it is necessary to carry out the simplest anti-shock measures (warming, ingesting hot tea);
Splinting
A splint is a pad made of hard material that reinforces the bandage. A splint bandage consists of a splint, a soft pad and a bandage. You can use cotton wool, clothing, etc. as a soft pad.
- The tire can be made from scrap materials. Thick cardboard, planks, and sticks are suitable for this.
- When applying a splint, you must remember that the splint must cover the two joints adjacent to the fracture.
- The splint should not come into contact with the skin. This is especially important in places where bones are located close to the surface of the body.
- It is most convenient to apply splints on the sides of the limb, less convenient on the front or back sides of the limb.
- There should be a soft pad under the tire.
- It is necessary to carefully bandage the splint to the immobilized part of the body so that it cannot move.
Splint bandages for the upper limb
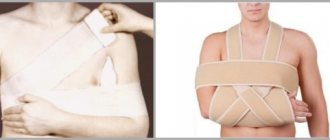
- If there is damage in the area of the shoulder joint (clavicle, scapula, head of the humerus, surgical neck of the shoulder), it will be quite enough to bandage the arm, correctly bent at the elbow, to the body with a scarf.
- If there is damage in the area of the elbow joint and forearm, a splint is applied to the shoulder and forearm from the outside, or two wooden splints are applied: one from the inside, between the shoulder and torso, the other on the lower forearm. Both splints should be well connected above the elbow joint. After which, the hand is suspended using two scarves.
- For fractures of the forearm bones, the splint is placed from the fingertips to the middle of the shoulder. The arm is bent at the elbow joint, at a right angle, the palm is facing the stomach, the fingers are bent, a roller is placed in the palm. The splint is bandaged along its entire length and then hung on a scarf.
- For fractures of the hand bones, the splint should go from the tips of the fingers to the middle of the forearm. The fingers should be bent and a roll of gauze or bandage should be placed in them. The palmar surface of the hand is slightly turned towards the stomach. After applying the splint and fixing the hand, the hand is suspended on a scarf.
- In case of a fracture of the humerus, the splint should cover the entire limb from the fingers to the shoulder girdle of the healthy side, fixing three joints. It will pass from the fingertips along the posterior surface of the forearm and shoulder to the back to the shoulder blade on the healthy side. If one ladder rail of sufficient length is not available, two short ladder rails can be used. After they are applied and fixed, the hand is suspended on a scarf or bandage.
- In case of a clavicle fracture, fixation is carried out with soft bandages. Immobilization can be achieved by hanging the limb on the injured side from a scarf.
Rib fractures
For isolated fractures of one or two ribs, the application of an immobilizing bandage is desirable. If three or more ribs are broken on one or both halves of the chest, you can use a simple bandage on the chest with a “belt.” The chest is bandaged tightly (pulled).
Splint bandages for the lower limb
- For fractures of the bones of the foot, the splint is placed from the tips of the toes to the middle of the shin, bending it in the shape of the letter “L”. The foot is at a straight angle to the shin. The splint is applied along the back of the lower leg and the plantar surface of the foot.
- In case of a fracture of the lower leg bones, three ladder splints are applied: one - along the back surface of the lower leg and along the plantar surface of the foot, pre-bent so that the foot is at an angle of 90° to the axis of the lower leg, the upper end should reach the middle of the thigh; the second and third are applied on the outer and inner sides of the limb from the base of the foot to the middle of the thigh.
- In case of a hip fracture, careful immobilization is required. For this, three splints are used: one splint length from the armpit to the inner edge of the foot, curved at the foot in the shape of the letter “L”, this splint is external; the second splint is applied to the back surface of the limb from the shoulder blade or buttock to the tips of the toes and is also curved; the third splint is located on the inner surface of the limb from the perineum to the edge of the foot.
In general, such recommendations in the field are very difficult to follow if you are not a professional carpenter. What to do if splinting is impossible is usually not written.
Splint bandages for injuries to the splint of the spine and head
Immobilization is achieved with two splints. The first splint is “put on” the head: it covers the crown, ears and both shoulders. The second splint is located between the shoulder blades on the back, then along the back of the head it passes to the crown and ends on the forehead, where it intersects with the first splint. Both tires are fastened together.
If splints are not available, two heavy sandbags can be used to immobilize this area, which are placed on the sides of the head of the victim lying on his back on a hard bed.
Splints for lumbar injuries
The first medical aid for injuries to the lumbar spine and pelvis will be to place the patient on a wooden board with legs apart and slightly bent at the knees - the so-called “frog” pose. The limbs must be secured by applying long splints along the entire body, tied to a shield, so that the patient does not move during transportation.
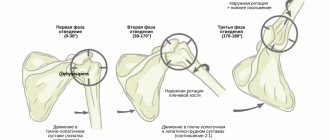
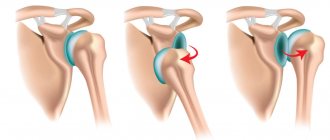
Shoulder fracture
Separately, it is necessary to note a fracture of the humerus, which can lead to dysfunction of the entire upper limb.
Fractures of the humerus, depending on the location on the bone, are divided into:
- proximal (upper) fracture in the area of the head, anatomical, surgical neck, tubercles of the humerus;
- diaphyseal (middle part of the bone body);
- distal (lower part) in the area of the trochlea, head, external and internal epicondyles.
Fractures can also be intra-articular (often with damage to the joint capsule, dislocation, displacement of the head of the humerus) and extra-articular, and may be accompanied by separation of the tubercles and epicondyles. In this case, violations of the integrity of the skin, blood vessels, muscles and ligaments are not excluded.
Stop bleeding
Bleeding is the release of blood from a blood vessel to the outside, into the surrounding tissues and cavities of the body. According to the source, bleeding is distinguished: arterial, venous, arteriovenous, capillary and parenchymatous.
Capillary bleeding is stopped by applying a regular, even loose, bandage to the wound and raising the limb upward. This helps to reduce blood flow to the wound, the formation of a clot and stop the bleeding and is final. Venous bleeding is stopped by applying a pressure bandage. Apply several layers of gauze or a piece of cotton wool to the wound and bandage it tightly. The blood vessels are compressed, a blood clot is formed and bleeding stops. Arterial bleeding occurs when an artery is damaged. Blood flows out in a stream, a fountain. The amount of blood ejected depends on the caliber of the vessel and the size of the wound in the vessel. Arterial bleeding can be stopped in several ways, depending on the diameter of the bleeding vessel.
- pressing the artery above the wound;
- pressing the artery in the wound;
- applying a pressure bandage;
- application of a tourniquet;
- maximum limb flexion.
The damaged vessel is pressed with 2-3 fingers to the bone in typical places. Bleeding from the artery must be stopped immediately. The fastest way is to press the artery in the wound and press the artery above the wound. This method is difficult, but makes it possible to prepare a tourniquet to stop bleeding.
Arteriovenous bleeding is mixed bleeding. Blood quickly fills the wound. Pressing the vessel above the wound does not stop the bleeding, but the blood becomes dark. Pressing the vessel below the wound does not stop the bleeding; the blood turns scarlet. In essence, it is necessary to stop arterial and venous bleeding in parallel.
Parenchymal bleeding is hidden bleeding in the cavities or extremities. Blood enters the cavity (for example, abdominal) or tissues of the extremities. If the victim’s limb begins to swell, this means that the artery is damaged; it must be clamped above the suspected site of the artery rupture. Such bleeding is considered the most dangerous because it cannot be stopped outside the operating room. It's not even covered in first aid courses because it's usually fatal.
Acute blood loss
Symptoms of acute blood loss depend on the rate of flow and the volume of blood lost. The faster the bleeding occurs, the more severe the clinical picture of acute blood loss. Rapid blood loss; 1/3 of the blood volume is life-threatening, the loss of half of the total blood volume is fatal. With a weight of 65 kg, the blood volume is approximately 5 liters. Thus, a loss of 1.5-1.7 liters of blood is dangerous, and 2.5 liters is fatal.
Symptoms of acute blood loss: pallor of the skin and visible mucous membranes, pointed facial features. According to the victim's sensations - darkening of the eyes, tinnitus, dizziness, nausea and vomiting - this is explained by irritation of the cerebral cortex and vomiting center due to hypoxia. The pulse is frequent and weak. Decrease in arterial and central venous pressure. As the crisis develops, disruption of higher nervous activity increases: first, anxiety appears, then fear, panicked facial expressions, disorientation, confusion and loss of consciousness.
First aid for external bleeding is to stop the bleeding as quickly as possible by any means.
Application of a tourniquet
The tourniquet is not applied to the skin. To avoid squeezing the skin, it should be protected with a soft pad made of bandage or fabric. The tourniquet can also be applied to clothing, after straightening its folds. You should not apply a tourniquet in the middle third of the shoulder and in the upper third of the leg, so as not to injure the radial and peroneal nerves. Before applying a tourniquet, the limb is elevated to create an outflow of venous blood. The tourniquet is applied above the wound, as close to it as possible, without excessive tightening, until bleeding from the wound stops and the pulse disappears in the peripheral arteries. The tourniquet should be visible on the victim. Make a note on paper about the time of application and place it under the tourniquet. In summer, the duration of stay of the tourniquet on the limb should not exceed 2 hours, and in winter - 1 hour. When using the tourniquet in children, the time is reduced by half. Every hour, and in winter - half an hour, the tourniquet must be loosened for 10-15 minutes, and then tightened again if bleeding occurs again.
Technique for applying a tourniquet: the tourniquet is placed under the limb above the wound. One hand of the person applying the tourniquet is on the outer side, the other on the inner surface of the limb. The tourniquet is stretched and the stretched section is applied to the area of passage of the main vessel. The first round is done with a cross to prevent its weakening. While constantly pulling the tourniquet, wrap it around the limb several times so that the paths of the tourniquet lie side by side, not on top of each other, and the area of contact of the tourniquet with the skin is as wide as possible.
Artificial respiration and chest compressions
Artificial ventilation
First of all, you should make sure that the airway is open and eliminate mechanical causes that impede breathing. To perform artificial lung ventilation using the mouth-to-mouth method, you must:
- position yourself to the right of the victim;
- lay the victim on his back, unbutton tight clothing;
- place a cushion under your shoulder blades to tilt your head back better;
- clean the mouth and throat of foreign bodies and mucus;
- to improve airway patency and prevent tongue retraction, tilt your head back, push your lower jaw forward and open your mouth;
- cover your mouth with gauze or a handkerchief;
- squeeze the wings of the nose with your fingers;
- take a deep breath, tightly clasp your lips around the victim’s mouth (nose) and with little effort blow air into the lungs.
The frequency of blowing is 14-15 per minute for adults, 20 for children, 30 for newborns. In adults, air must be blown in with such force that the chest expands. In children, insufflation is used with less force. For newborns, insufflation is performed simultaneously through the nose and mouth. When air is blown in, the victim’s chest rises; to create a passive exhalation, his head is turned to the side. Every 5-6 breaths it is necessary to check for a pulse in the carotid artery. Artificial ventilation is carried out until spontaneous breathing is restored.
Indirect cardiac massage
When breathing stops, the victim may stop cardiac activity. The person providing assistance is positioned to the left of the victim. The purpose of the massage is to create artificial blood circulation by rhythmically squeezing the heart between the sternum and the spinal column. In this case, the blood is pushed out of the heart into the arteries; after the compression stops, the heart (ventricles) straightens, and the blood returns back through the veins. Indirect cardiac massage technique
- the person providing assistance is positioned to the left of the victim
- The patient is placed on a hard surface on his back
- a strong blow with a fist is applied to the lower part of the sternum (just above the xiphoid process), in some cases this is enough to restore the heart rhythm
- The palms of both hands, one on top of the other, are placed on the lower sternum, the right palm is on top
- produce jerky pressure on the sternum (up to 60 per minute)
- pressure is applied with straightened arms, tilting the torso forward to provide sufficient force, while the sternum should move towards the spine by 4-5 cm
When performing chest compressions in infants, pressure is applied to the sternum with the tip of a finger or the thumbs of one hand. In infants, the frequency of compressions on the sternum is 100-120 per minute. Indirect cardiac massage is always performed together with artificial ventilation. If resuscitation is carried out by one person, then after every 15 pressures on the sternum, he should stop the massage and take 2 strong, quick breaths “from mouth to mouth”. If it is performed by 2 people, then 1 injection into the lungs should be made after every 5 pressures on the sternum. The person performing artificial respiration monitors the reaction of the pupils and the pulse. Resuscitation measures are effective if: a pulse appears, the pupils constrict, a reaction to light appears, pallor of the skin, cyanosis decreases, spontaneous breathing is restored. It makes sense to carry out resuscitation for 3-4 minutes if there is no resuscitation brigades and special equipment.
First aid for drowning
When drowning, water enters the respiratory tract and stomach. As a result, water penetrates into the blood and the water-salt balance of the body is disrupted. After this (we won’t go into details), breathing and heartbeat stop. It is conventionally accepted to distinguish two types of drowning: “pale” and “blue” asphyxia. With pale (white) asphyxia, a rapid reflex cessation of breathing and heartbeat occurs. Reflex laryngospasm develops and water does not enter the respiratory tract. The skin with this type of asphyxia is pale. With “blue” asphyxia, the respiratory tract is filled with water, and the victim’s skin is bluish in color.
With white asphyxia, artificial ventilation of the lungs is performed from mouth to mouth and indirect cardiac massage. With blue asphyxia - rapid removal of fluid from the respiratory tract: the victim is placed with his stomach on his bent knee, his head hangs down, pressing on the chest, water flows out of the respiratory tract and stomach. After this, the victim is placed on his back and resuscitation is performed (artificial ventilation and closed cardiac massage). Resuscitation measures are carried out until breathing is stable.
Types of treatment:
- Conservative therapy is carried out using medications. After the limb is anesthetized, in case of a closed fracture, bone fragments are compared, and then the limb is fixed.
- Surgical intervention. The traumatologist returns the displaced fragments to their original state. There is an open and closed method.
- Skeletal traction. This type of treatment is used infrequently, if other methods fail, if the fragments diverge significantly and it is impossible to compare them. The technology consists of installing a pin that matches and sets the fragments. Next, a special type of plaster cast is applied for a month. The patient must remain in bed.
First aid for burns
- remove the victim from the burning room; extinguish the flame on the victim by covering the burning area with a thick cloth, covering it with sand or snow or immersing it in water; the victim can put out the fire himself by rolling on the ground
- in case of burn with boiling water, hot food, resin, i.e. In case of any thermal burn, you must quickly remove clothing soaked in hot liquid; Do not remove areas of clothing that have stuck to the skin; you must carefully cut off the clothing with scissors
- for chemical burns - remove clothes and wash the affected area with a stream of water for 15-20 minutes
- immerse the burned areas in cold water for 10-15 minutes (for burns of the upper extremities, you can place them under cold running water), this will reduce the pain and burning sensation
- Apply a sterile bandage to the affected area, or, if not available, any clean cloth.
- apply cold to the burned area (snow, ice in a plastic bag)
- carrying out anti-shock measures: give 1-2 tablets of analgin; wrap up and warm the victim; drink hot tea, as well as mineral water or a soda-salt solution (1 teaspoon of salt per 1 liter of water); perform transport immobilization for burns of the upper and lower extremities
This topic is very broad in terms of the degree of burns and sources of damage. The above is enough to ensure that there is something to do with the victim before the ambulance arrives.
Frostbite
Frostbite is tissue damage caused by exposure to cold. They are observed both at low temperatures and at temperatures above zero degrees (1-5°C). In the development of frostbite, a significant role is played by: increased air humidity, wind force, wet clothing, excessive sweating of the skin, tight shoes, prolonged immobility, fatigue, malnutrition, shock, and the presence of alcohol intoxication.
Most often, frostbite affects the nose, ears, fingers and toes, and less often the knee joints and buttocks. During frostbite, two periods are distinguished: latent reactive periods. In the hidden, the effect of cold on the fabric continues. The victim notes a tingling sensation and slight pain. The skin in the area of frostbite is cold, pale, and skin sensitivity decreases. These changes are associated with spasm of blood vessels and metabolic disorders. The reactive period begins after the tissues are warmed, i.e. after the cold ceases. During this period, signs of inflammation and necrosis appear, associated with the depth of tissue damage.
Actions to help:
- Warm the frostbitten area of the body, restore blood circulation by warming, massaging until the skin turns red, becomes sensitive, and becomes able to move your fingers. Give the victim a warm drink.
- If within a few minutes the skin does not acquire a normal appearance, then it is necessary to place the affected part in warm water, followed by treating the skin with alcohol and applying an insulating bandage.
- If watery blisters appear on the body, cover them with a napkin (bandage) after treating with alcohol.
- Wrap the affected limb in a warm cloth, elevate it, and fix it, which will reduce swelling.
- Give me a painkiller.
When providing first aid, you should not: rub the affected areas with snow, lubricate them with greasy ointments, or warm them up intensively.
First aid
The main actions that need to be taken when helping a person injured with a fracture of the humerus are:
- stopping bleeding;
- pain reduction;
- immobilization, fixation of the limb.
If there is a violation of the integrity of the skin or contamination of the wound, you need to rinse the wound with clean water, apply a cotton-gauze bandage, and if the latter is not available, apply a clean cloth folded several times. If there are signs of significant bleeding, it is advisable to press the blood supply vessel with your fingers for 20 minutes (this can be done by people who have undergone special training). To reduce pain, apply cold locally: ice wrapped in a cloth or bottles of cold water. It is advisable to administer painkillers by injection, subject to certain conditions, so this should be done by medical professionals.
Electric shock
When electrocuted, the muscles begin to contract convulsively. This causes pain and muscle paralysis. Due to spasm of the vocal cords, the victim cannot call for help. If the current does not stop, then after a while loss of consciousness and cardiac arrest occurs. In addition, the passage of current leads to burns of the skin and internal tissues and blood clotting. The procedure for dealing with electrical injuries is as follows:
- turn off the power source
- evacuate the victim from the affected area
- if the heartbeat stops, start chest compressions
- After the pulse appears, place the victim on his side
- call an ambulance
- Monitor the condition of the victim; repeated cardiac arrest may occur.
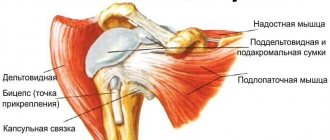
Anatomy
Anatomically, the upper limb consists of the shoulder girdle, that is, the shoulder girdle, and the free upper limb, which includes the shoulder, forearm and hand. Accordingly, the bone structures of the shoulder girdle on one side of the body are: the scapula and clavicle; free upper limb: shoulder, bones of the forearm (radius and ulna), bones of the hand (wrist, metacarpal bones, phalanges of the fingers).
Content:
- Anatomy
- Shoulder fracture
- Signs of a shoulder fracture
- First aid
- Fracture fixation
- Conclusion
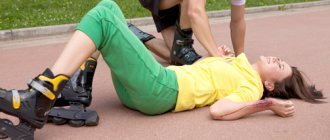
Traumatic injury to the upper extremity is the most common among all injuries and occurs as a result of a blow or fall on the arm. The latter can manifest itself as small abrasions of the skin, bruises of soft tissues, or be accompanied by more serious injuries, fractures, fracture-dislocations of bones.
Help with poisoning
Poisoning is the entry of a toxic substance into the body. In case of poisoning through the mouth, gastric lavage must be provided. Give a glass of clean water to drink. For one liter of water, add a dessert spoon of salt (10 g) and a teaspoon of baking soda (5 g). After drinking every 300-500 ml of water, you should induce vomiting by touching the root of the tongue with your fingers. The total volume of liquid taken during gastric lavage should be at least 2500-5000 ml. Gastric lavage is carried out until the “clean lavage waters”. In the absence of consciousness, the stomach cannot be washed.
Within the framework of the article, inhalation poisoning is considered only in terms of household and carbon monoxide. Signs of carbon monoxide poisoning: pain in the eyes, ringing in the ears, headache, nausea, vomiting, loss of consciousness, redness of the skin. Signs of household gas poisoning: heaviness in the head, dizziness, tinnitus, vomiting, severe muscle weakness, increased heart rate, drowsiness, loss of consciousness, involuntary urination, bluish skin, shallow breathing, convulsions.
The procedure is as follows:
- take the victim out into the fresh air (do not allow yourself to be poisoned)
- if there is no heartbeat or breathing, perform resuscitation measures
- lay the victim on his side
- call an ambulance
In general, when to call an ambulance depends on the situation. If you are the only one helping someone, you first need to make sure that the victim is breathing, and then call. Otherwise, the ambulance may not make it in time.
What not to do when providing first aid
- You should never be a hero. Evacuation of a victim from a danger zone must be approached carefully. Otherwise, instead of one victim there will be two.
- In case of an accident, do not remove the victim from the car. It is better to turn off the ignition and disconnect the battery. In general, it is better not to move an injured person unless you know what you are doing. It is worth getting the victim out of the car only in case of fire.
- Recession of the tongue. If a person is unconscious, but there is breathing, do not remove his tongue from his larynx. There is such a misconception, you shouldn’t do this. Lay the victim on his side or tilt his head back - the airways are open.
- In case of food poisoning, potassium permanganate crystals are often used to lavage the stomach. They need to be dissolved in water at a temperature above 70 degrees, that is, in hot water. Undissolved potassium permanganate crystals cause ulceration of the gastric mucosa. Proper gastric lavage is described above.
- If a person chokes (food gets into the upper respiratory tract), do not hit him on the back. The situation can be made worse. You need to calm the person down and ask him to take a few slow breaths and sharp exhalations. The body's protective reaction in such cases is coughing. When exhaling, it is better to lean forward slightly.
- During an epileptic attack, do not unclench the person’s teeth. It is necessary, during the active seizure phase (convulsions), to hold the patient’s head so that he does not damage it, and during the second phase (sleep), turn him to the side.
Which joints should a splint fix for a hip fracture?
Instructions:
- In the case of the hip, the knee, ankle and hip are fixed. Thus, the length of the splint for a hip fracture is quite long, starting from the armpit and ending under the foot.
- When applying a splint in case of a hip fracture, it is necessary to use not one, but three strips. The first of them carries out fixation and starts from the armpit, ends in the foot area, and bends in the shape of the letter G.
- Thus, it prevents the foot from moving. That is, from the side the tire should bend at an angle of 90 degrees. Regarding the back surface, the splint starts in the area under the buttock, and also goes down to the foot area, bending at an angle of 90 degrees.
- As for the third splint, it starts in the area of the inner thigh, under the groin, and also ends in the area of the foot. Thus, the leg is completely fixed.
- There is no possibility to bend it at the knee, it is also impossible to move, somehow bend the leg in the hip area. The person finds himself practically immobilized.
- For a hip fracture, only seven pieces of tissue are needed. Pieces are passed under the lower back, in the armpits, in the groin area, above and below the knee, in the ankle area. Thus, it is necessary that the leg is completely motionless and fixed.
- Regarding the hip break, it is often difficult to find some fairly long boards. That is why it is allowed to fix one limb to another. Thus, a strip of blanket is laid between the legs, which is folded several times and a rectangle is formed.
- Thus, they are fixed in the ankle area, under the knee, above the knee, in the groin area, in the lumbar area. This is necessary so that it is impossible to move the limb to the side and disturb the injured hip. As for rib fractures, splints are not used.
Splint for hip fracture
Hip fracture
Tire made from improvised means